Automated Action Templates
Accounts Payable Automated Approval Request
Note: to use this Automated Action template, you will need to be on a Business or Enterprise plan.
Scenario summary
Get instantly notified when new vendor invoices are submitted, and know when to assign an owner to approve the invoice. Smartsheet Automated Actions will trigger an update request to the Accounts Payable process manager to assign a vendor owner to all new invoices. The assigned vendor owner will then automatically receive an approval request, and be able to review the invoice from their email, the Smartsheet Notification Center, or the Smartsheet mobile app.
Prebuilt rules
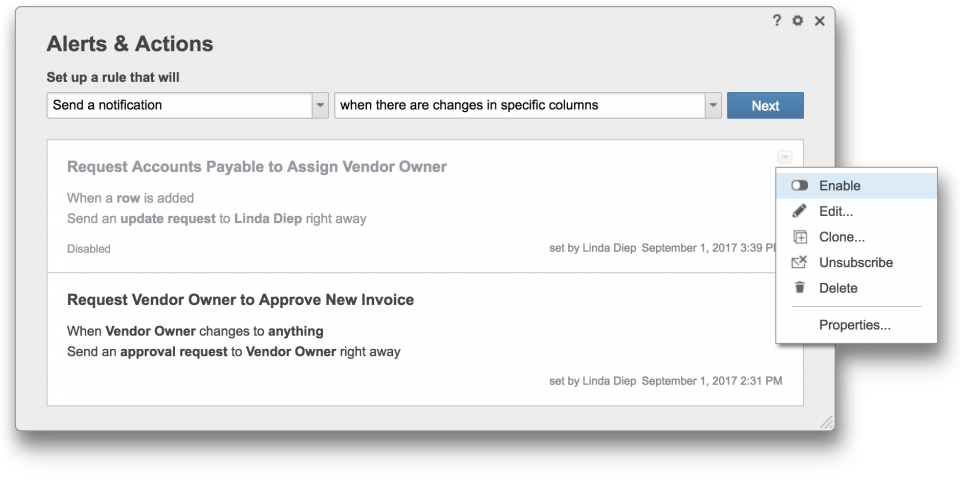
Once you’ve downloaded this template, you should see the following rules prebuilt for you in the Alerts & Actions tab at the bottom of the sheet. Some of these rules are automatically enabled, and some you will need to make edits to and then enable before using.
1. Request Accounts Payable to Assign Vendor Owner (Disabled)
Purpose of this rule: Trigger an automated update request to the Accounts Payable process manager to assign a person to approve the invoice.
2. Request Vendor Owner to Approve New Invoice (Enabled)
Purpose of this rule: Trigger an automated approval request to the vendor owner to approve the invoice.
Before you begin
To use the Automated Action rules, you must first make a few edits to the rules already created in this template and enable them.
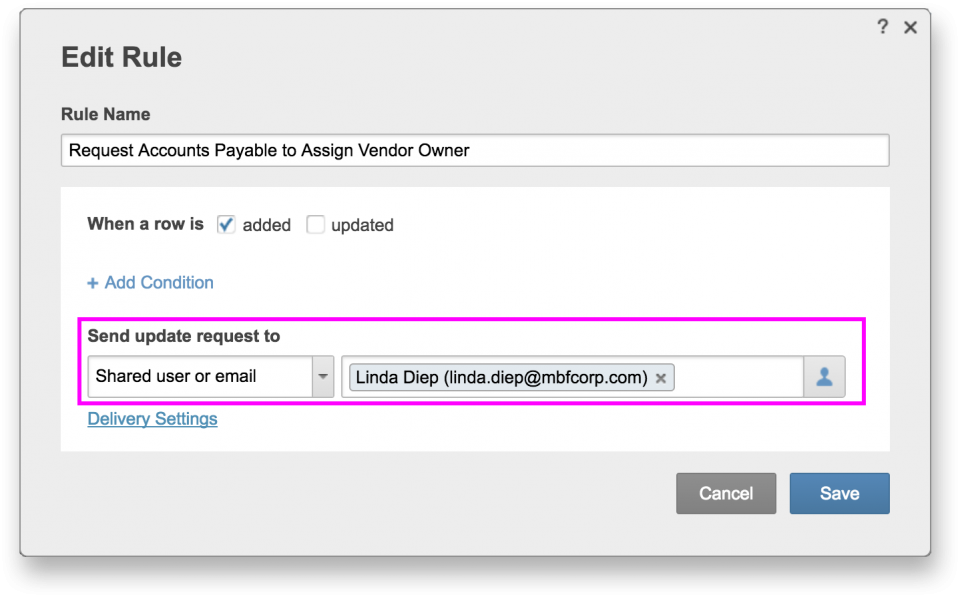
1. Edit Rule: Request Accounts Payable to Assign Vendor Owner
-
Open the Accounts Payable Approval Request sheet.
-
Click the Alerts & Actions tab at the bottom of the sheet.
-
Click on the arrow in the upper right hand corner of the “Request Accounts Payable to Assign Vendor Owner” rule to view the drop-down menu, then select “Edit” Add the email address of the Accounts Payable process manager (the person you would like to receive the update request) in the field next to Send update request to Shared user or email.
-
Click on “Delivery Settings” to review and adjust the subject, message, and frequency.
-
Then click “Save”
Note: Sheet owners and admins can create automated notifications and requests for individuals who are shared to the sheet, anyone within their organization, or any email address.* The default setting on the Alerts & Actions rules is only those shared to the sheet can receive automated notifications and requests. Sheet owners and admins can modify this by clicking on the settings icon in the upper right corner of the Alerts & Actions Settings dialogue box, then selecting their preferred option.
* System Admins can choose who receives automated notification and requests at the account level. These account-level settings will override the sheet settings.
2. Enable rule
You will need to enable one rule in this template: Request Accounts Payable to Assign Vendor Owner. Click on the arrow in the upper right hand corner of the “Request Accounts Payable to Assign Vendor Owner” rule to view the drop-down menu, then click “Enable.”
How it works
-
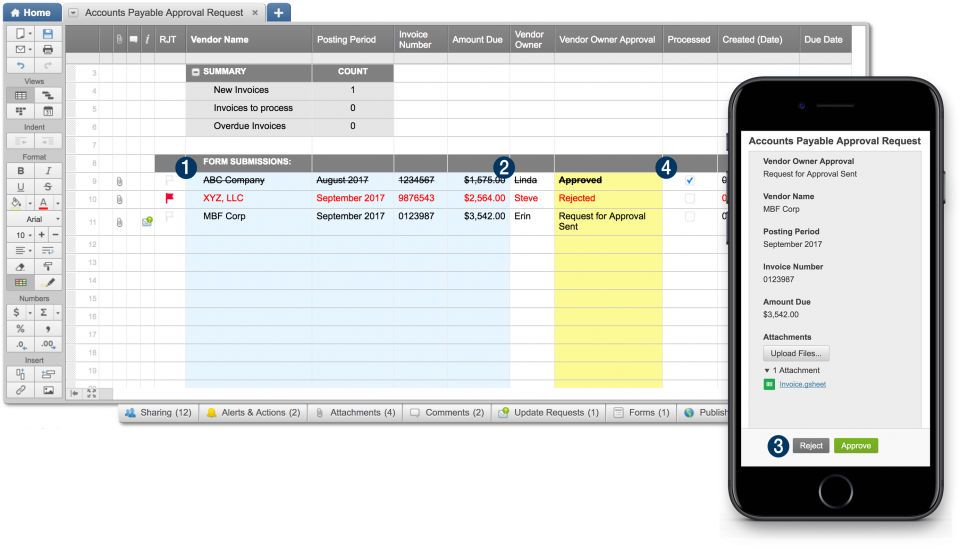
A vendor submits an invoice using the form.
-
An automated update request will be sent to the Accounts Payable process manager, who can assign a vendor owner to the invoice.
-
An automated approval request will be sent to the vendor owner, who can review and approve/deny the invoice.
-
Once approved, Accounts Payable can begin processing the invoice.
Equipment Purchase Automated Approval Request
Note: to use this Automated Action template, you will need to be on a Business or Enterprise plan.
Scenario summary
Submit your equipment purchase requests using forms! Requests over a particular dollar amount will trigger an automated approval request to the requestor’s manager. Once the purchase is approved/denied, the requestor will instantly be notified.
Prebuilt rules
Once you’ve downloaded this template, you should see the following rules prebuilt for you in the Alerts & Actions tab at the bottom of the sheet. These rules are automatically enabled for you.
1. Request Manager Approval for Purchases more than $500 (Enabled)
Purpose of this rule: Trigger an automated approval request to the manager when the estimated cost of a piece of equipment requested for purchase is greater than $500.
2. Alert Requestor of Status (Enabled)
Purpose of this rule: Trigger an automated notification to the requestor when the manager has approved or denied the equipment purchase approval request.
Note: Sheet owners and admins can create automated notifications and requests for individuals who are shared to the sheet, anyone within their organization, or any email address.* The default setting on the Alerts & Actions rules is only those shared to the sheet can receive automated notifications and requests. Sheet owners and admins can modify this by clicking on the settings icon in the upper right corner of the Alerts & Actions Settings dialogue box, then selecting their preferred option.
* System Admins can choose who receives automated notification and requests at the account level. These account-level settings will override the sheet settings.
How it works
-
Submit a request to purchase new equipment over $500. In order for the approval request and notifications to send, the requestor’s and manager’s email addresses must entered.
-
An automated approval request will be sent to the manager, who can then review the request from their email, the Smartsheet Notification Center, or the Smartsheet mobile app.
-
A notification will be sent to the requestor once the request has been approved or denied.

Order Confirmation Automated Request
Note: to use this Automated Action template, you will need to be on a Business or Enterprise plan.
Scenario summary
Someone submits a request for an order through a Smartsheet form. Smartsheet Automated Actions triggers an update request to the assigned product manager and they can confirm or deny the request right from their email, the Smartsheet Notification Center, or the Smartsheet mobile app. The requestor is automatically notified if the request can be fulfilled per their request.
Prebuilt rules
Once you’ve downloaded this template, you should see the following rules prebuilt for you in the Alerts & Actions tab at the bottom of the sheet. Some of these rules are automatically enabled and some you will need to make edits to and then enable before using.
1. Request Product Manager to Confirm Delivery (Disabled)
Purpose of this rule: Trigger an automated approval request to the product manager to confirm the product delivery.
2. Alert Requestor of Delivery Status (Enabled)
Purpose of this rule: Trigger an automated notification to the requestor when their request has been reviewed (confirmed or denied).
Before you begin
To use the Automated Action rules, you must first make a few edits to the rules already created in this template and enable them.
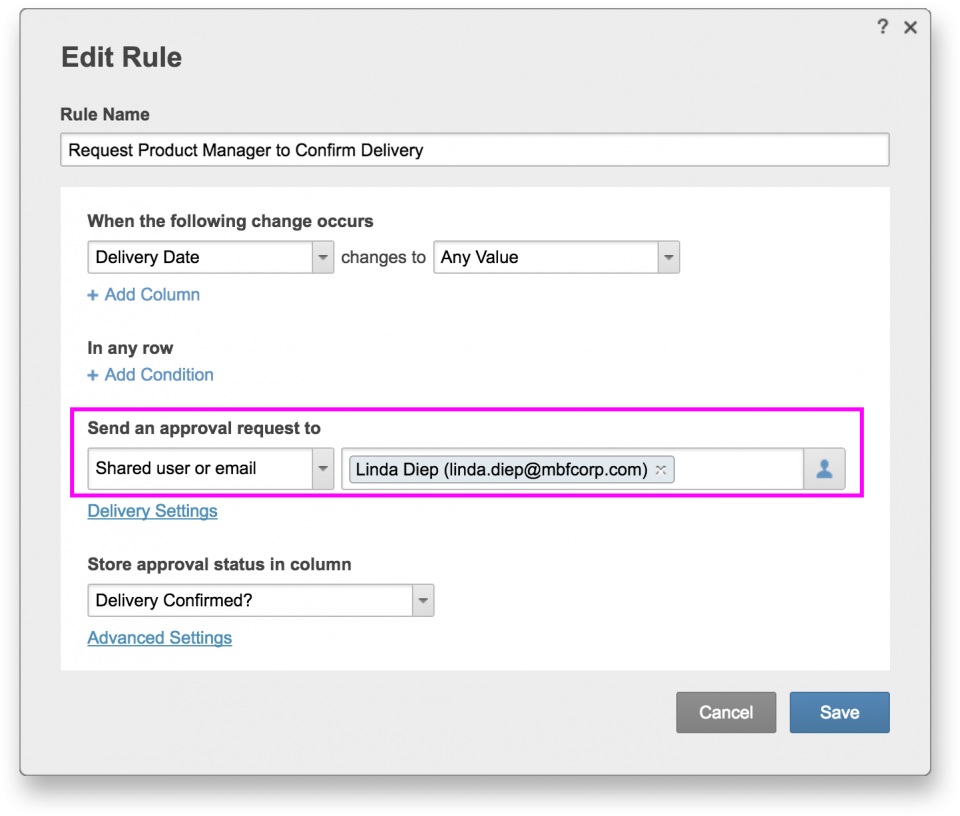
1. Edit Rule: Request Product Manager to Confirm Delivery
-
Open the Order Confirmation Request sheet.
-
Click the Alerts & Actions tab at the bottom of the sheet.
-
Click on the arrow in the upper right hand corner of the “Request Product Manager to Confirm Delivery” rule to view the drop-down menu, then select “Edit.”
-
Add the email address of the product manager you’d like to receive the approval request in the field next to Send an approval request to Shared user or email.
-
Click on “Delivery Settings” to review and adjust the subject, message, and frequency.
-
Then click “Save.”
Note: Sheet owners and admins can create automated notifications and requests for individuals who are shared to the sheet, anyone within their organization, or any email address.* The default setting on the Alerts & Actions rules is only those shared to the sheet can receive automated notifications and requests. Sheet owners and admins can modify this by clicking on the settings icon in the upper right corner of the Alerts & Actions Settings dialogue box, then selecting their preferred option.
* System Admins can choose who receives automated notification and requests at the account level. These account-level settings will override the sheet settings.
2. Enable rule
You will need to enable one rule in this template: Request Product Manager to Confirm Delivery. Click on the arrow in the upper right hand corner of the “Request Product Manager to Confirm Delivery” rule to view the drop-down menu, then click “Enable.”

How it works
-
Someone submits a delivery request using the form.
-
An automated approval request (the ‘approve’ and ‘decline’ options have been changed to ‘confirm’ or ‘deny’) will be sent to the product manager, who can review the delivery request.
-
A notification will be sent to the requestor once the request has been confirmed or denied.

Project Milestones and Deliverables Approval Request
How to set up an automated action rule on the Project Milestones and Deliverables template
Note: You will need to be on a Business or Enterprise plan to use the automated action rules built into this template.
Setup
If you haven’t already, you can get a copy of this template here.
Scenario summary
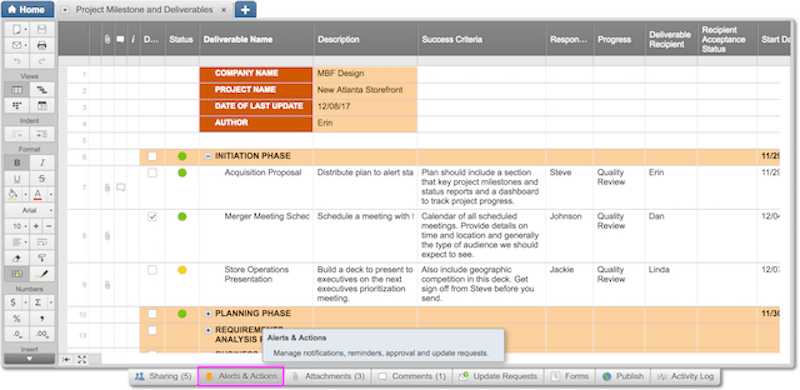
The Project Milestones and Deliverables template is built to help you get from ideas to actions faster. Use this template to build a plan;map out tasks, dependencies, and task owners; set milestones; and outline key deliverables. Once your plan is in place, you can easily attach deliverables to keep everything in context.
Build your automated action rules
Below we walk you through how to create an automated action rule within your sheet. For more help on automated actions read the help article here.
1. Deliverable Acceptance Request (Enabled)
Purpose of this rule: Trigger an automated approval request to the assigned deliverable recipient when the deliverable is ready for review.
-
Click the Alerts & Actions tab at the bottom of your sheet.
-
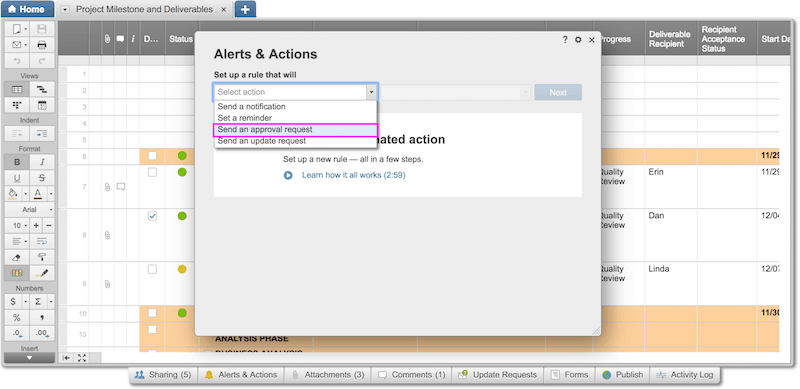
Click on the Set up a rule that will drop-down menu and select Send an approval request.
-
Click Next.
-
Give your new rule a custom name (optional).
-
Create a trigger for when to send the approval request, click the When the following change occurs drop-down menu and select Progress.
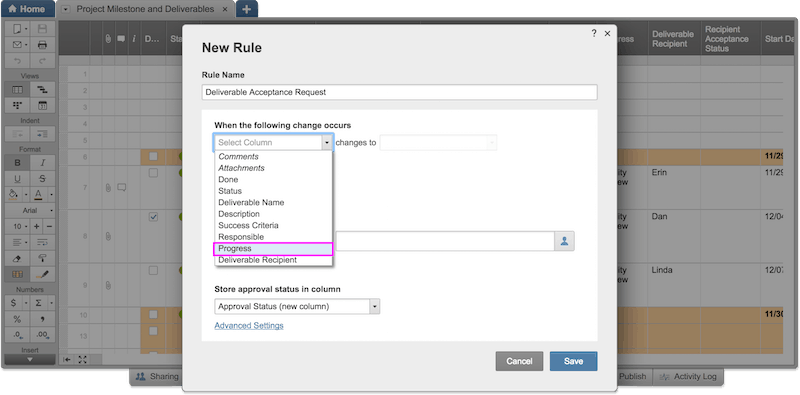
Why? We are selecting this column because the person responsible for this task is expected to track their deliverable progress by selecting one of the three options in the drop-down menu. -
Select from the next drop-down menu, changes to Deliver.
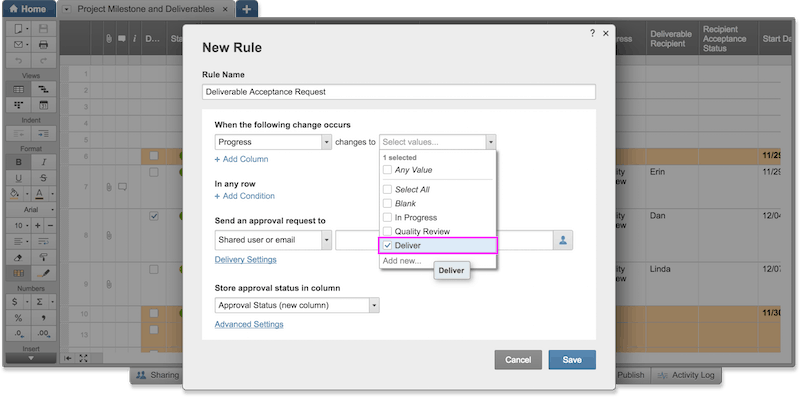
Why? This logic means when the person responsible changes their progress to Deliver, it will trigger the approval request. -
In the next step, In any row, we can skip adding a condition because we want the approval request to trigger on all rows.
-
Click on the Send an approval request to drop-down menu, Contact in column.
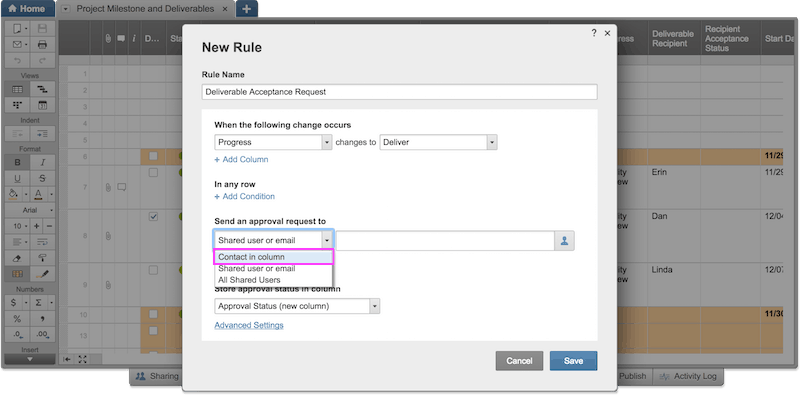
Why? This is particularly helpful when you have approvers that vary for different rows/items. If your approvers are not already shared to the sheet or will not be shared, it is important you adjust your Alerts & Actions settings to allow any email address to receive notifications. See important note at the end of the next section. -
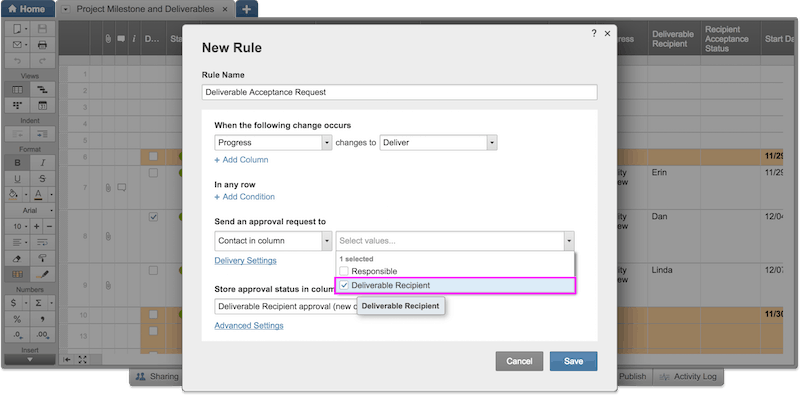
Next, select the column we’ve used to assign the approver, which is Deliverable Recipient.
-
In the Delivery Settings, you can choose when to send the approval request and customize the message to help give your recipient some context to the request.
-
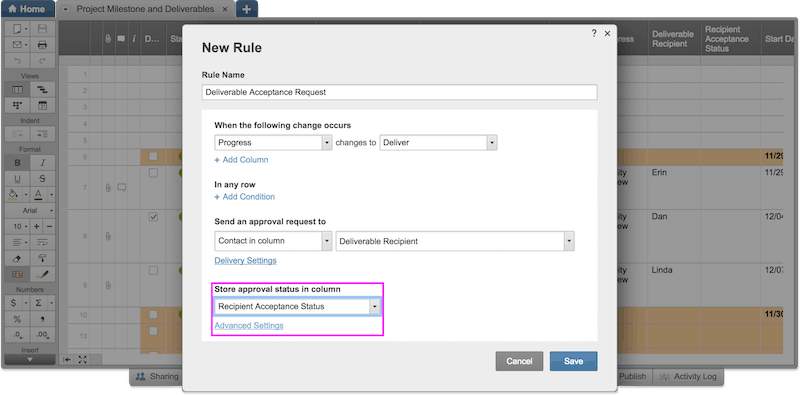
Select from the Store approval status in column drop-down menu, Recipient Acceptance Status and click Advanced Settings.
-
Map the Dropdown value column for Submitted, Approved, and Declined.
-
In the Actions buttons text is where you customize what you want the Approved and Declined button to say and click OK.

Why? In our example, we use Accept Deliverable for Approved and Reject Deliverable for Declined. -
Click Save.


Test your new rule is working
You’re all set! It’s good practice to test your automation rule after creating them to make sure they work and your approver has all of the information they need to make a decision. So let’s send yourself an approval request.
-
Make sure your account is configured to receive your own sheet change notifications, by going to Notification in your Personal Settings.
Why? To receive notifications on the changes that you make to sheets, including sending yourself an approval request, you'll want to adjust your personal settings. -
Back in the sheet, make yourself the approver by putting your name in any row in the Deliverable Recipient column.
-
In the same row, change the Progress column to Deliver.
Why? If you remember in Step VI, the trigger for the approval request is when you change the Progress column to Deliver. -
Click Save.
-
In less than one minute Smartsheet automated actions will trigger the approval request to the deliverable recipient and update the Recipient Acceptance Status column to Delivered.
-
Go to your Notification Center, email, or Smartsheet mobile app to see the approval request come through!
Important Note: Sheet owners and admins can create automated notifications and requests for individuals who are shared to the sheet, anyone within their organization, or any email address.* The default setting on the Alerts & Actions rules is only those shared to the sheet can receive automated notifications and requests. Sheet owners and admins can modify this by clicking on the settings icon in the upper right corner of the Alerts & Actions Settings dialogue box, then selecting their preferred option.
* System Admins can choose who receives automated notification and requests at the account level. These account-level settings will override the sheet settings.
OK, now you’ve set up the automation action. Here’s how you can use the template:
-
Build out the milestones and deliverables plan by defining the deliverables requirements, assigning the deliverable owner and recipient, and setting deadlines.
-
As the deliverable is being worked on, the person responsible will select from the Progress drop-down column their progress on the deliverable (In Progress or Quality Review). These drop-down menu options can be customized to fit your project statuses.
-
When the deliverable is ready to be delivered to the recipient, the person responsible selects ‘Delivered’ from the Progress drop-down menu.
-
An automated approval request will be sent to the recipient, who can review and accept or reject the deliverable.
-
Once reviewed, the project manager can see which deliverables are successfully meeting requirements and delivering on the project objectives or needs improvement.

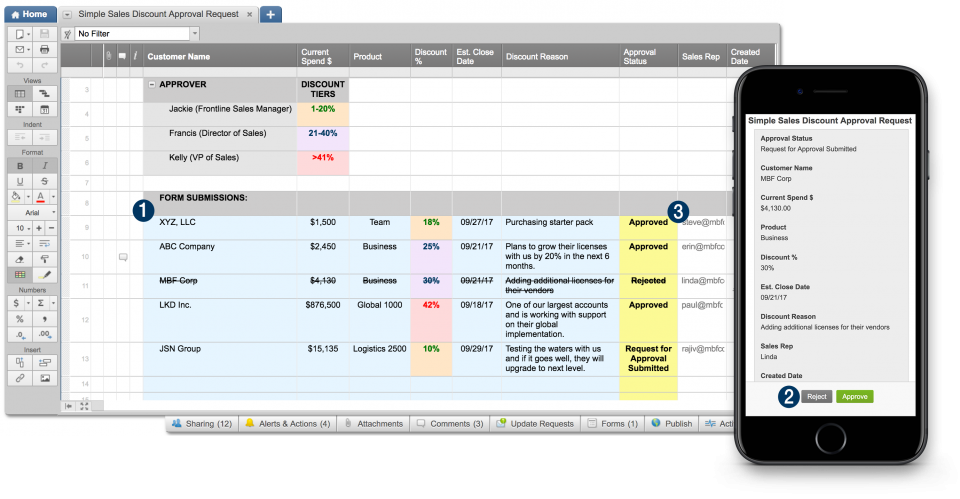
Sales Discount Automated Approval Request
Note: to use this Automated Action template, you will need to be on a Business or Enterprise plan.
Scenario summary
Automate your sales discount approval process with Smartsheet Automated Actions. Sales reps submit discount requests using forms that collect the information you need in order to approve a discount. An automated approval request is triggered to the appropriate approver—frontline manager or director—depending on the discount tier.
Prebuilt rules
Once you’ve downloaded this template, you should see the following rules prebuilt for you in the Alerts & Actions tab at the bottom of the sheet. Some of these rules are automatically enabled and some you will need to make edits to and then enable before using.
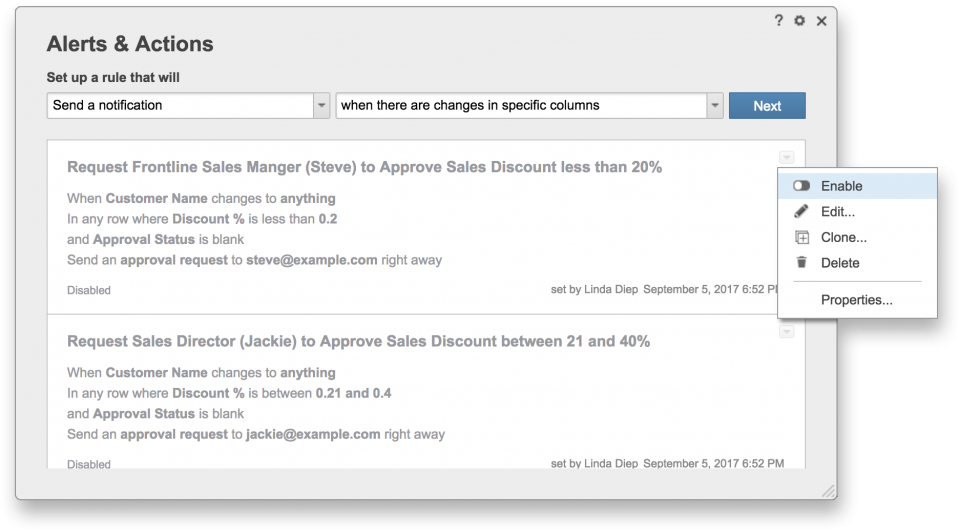
1. Request Frontline Manager to Approve Sales Discounts for 10-20% (Disabled)
Purpose of this rule: Trigger an automated approval request to the frontline sales manager to approve sales discounts between 10% and 20%.
2. Request Director to Approve Sales Discount greater than 21% (Disabled)
Purpose of this rule: Trigger an automated approval request to the Director of Sales to approve sales discounts greater than 21%.
3. Notify Sales Rep of Approval Status (Enabled)
Purpose of this rule: Trigger an automated notification to the sales rep when the discount request has been approved or denied
Before you begin
To use the Automated Action rules, you must first make a few edits to the rules already created in this template, then enable them.
1. Edit Rule: Request Frontline Manager to Approve Sales Discounts for 10-20%
-
Open the Sales Discount Approval Request sheet.
-
Click the Alerts & Actions tab at the bottom of the sheet.
-
Click on the arrow in the upper right hand corner of the “Request Frontline Manager to Approve Sales Discount for 10-20%” rule to view the drop down menu, then click “Edit.”
-
Add the email address of the person you would like to receive the approval request in the field next to Send an approval request to Shared user or email.
-
Click on “Delivery Settings” to review the subject, message, and frequency.
-
Then click “Save.”
-
Repeat steps 3-6 for Request Director to Approve Sales Discount greater than 21%

Note: Sheet owners and admins can create automated notifications and requests for individuals who are shared to the sheet, anyone within their organization, or any email address.* The default setting on the Alerts & Actions rules is only those shared to the sheet can receive automated notifications and requests. Sheet owners and admins can modify this by clicking on the settings icon in the upper right corner of the Alerts & Actions Settings dialogue box, then selecting their preferred option.
* System Admins can choose who receives automated notification and requests at the account level. These account-level settings will override the sheet settings.
2. Enable rules
You will need to enable two rules in this template: Request Frontline Manager to Approve Sales Discount for 10-20% and Request Director to Approve Sales Discount greater than 21%. Click on the arrow in the upper right hand corner of each rule to view the drop down menu, then click “Enable.”
How it works
-
Sales rep fills out the form with all the required information and submits the request.
-
An automated approval request will be sent to the appropriate approver, who can review the information from their email, the Smartsheet Notification Center, or the Smartsheet mobile app.
-
For discounts between 10% and 20%, an automated approval request will be sent to the frontline sales manager.
-
For discounts greater than 21%, an automated approval request will be sent to the Director of Sales.
-
-
A notification will be sent to the sales rep once the request has been approved or denied.
Time Card Automated Approval Request
Note: to use this Automated Action template, you will need to be on a Business or Enterprise plan.
Scenario summary
Log your hours worked on a project and check “submit for approval” to send your manager an automated approval request. Smartsheet Automated Actions will send an approval request to your manager, who can then approve your time card right from their email, the Smartsheet Notification Center, or the Smartsheet mobile app.
Prebuilt rule
Once you’ve downloaded this template, you should see the following rule prebuilt for you in the Alerts & Actions tab at the bottom of the sheet. This rule is automatically enabled for you.
1. Request Manager’s Approval (Enabled)
Purpose of this rule: Trigger an automated approval request to the manager when the time card is ready for review.
Note: Sheet owners and admins can create automated notifications and requests for individuals who are shared to the sheet, anyone within their organization, or any email address.* The default setting on the Alerts & Actions rules is only those shared to the sheet can receive automated notifications and requests. Sheet owners and admins can modify this by clicking on the settings icon in the upper right corner of the Alerts & Actions Settings dialogue box, then selecting their preferred option.
* System Admins can choose who receives automated notification and requests at the account level. These account-level settings will override the sheet settings.
How it works
-
Enter time card information in all of the blue colored columns. In order for the approval request to send, a manager email address must entered.
-
Check the ‘submit for approval’ box.
-
An automated approval request is sent to the manager, who can then review the hours from their email, the Smartsheet Notification Center, or the Smartsheet mobile app.
