Definitions: Workflow Rule Terms and Features
In general, workflow rules can be broken into two main components, which can help guide sales people in determining the type, quantity, and results desired from each scenario. These two components are:
- Criteria: The “if” part of the “if/then” statement. In other words, the criteria are what must be true of the record for the workflow rule to execute the associated actions.
- Actions: The “then” part of the “if/then” statement. In other words, the actions are what to do when the record meets the criteria.
Throughout the sales cycles and all the configurations of workflows, a salesperson likely will run into specific terms. Here is a glossary that will make working with Salesforce and creating workflows more easily understood:
Action group: In Process Builder, this includes all the actions that fall under one set of criteria. It can consist of multiple immediate actions and scheduled actions.
Action timing: This refers to time-dependent actions and time triggers in workflow rules, as well as scheduled actions in Process Builder. These all fire an action or series of actions at preset times as criteria are met.
Chatter: This is Salesforce’s intranet social network that’s accessible only by members of a team account. It is intended for collaboration, discussion, and file sharing. It is also a dashboard where users can take actions in one click, approve update requests, take surveys, and store company onboarding and FAQ material.
Criteria builder: To establish your rule criteria, you’ll go through the criteria builder, which lets you create statements that can be determined to be true or false.
Email alert: This is an action that, when triggered, sends a previously created email template to a recipient designated by specific conditions they met. These are often set as a series, emailing one recipient a number of emails at preset intervals for marketing or sales purposes.
Email template: These are emails a user can preset for specific purposes with text and HTML design elements that are automatically sent as a result of meeting designated conditions in Salesforce. They can be personalized using the merge fields function to change the names, companies, and other information referenced throughout an email.
Evaluation criteria: This is the first choice for a workflow rule, which decides at what times all its constituent conditions will be read to determine that an action should be triggered. There are three choices. The first is “when a record is created or edited to meet a rule’s criteria,” which could be useful for setting automatic follow-up reminders once a lead record is entered into a system. The second is “only when a record is created,” which could be useful for setting automatic follow-up reminders once a lead record is entered into a system. The third is when the “formula evaluates to true,” which is useful for situations where you want a trigger to be narrowly focused, like sending a notification email to a senior account manager only if an opportunity worth over $1 million in their specific region changed status to “won” in the last week.
Field: This is a part of a rule criteria that selects a particular category of your Salesforce data, which becomes the base object for evaluation. It includes such data as opportunities, customers, and more.
Field update: This is a workflow action that automatically changes a field to have a new given value once conditions are met.
Formula editor: The formula editor is used by many features in Salesforce, including workflow rules.
HTML: Hypertext Markup Language is a basic front-end web design coding language, used to determine appearance, format, and layout information to a web browser or email app. Salesforce workflow rules uses HTML when creating email templates for later use.
If/else statement: This is an advanced type of logic that you can use in Process Builder, which follows this format: “If condition X is met, trigger action Y, but if condition X isn’t met, trigger action Z, and so on.” You can extend these to make a complex network of conditions that sort data exactly to where it should be and trigger sensitive actions without error.
If/then statement: This is the basis of the criteria in a workflow rule — that is, “when condition X is met, trigger action Y.” You can stack these on top of one another to create highly specific conditions and ensure an action is triggered only at the appropriate time.
Letterhead: This is the built-in email template creation tool wherein you can arrange preset headers, footers, line breaks, colors, and logos for quick, professional emails.
Lightning: An updated collection of tools and services for Salesforce, the Lightning Experience performs in real time on web browsers and in conjunction with a mobile app. It includes upgrades like customizable dashboards, a crisp UI, and contextual hovers that give you more information without having to load new pages.
New task: A workflow action that autogenerates a task for given users when established criteria have been met.
Object: These are the elements of your workflow rule that affect one another. The primary or “base” object is the independent variable in your if/then statement, whose condition affects whether another object is triggered. An object could be anything from a particular user to a company. In some cases, you may use a cross-object workflow — for instance, case comment to case or custom object to any master object.
Operator: This is the part of the rule criteria that determines the relationship between the base object in the field and the specified value. Options range from “equals” and “greater than” to “does not contain” and “starts with.”
Outbound XML message: This is another triggered workflow action, which sends information to a specified endpoint URL external to the Salesforce ecosystem. These messages can contain selected data fields to create status updates and the like. You can create and trigger these only in workflow rules, not in Process Builder.
Owner: This refers to the user who either owns a particular workflow rule (a Salesforce admin), or to the person who owns a particular record that will be affected by a workflow action. You can assign both within the app.
Picklist: This is another term for a drop-down menu, which consists of all possible values in a given field, including custom fields. These are useful for setting rule criteria, as they define the values you can select for fields.
Privileges: These are settings that determine whether users can access certain data and affect a workflow action’s effectiveness.
Process Builder: This is a way to automate processes with a more visual, flowchart-style interface. It is built into the Lightning Experience and helps get an overview of all processes working together.
Protected Component: If you check this box, the component won’t be referenced by or linked to components from a subscriber org. Also, it lets the developer delete the component in later releases without detriment to Apex test results.
Record: This is one set of data in Salesforce, akin to a single row on a spreadsheet. For example, an opportunity record might contain the relevant company, the main point of contact, and their contact information, as well as how much the potential deal is worth and what stage of the sales funnel it’s in.
Reevalution of workflow rules: By checking the field Reevaluate Workflow Rules After Field Change, you tell Salesforce to reset your workflow rules. However, if one of your workflow rules is dependent on an action from another workflow rule, this may affect the outcome.
Rule criteria: This is the set of rules that need to be evaluated and met for a workflow action to occur. They include the field that narrows down the base object, the specific value the object should be judged by, and the operator that defines the relationship between object and value. Criteria can be simple with just one line or specific with a series of statements that all must be true for the rule to occur.
Sandbox: This is a development or staging platform in Salesforce that allows you to test your workflow rules and processes outside of real time, and without any actual consequences if things go wrong.
SOAP API: A SOAP (Simple Object Access Protocol) is a messaging system that allows programs with different operating systems to communicate through HTTP and XML. It’s used in Salesforce for outbound messages to other apps.
Value: This is the part of a rule criteria that helps define whether an action should trigger for a base object. Depending on the type of field, it could be text information custom to a user or their company, or a numerical value.
Visualforce: This is a custom tag-based code language for Salesforce emails and apps, similar to HTML. Its main advantage is including tags that relate specifically to Salesforce data, such as fields and records.
Workflow action: This is an event that fires when a certain set of conditions in a workflow rule is met, and can range from email alerts and field updates to new tasks given to a particular owner.
Workflow queue: A list of actions that have been set into motion but haven’t yet fired, resulting from workflow rules with non-immediate triggers. From here, a user can manage, modify, and cancel actions as they wish.
Workflow rule: This is a command created by a user in advance to cause a workflow action to automatically take place when a series of conditions are established. You can decide that these occur immediately after the conditions are met, such as updating a field to reflect the new status of a deal, or to trigger at a certain amount of time or intervals after meeting specific conditions, such as sending an email series at preplanned times to a new prospect.
WYSIWYG: WYSIWYG stands for “what you see is what you get,” and it’s an editor that outputs font, coloration, arrangement, inserted images, and more exactly as they’ll appear to end users, as opposed to code editors like HTML. This is used for creating some types of email templates in Salesforce.
The History of Workflow Rules and Current Landscape
Salesforce began in 1999 in San Francisco as a software as a service (SaaS) tool for sales enablement, to track and score leads and measure sales from the individual salesperson level up to management and executives. It’s now a cloud-based service with dozens of features and functions, and it serves small to midsize businesses, as well as enterprise companies.
A variety of other companies have been historically, or are currently, competitive in the sales enablement and CRM space, either as stand-alone solutions or as options that can be integrated with Salesforce. They include:
eGain Communications
KANA Software
RightNow Technologies
Talisma
LivePerson
KNOVA
Sword Ciboodle
Microsoft Dynamics CRM
Oracle Siebel
SAP
Oracle CRM on Demand
Entellium
HubSpot
CallidusCloud
Benefits of Creating and Using Workflow Processes
The main benefit to using workflow processes is that once you create a process for a certain sales scenario, you can use it again and again, whenever and wherever it’s relevant. In other words, it can help the sales team be more effective and efficient, and target the right prospects with the right approach. It also means salespeople can focus on what they do, and need to do, best: connecting with customers to close the sale. Other benefits of creating and using workflow processes include:
Automating certain business processes.
Increasing user efficiency.
Keeping errors out of data.
Streamlining the workday for employees who can complete other tasks sooner.
Strengthening and empowering the sales group.
Tracking competition.
Enabling deeper understanding and concentration by staff.
Simplifying the sales cycle.
Workflow Rules vs. Process Builder

Though this article cites workflow rules frequently as a concept, the feature is only one method for creating automatic processes in Salesforce. A newer method is a feature called Process Builder, or Lightning Process Builder, which exists alongside workflow rules. But what exactly is the difference?
“Process Builder allows for building a process graphically, resembling a flow chart,” says Jonathan Keel, founder and president of 6 Street Technologies. “In traditional workflow rules, there are multiple screens to step through to set up the rule. Doing this does not provide the person building the rule a holistic view at a glance the way Lightning Process Builder does. Another major difference is that in Lightning Process Builder you can have multiple sets of criteria in a single process that trigger different actions.
“In a workflow rule, you get one set of criteria with multiple conditions and then a list of actions to run after the criteria is met. Being able to ‘chain’ multiple sets of criteria provides for if-then-else logic to easily build complex business processes. With traditional workflow rules, you would need several different rules to catch the different scenarios in your requirements. This can make complex business processes difficult to maintain.”

“In a workflow rule, you get one set of criteria with multiple conditions and then a list of actions to run after the criteria is met. Being able to ‘chain’ multiple sets of criteria provides for if-then-else logic to easily build complex business processes. With traditional workflow rules, you would need several different rules to catch the different scenarios in your requirements. This can make complex business processes difficult to maintain.”
-- Jonathan Keel
Founder and President of 6 Street Technologies and author of Lightning Process Builder and Visual Workflow: A Practical Guide to Model-Driven Development on the Force.com Platform
There are other differences in addition to visualization and scalability. A workflow rule can be made only to create tasks, update fields, and send email alerts and outbound messages. Process Builder can create and update records, launch an entire flow, send an email, submit items for approval, call apex methods (custom code), and post to Chatter (Salesforce’s internal enterprise social network). However, unlike workflow rules, Process Builder can’t send outbound XML messages.
The other question is accessibility. Process Builder has been the promoted method of automation since it was introduced in 2014, and now in the fully featured Lightning Experience, it’s the only apparent choice. However, if you dig into the menus to the Salesforce Classic experience, you can locate the workflow rule creation page by first selecting the plus (+) tab, then Workflows.
A Step-by-Step Guide to Creating Workflow Rules
A classic workflow rule is simple enough to create, but to be successful, it must consider a lot of factors. For the following example, we’ll explore a common scenario that salespeople using a CRM may need: automatically setting a series of follow-up tasks once an opportunity changes to “Closed Won.”
Switch from Lightning Experience to Salesforce Classic, select the plus (+) tab on the right end of the top-level navigation, then select Workflows, followed by New.
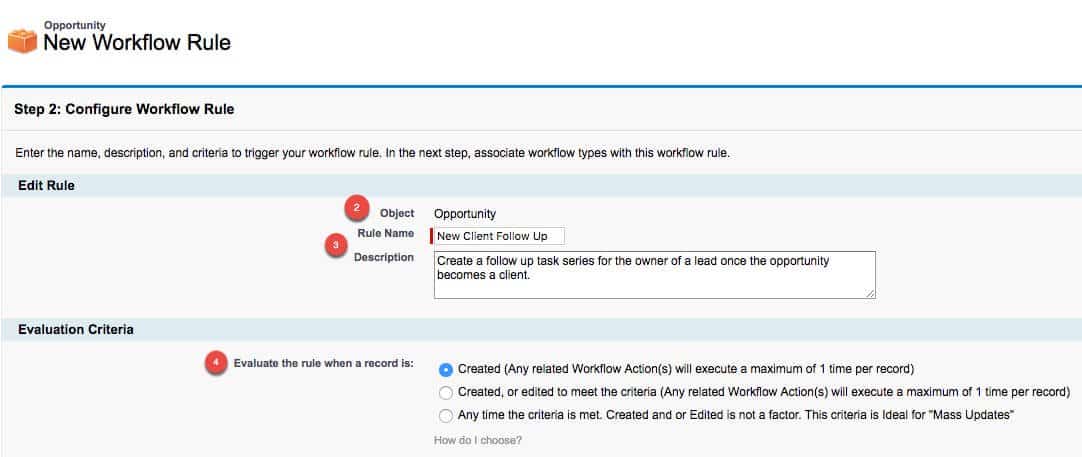
- Choose your base object from the drop-down menu. This is one of your broad established or custom data categories in Salesforce, such as Opportunities, Ad Groups, Deals, and Leads. This determines what category of data your rule will affect. For this example, select Opportunity.
- Next, name your rule and give it a description. This step isn’t difficult, but filling it out clearly and comprehensively is vital when you have multiple workflow rules in place, so admins can recognize what each is about. For this, let’s name the rule New Client Follow-Up, and describe exactly what it does with “Create a follow-up task series for the owner of a lead once the opportunity becomes a client.”
Now set the evaluation criteria, which determine the circumstances a record might be judged under to decide if a rule should run. There are three options. You could set it to happen when the relevant record is created, which can trigger one workflow action immediately or at a set time interval after it’s created. You could program it to trigger when the record is created or edited to meet the criteria, which can trigger actions only immediately after. Or you can tell it to trigger any time the criteria is met, which is ideal for mass updates. For this example, we’ll set it to anytime the record is created or edited to meet the criteria.
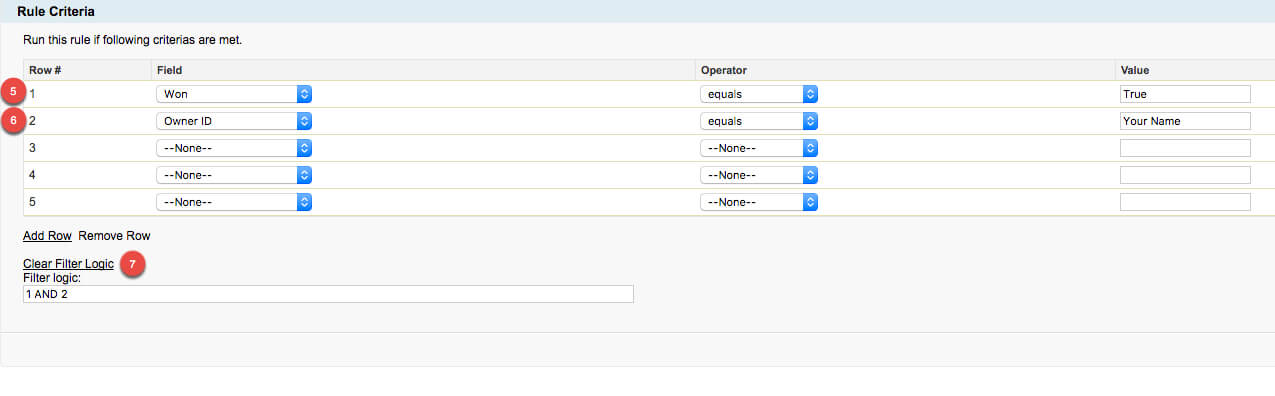
Set the rule criteria, which are the conditions that must be met for the workflow action to trigger. These can be one or multiple rows, and it can consist of a few elements.
The field is one aspect of the object selected; for our object Opportunity, this includes data on the lead, such as address, email, created on, etc. We’ll select Won.
The next element is the operator, which defines the relationship. It could be Equals, Includes, Does Not Include, Is Greater Than, and others. We’ll select Equals since we’ll want this to happen in only a specific case.
The final element is the value. If the field has a pre-existing picklist, you’ll be able to hit the magnifying glass icon and select the value. Otherwise, enter the value directly. For this example, the value will be True.To make sure the rule isn’t too broad, we’ll create a second rule criteria that says, “Owner ID equals (your name).”
Below everything are the logic filters, which describe how each line of criteria should relate to each other for the workflow action to trigger. In this example, we’ll leave it at the default of 1 AND 2, referring to each of the numbered rows. In other cases, this could be OR and include any number of rows.
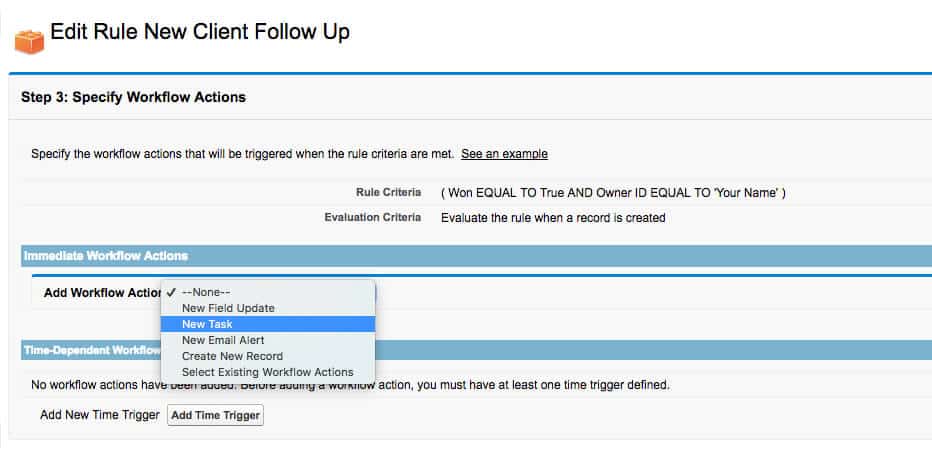
- Now it’s time to specify the workflow action we want. You can select immediate actions that happen as soon as the criteria are met, or time-dependent actions that trigger a set amount of time later.
There are five types of actions:
- A New Field Update will create the field specified.
- New Task will create a task assigned to a specified user.
- New Email Alert will send an email based on a template you create to one or more recipients.
- Create New Record will set up a specified record with all the attributes you select.
- Existing Workflow Actions is a quick way to build similar rules for other sets of users or criteria.
As soon as you select your action, a new page opens. In this example, we select New Task.
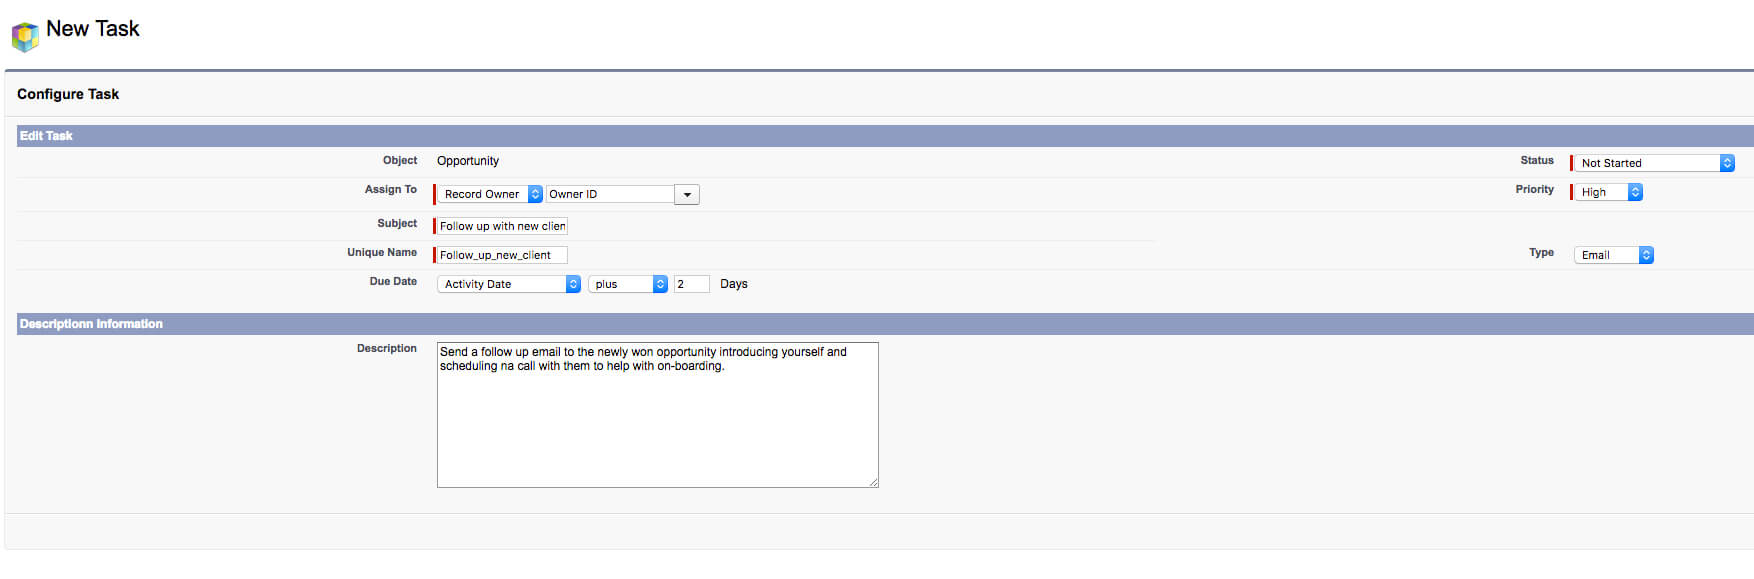
- In the Configure Task window, you can select who to assign the task to, the subject name and description of the task, its priority and status, the type of task, and the due date relative to the triggering workflow rule. See the screenshot for examples on how to complete.
- Finally, it’s time to test the rule. To avoid causing unintended problems, you’ll need to test it in a Sandbox dev environment. In the Sandbox instance, create the relevant records that would be affected by your rule, then change them to meet the criteria of said rule. In this case, create an opportunity owned by the same user named in the rule. If the workflow action fires and the owner is given the new task, your work is done, and you can activate your rule. Congratulations, you’ve just automated a piece of your Salesforce tasks!
Creating Email Templates for Workflow Rules
In the above example, we created a new task with our rule. This and most other actions can be created one step at a time as you go, but if you want to send an email, you must have existing templates before you start. Here’s how to create them:
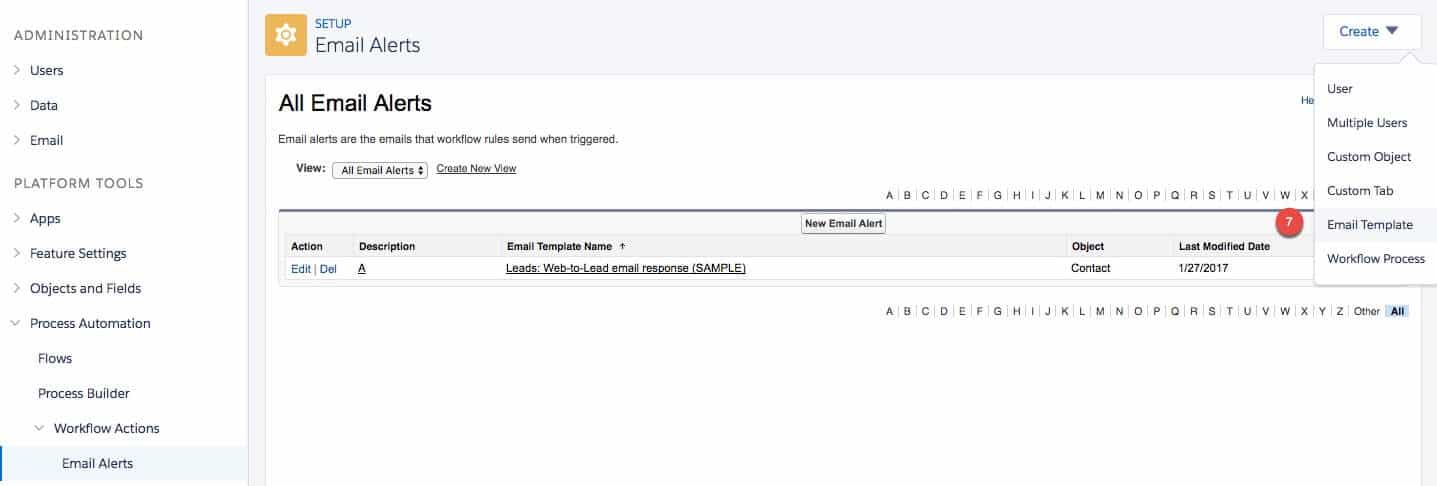
1. Unlike with the workflow rules, you can create email templates in the more intuitive Lightning Experience. To navigate to the template builder, click the settings gear icon in the top-right corner of your dashboard. Then in the top-right of that screen, click the Create drop-down menu and select Email Template.
- Next, select what type of email template you want to create.
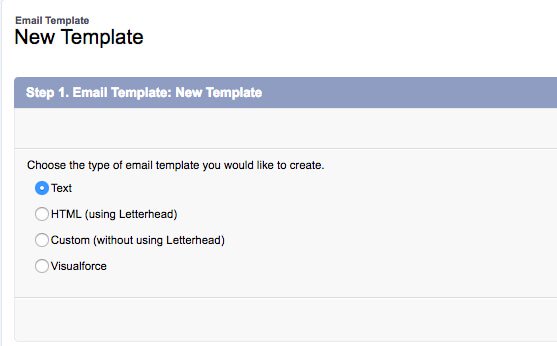
You can use plain text to create a simple, natural email that contains merge field data like {!Contact.FirstName} to autofill known variables and speed up email writing. You can also add attachments to your templates, which could be used to include a current sales sheet along with all prospecting emails, for example.
You can also choose HTML (using Letterhead) to build a template with your company letterhead. To use this option, you must have existing letterhead under Setup > Email > Letterheads. You can edit colors, height, dividing lines, headers, footers, logos, and more on this template without having prior HTML experience.
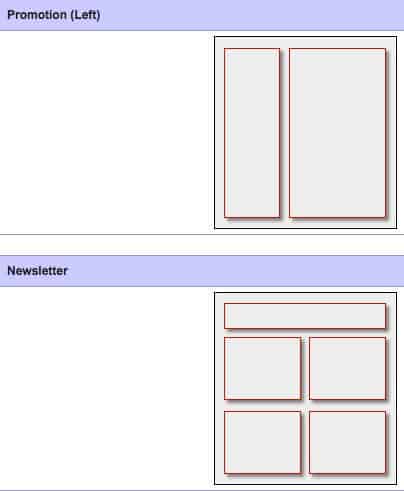
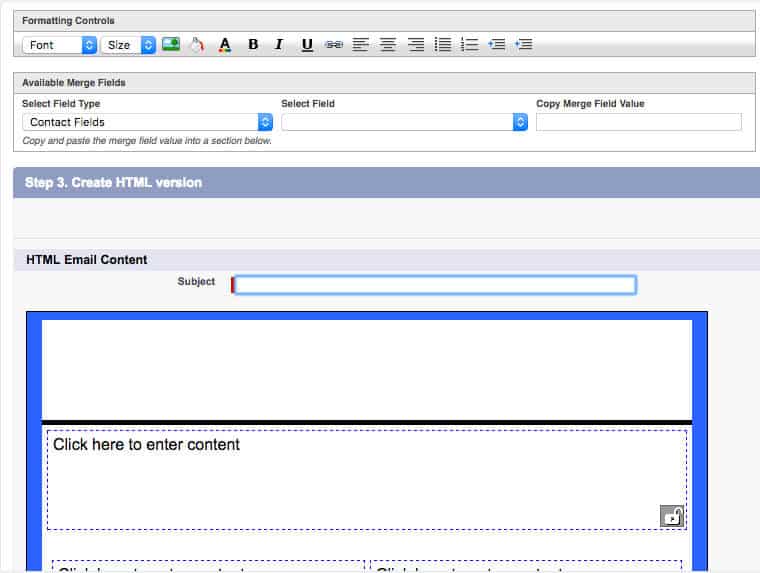
Once you create the letterhead, you can choose from a series of preset formats that divide the content into blocks, and then insert images and use the WYSIWYG editor. To ensure your message gets across no matter what, you will be prompted to create a text-only version for situations where an email app such as Outlook doesn’t automatically load images and formatting. This option also allows for attachments and merge fields.
The third option is creating a custom template (without using Letterhead), allowing for an entirely HTML email template’s code to be inserted and rendered. This is helpful if your organization uses a more advanced email building tool or completely custom developed code, and you want to maintain that for automated emails through Salesforce. Again, merge fields, attachments, and a plain text emergency version are all available through this option.
The final option is to use Visualforce. This is a custom tag-based code language for Salesforce, similar to HTML. Its main advantage is including tags that relate specifically to Salesforce data, such as fields and records.
3. Select your creation method and develop your template based on your available assets and expertise, along with the purpose. Create a simple conversational message with the Text option. If you want a robust marketing email but lack the design talent, HTML with Letterhead is an easy way to sidestep the limitation. Animated, interactive, and otherwise advanced emails should be built in HTML or Visualforce.
4. Use merge fields to make your emails even more automatic. Insert first and last names carefully, and construct sentences that sound human and not automated. Insert organizations or areas for emails trying to sell to problems in a particular city, for example. Plan them out carefully to avoid embarrassing automated mistakes.
5. Add attachments to your templates, where necessary. Attachments like sales sheets, reports, and other frequently sent documents can be perfect to include in templates. To avoid oversending these materials, create several specific templates for situations where one attachment might be better than another.
6. Create a plain text version of your email when prompted. Not all web browsers and email clients give automatic permissions to display HTML images and formatting, which could leave your email an unreadable mess that goes straight to the trash can. The plain text version will display when HTML is rejected, allowing your message to remain persuasive and intentional. Avoid simply copying over HTML text — tailor your template to the fact that your immaculate designs and company logo won’t be there. Provide the same information in a short message that doesn’t rely on pictures to bring it all home.
Special Lightning Experience Templates
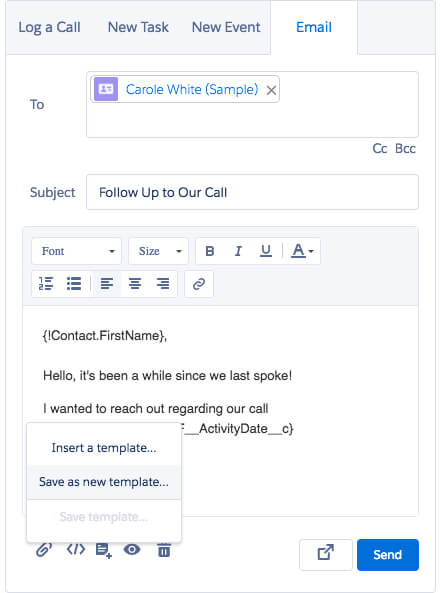
Say you’re in a lead’s record and you decide to send them a fresh email. You’ve started drafting it in the Activity sidebar, using merge fields, and it hits you: This would make a great template!
Luckily, you don’t have to re-create all your work in the email template builder. Instead, when you have the email where you want it, hover your mouse over the plus (+) icon next to a document, and select Save as a new template. Then you can name it and reuse it in the future.
Using Process Builder to Create Workflows
Salesforce doesn’t hide the fact that it would prefer users to stick to the latest version of its platform, given its “no software,” cloud-based philosophy. Process Builder is considered an improved version of workflow rules in nearly every regard, and it provides a more intuitive way to think about your process automation. That is why it is available in the updated Lightning Experience, while workflow rules are relegated to Salesforce Classic. It should be noted that the email template creation method above works for Process Builder, too.
Here’s a basic guide on how to achieve nearly the same goal as the workflow rule example above, but with extra “if/else logic” to make it more nuanced and workable for multiple scenarios.
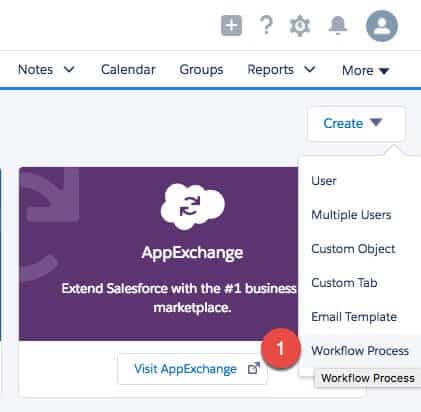
1. Navigate to Process Builder in the Lightning experience by clicking the gear icon in the top-right corner, selecting Setup Home, then clicking the Create menu in the top-right corner, followed by Workflow Process.
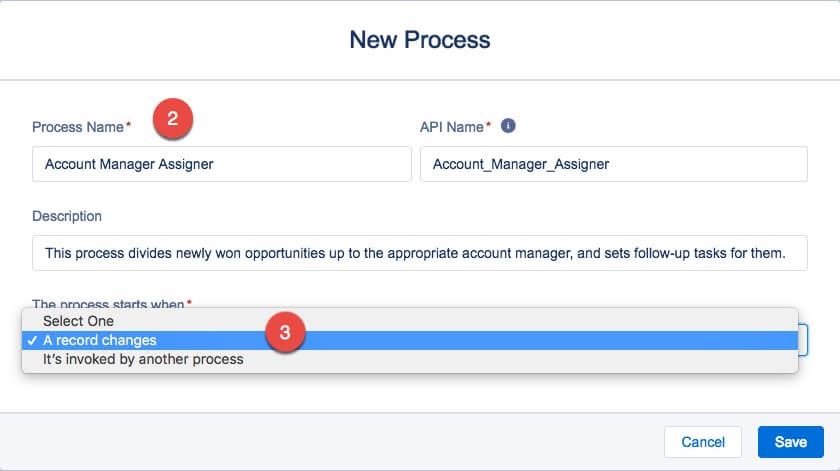
2. Click the New button to create your first process. Give the process an identifying name and description, along with a completely unique API Name (usually autogenerated from the process name you choose). For this example, we’ll call our process the Account Manager Assigner, with a purpose broader than the workflow rule example earlier in this article. Its description in this process divides newly won opportunities up to the appropriate account manager and sets follow-up tasks for them.
These processes can contain a network of related rules; provide a name and API name that is unique, broad, and forward-thinking to clarify their intent; and help admins decide whether to include new rules under the existing process.
3. Select when the process starts, which is essentially the evaluation criteria of Process Builder. You can choose A Record Changes, which allows for processes that react to human input, or when It’s invoked by another process, which allows for chained automated processes. For our example, we’ll choose A Record Changes.
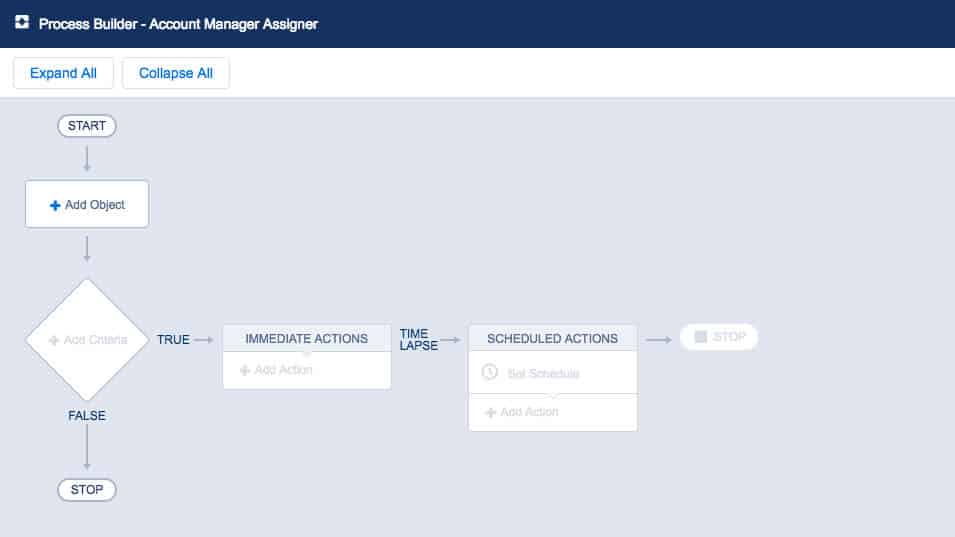
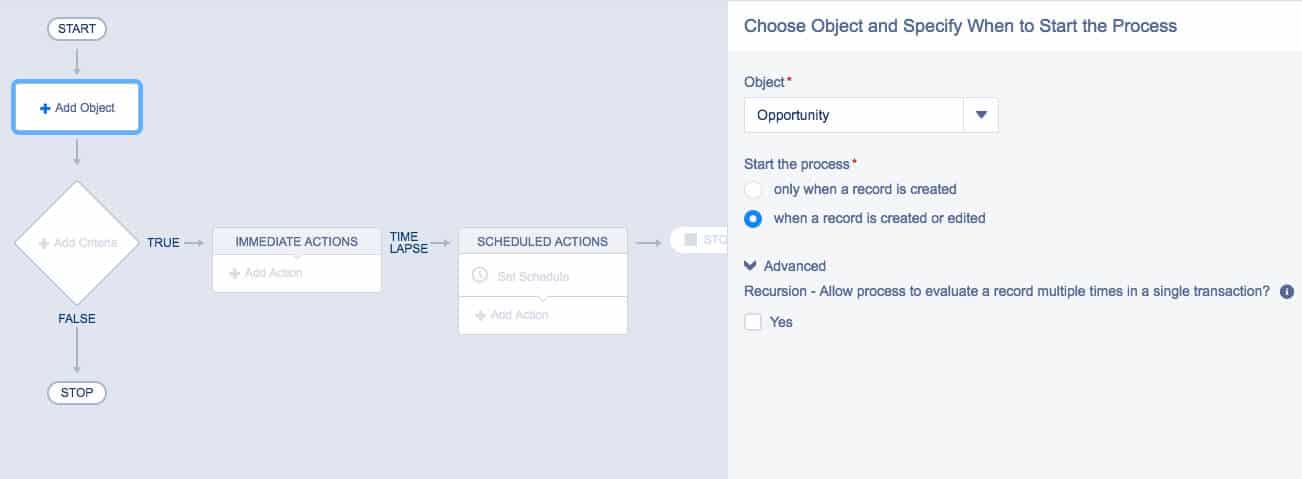
4. Now you’ll see a basic process flow, which has similar inputs to workflow rules but in a more visual layout. From Start, there’s a space to add a base object, plus custom criteria that can either be true or false. When true, it can trigger immediate actions and/or scheduled actions, and either stop or begin more actions. When false, it could stop, or add new if/else criteria for evaluation.
5. We’ll start by borrowing from the earlier workflow rule. Add an object, then the opportunity. Select to start the process when a record is created or edited. There is an advanced option that allows for a process to evaluate multiple times per transaction, but it isn’t necessary for this process.
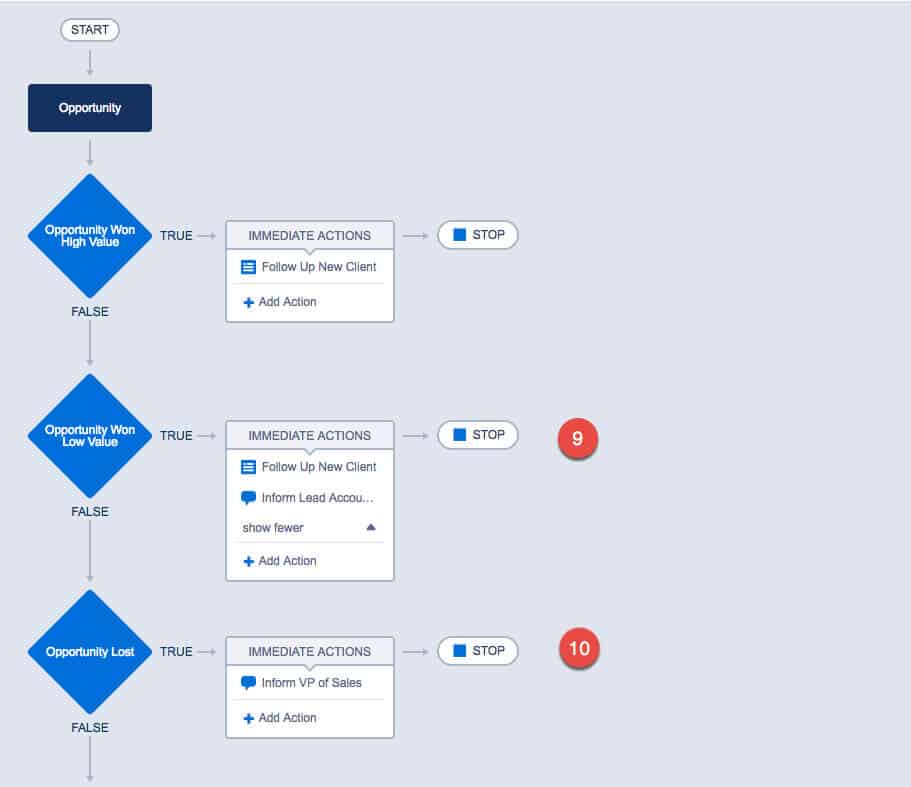
6. The new version of criteria rules is slightly different. You still give your rule a name that helps easily identify the step, but now you can set the executive criteria to when the conditions are met, when a fully custom formula evaluates to true, or no criteria at all — just execute the actions. If you select Conditions, they work the same way, with a field, operator, and value, but now they include a type, based on the affected field. You can still customize the logic between each line to be OR or AND. For the example, we’ll name this Opportunity Won High Value. This action group’s criteria is set to whether the opportunity’s “won” state equals TRUE and its value is greater than or equal to $1 million.
7. Now we need to define our first criteria action group. The actions available in the Process Builder include Create a Record, Email Alerts, and Update Record, but Outbound Messages are no longer available. In its place is Quick Actions for creating micro records like logging a call, and Post to Chatter (Salesforce’s intranet social network tool), which can help with sales competitions and sharing information.
For our example, we’ll select Create a Record, and name it Follow Up New Client as before. Set the record type to Task. Now we can customize the field values that define the task. This is similar to creating a task in workflow rules, but now you can customize every aspect of it — nothing is assumed.
The three field values we’ll use are Assigned to ID “Lead Account Manager” (a placeholder name for this example), Priority set to High, and Due Date Only = TODAY + 2. What this means is that a won opportunity worth $1 million or more will create a task assigned to the lead account manager and that has it marked as high priority and due in just two days.
Under advanced options, Process Builder asks if you want to execute the actions only when specified changes are made to the record. Typically, when this option appears, you want to tick the i box, as it lets the process ignore irrelevant record changes, such as adding a description to the opportunity.
8. At this point, we have a solid rule that mostly mirrors the workflow rule from before. However, look at the options before us. If the criteria is true, it will create our task and then stop. If it isn’t true, it will stop. That’s not a very robust process.
For example, we could create another immediate action that sets a second follow-up task for the salesperson. We could create an action that sends an email alert to the assigned user’s manager, informing them to check in with their account manager to ensure they followed through with the won opportunity. Or we could add another criteria defining a different set of actions for a different outcome.
9. Let’s explore the latter for an example of an if/else statement. This criteria will be Opportunity Won Low Value, where the reminder task is assigned to a lower-level account executive when the won opportunity is worth less than $1 million. Everything else is the same, but now we’re developing a branching path that automates every outcome. A good idea for this is to post to the Chatter of the lead account manager to let them know that the account executive has received this client in a dashboard they’ll always have open.
10. Consider the other logical outcome: The opportunity is lost. Creating yet another criteria for this situation closes the loop, which creates a full process for one set of common activities. This last event might inform the VP of sales via Chatter that an opportunity is closed and lost.
Examples of Workflows to Automate
Now that you’ve seen how to automate Salesforce both through workflow rules and Process Builder, and you’ve explored how to set tasks for users and send alerts based on opportunity activity, let’s see other types of rules you might set. These will follow the Process Builder style of creation, as it is more robust and clearly the direction Salesforce is heading.
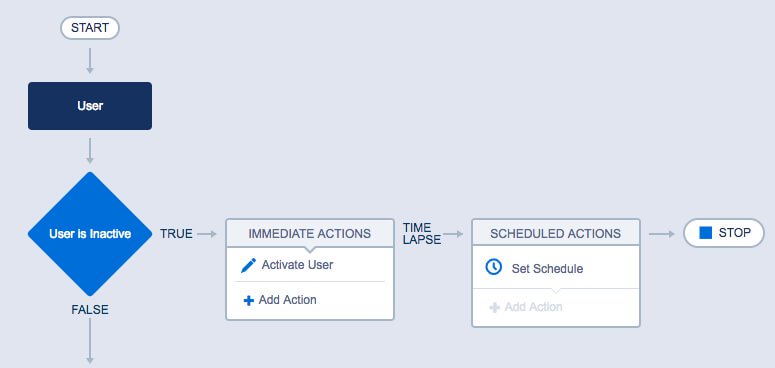
Automatically Activate New Users
Description: Make sure that each new user is active so that the user can log in to Salesforce
Process Starts When: A record changes
Object: User
Criteria Name: User Is Inactive
Criteria: [User].IsActive Equals False
Immediate Action Name: Activate User
Record Type: User
Criteria: None
Immediate Action: Active Equals True
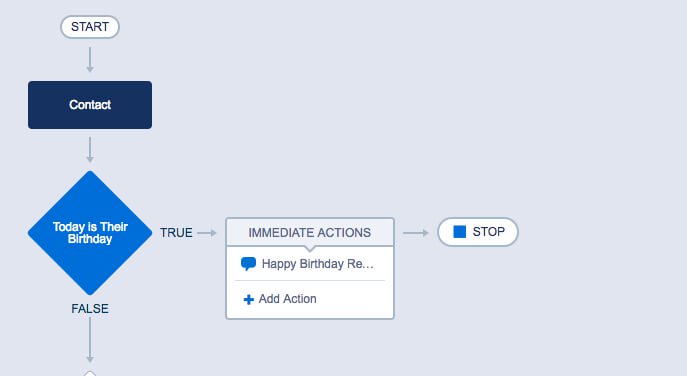
Reminder for Contact Birthday
Description: Remind the contact’s owner to send birthday wishes on the day of the contact’s birthday
Process Starts When: It’s invoked by another process
Object: Contact
Start Process When: A record is created or edit
Criteria Name: Today Is Their Birthday
Criteria: [Contact].CRMG_WF_Today_c Equals [Contact].Birthday
Immediate Action Type: Post to Chatter
Action Name: Happy Birthday Reminder
Post To: User
User: Your Name
Message: {![Contact].FirstName}{![Contact].LastName}’s birthday is today! Make sure to wish them a happy b-day and follow up with them.
Set Default Status of New Cases
Description: Set default status of each new case
Process Starts When: A record changes
Object: Case
Start Process When: A record is created
Criteria Name: Case Status Not Set
Criteria: [Case].Status Is null True
Immediate Action Name: Set Status
Record Type: [Case]
Criteria: None
Immediate Action: Status set to “New”
Inform Sales Managers When Large Deals Are Qualified
Description: Inform the Sales Manager when a deal worth $1 million or more has been qualified
Process Starts When: A record changes
Object: Quote
Start Process When: A record is created or edit
Criteria Name: Large Quote Accepted
Criteria: [Quote].Status Equals Accepted AND [Quote].Grand Total is Greater than or Equals $1,000,000
Immediate Action Type: Email Alerts
Immediate Action Name: Email Sales Manager
Email Alert: DealQualified (you must create yourself)
Follow Up Before a Contract Expires
Description: Email a renewal manager 30 days before a contract’s end date
Process Starts When: It’s invoked by another process
Object: Contract
Start Process When: A record is created or edit
Criteria Name: Contract Expires in 30 Days
Criteria: [Contract].Status Equals Activated AND [Contract].EndDate Equals TODAY() - 30
Immediate Action Type: Email Alerts
Immediate Action Name: Alert Renewal Manager
Email Alert: Contract Expires_Soon (you must create yourself)
Planning Your Workflow Map
Making one solid rule or process isn’t too difficult once you learn the location of all the menus. In fact, it’s so simple that you’ll want to create more to cut out the busy work from your day. However, overlapping rules, poor documentation, and lack of precision can lead to a system that takes more time to untangle than it saves.
In his book on process automation in Salesforce, Jonathan Keel of 6 Street Technologies says that “one must wrap their mind around what the business process needs to be before building any workflow rules. It’s best to meet with the business stakeholder and get a grasp of what they are trying to achieve.” He shares how to start thinking about it here with four important stages:
- Understand
- Plan
- Build
- Test
“To ensure a set of solid workflow rules,” Keel says, “one must have a holistic understanding of the processes you are trying to automate. Discussing all the different business processes and what the overall goals are before building anything will allow you to soak up the necessary information to go on to the next step.
“Now that you understand what your business stakeholder wants to do, start planning how it might look on paper. People tend to draw out flow charts at this point. If you know you have multiple workflow rules you must build, and you will, then having a flow chart drawn out will allow you to put the overall design on paper. This has the added effect of documenting the overall process to then show to your business stakeholder to make sure everyone is on the same page.
“Once that design is approved then build, build, build."
“Finally, once you have built out the workflow rules you need to test them out. All too often testing is skipped or reduced due to running out of time on a project, but it is extremely important. Testing workflow rules out after they are built will ensure not only that they do function correctly, but also that there are no potential overlaps or contradictions in logic.”
To achieve what Keel is talking about, start by creating a flowchart of every manual process and making decisions if you haven’t yet. At what point are sales managers brought in: when a sale is closed, when an opportunity is lost, just at the end of the month? Which items are sent as tasks rather than as emails? What emails do you want to automate, and what do you want to write from scratch each time? Does everyone on the team know which automatic emails are going to their leads, so they don’t repeat information? Do salespeople get updates that emails have been sent on their behalf, so they remember that as part of the sales cycle?
These and other questions are vital to creating a network of processes that don’t overlap or lead to confusion within the team or with their clients.
The other important question is that of documentation within the workflows themselves. Jonathan Keel covers more of that here:
“You can always tell a great workflow rule not so much by its steps but by when it’s self-documenting ... the rule name, the description, and the rule criteria should have information that a Salesforce admin can read at a glance and understand the intent of the workflow rule. The rule name needs to be solid in explaining the intent of the workflow rule. A good name such as ‘Opportunity is Updated (but not to Won)’ does a great job of telling what a workflow rule’s intention was when it was built.
“This also applies to coming up with a name for workflow actions. Also, putting as much information in the description field as possible as to what the workflow rule is supposed to do and why it exists provides not only requirements to the original admin about what it should do, but also to future admins that need to update the workflow rule or figure out what it does. This also applies to the description field for workflow actions. Finally, if a rule criteria that uses a formula is formatted neatly so you can understand it at a glance, then you know there is real craftsmanship at work.”
Tips for Making the Most of Salesforce Workflow Processes
As you begin to work more deeply in Salesforce and workflow processes, following these tips as a checklist when you begin and while you are refining the rules will help you get the most out of the systems.
Recognize scenarios warranting business process automation.
Know how to properly apply evaluation criteria to workflow rules.
Be able to develop rule criteria for workflow rules.
Understand how and when to create workflow actions, including time-based actions.
Be familiar with key considerations when working with workflow rules.
Collect requirements, which is essential to creating successful processes in Salesforce.
Save Time with Automated Workflows Using the Smartsheet for Salesforce Connector
Empower your people to go above and beyond with a flexible platform designed to match the needs of your team — and adapt as those needs change.
The Smartsheet platform makes it easy to plan, capture, manage, and report on work from anywhere, helping your team be more effective and get more done. Report on key metrics and get real-time visibility into work as it happens with roll-up reports, dashboards, and automated workflows built to keep your team connected and informed.
When teams have clarity into the work getting done, there’s no telling how much more they can accomplish in the same amount of time. Try Smartsheet for free, today.