Benefits of Good Data Management
The true value of establishing strong data management standards isn’t solving problems - it’s preventing them. This holds true for Salesforce admins at organizations of any scale and within any industry. For example, a nonprofit admin, using its free 501(c)(3) licenses, needs solid donor contact lists, and good data management helps them be confident in seeing where money is coming in from, and where it’s spent. For the enterprise admin team with their hundreds of thousands of records, good data management keeps their information reliable while preventing dangerous errors from slipping through the cracks. For so-called “lone wolf” admins, whether contracting or working in-house, proper data management helps them not only stay on top of everything, but it also helps them train others in their organization not to create problems on accident.
Glossary of Data Management Terms and Features
Analytics Snapshots: Also known as “Reporting Snapshot,” are reports that can be regularly scheduled to provide a summary of data at a given time and are saved as custom objects on their constituent records. They’re helpful for viewing trends over time and filtering out unneeded data.
Checkboxes: A type of field in a record that can either be checked or unchecked. When importing raw data into Salesforce, a “1” means a checked value, and a “0” means an unchecked value.
Custom Objects: This is a field in your raw data that is not one of the following: accounts, contacts, leads, or solutions.
Data Export: Moving data from the Salesforce platform into a raw .csv file or Microsoft Excel file.
Data Recovery: Retrieving deleted data to ensure continuity. Deleted records last for 15 days before being removed permanently. Salesforce maintains some backup data that they can recover for fees in the tens of thousands of dollars, in emergencies. It is best to maintain your own backups by creating regularly-scheduled reports and exporting them as securely-stored .csv files.
Data.com: A Salesforce add-on service for an extra fee that helps clean your existing contact and lead data.
Date/time fields: Anytime you import fields with date or time information, the formatting needs to match the format of such values in your Salesforce platform. Validation rules can prevent incorrectly-formatted records from being imported.
Data Loader: A built-in app that is capable of importing as many as five million records of any type at a time. It has a simple selection UI for non-technical users, and a more complex command line that can make data imports automated.
Default Values: In the Data Import Wizard, you must set which values appear when importing checkboxes and picklist fields without matching data or proper mapping.
Dirty Data: Incorrect, broken, or out-of-date data in Salesforce.
ETL (Extract, Transform, Load): An acronym/phrase that refers to the function of exporting, cleaning, and reimporting data. A great number of first- and third-party extensions, called “ETL apps,” exist for the general purpose of mass data cleaning.
Export Wizard: A built-in Salesforce tool that lets you export data manually once per six days or 28 days, or automatically on these weekly or monthly intervals.
Formula Fields: A field type that contains a spreadsheet-like formula that calculates at run-time for unique, up-to-date data on each viewing.
Good Data Quality: Reliable imported data that has the correct field mapping, cleaned regularly, and kept up-to-date.
Import Wizard: A built-in tool that guides users through importing raw data into Salesforce. It works for 50,000 or fewer records, and most importantly is not an automated import process.
Lookup Filters: Such filters help narrow down your data to just those that match the criteria you need, which is helpful for viewing, reporting on, and exporting data.
Multidomain Management: In organizations with multiple internal Salesforce orgs, this is the practice of performing data management across them. It can require third-party integrations to do well, and it handles data from different instances and establishes hierarchies of usable data for different roles in your organization.
Picklists: As pertains to data management, picklists are tricky because when exporting and importing specific fields, you need to carefully choose the selections. If you import a picklist value that doesn’t match an existing one, you need to have an unrestricted picklist to import the new value. Otherwise, it goes with a preset default value. Multi-select picklists need to have values separated by semicolons in your import file for them to map correctly.
Record IDs: A 15 or 18 digit ID unique to your Salesforce organization, which is called on when mapping your data during imports.
RegEx (Regular Expression): Another language that functions like a more heavily-scrutinized version of validation rules. It helps to enforce proper formatting for things like addresses, postal codes, dates, and more.
Standard Objects: Standard objects are one of the following: accounts, contacts, leads, or solutions. They are easiest to map for import into Salesforce from raw data.
Upsert: A method for exporting Salesforce records with Parent and Child relationships intact for later import. It is a combination of Update and Insert, as it does either of these things based on whether a matching record exists for External ID fields.
Validation Rules: Pre-set criteria that prevent records with incorrect formatting from getting collected and saved. These can have formulas to evaluate records on multiple fields before returning a “True” or “False” value.
Extracting, Transforming, and Loading Data in Salesforce Classic
Salesforce Classic is the original look-and-feel for Salesforce, which many users still prefer. This step-by-step guide will use only its built-in tools and Excel to perform the extracting, transforming, and loading (ETL).
Extracting
- Click Setup on the top right, then expand the Data Management section on the left rail, and click Data Export. This will take you to the built-in Data Export Wizard.
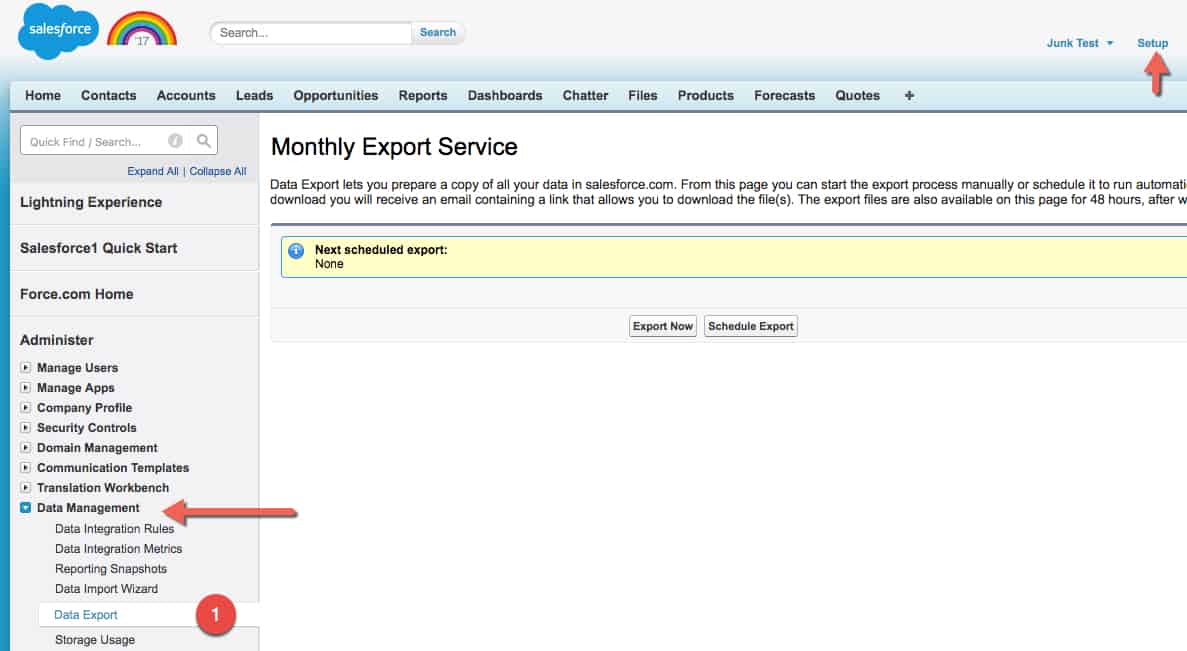
- Click either Export Now or Schedule Export. For this guide, we’ll export now - for scheduling a data export all you do is select date, time, and intervals. These can be weekly or monthly.
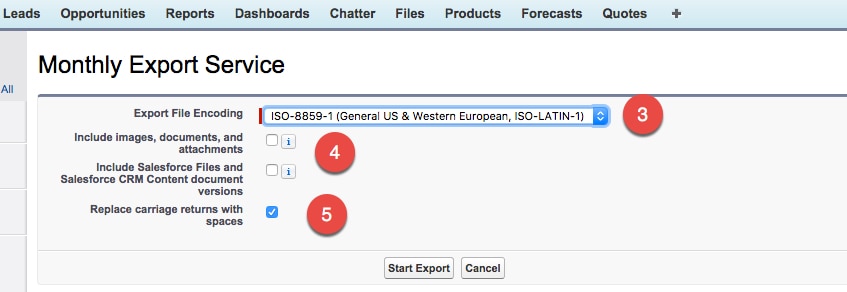
- Choose your export file encoding - ISO-8859-1 is a good standard for most of the world’s scripts, whereas major Asian languages such as Japanese, Chinese, and Korean have multiple scripts options.
- Select whether you want to include images, documents, attachments, and proprietary Salesforce CRM content along with your data. Note: This makes it take longer to export, depending on the number of records with this data and the size of attachments.
- There’s an option to Replace your carriage returns between records with spaces. Click this option if you plan to re-import your data or place it in other applications.
- Next, select your Exported Data. The checked default option is Include all data, which is good if you don’t know all the sections. Alternatively, you can select each section you want to export, which can be helpful for weekly reports. Also, if a particular field has corrupt or duplicate data (thanks to a third-party app or an analyst’s findings), you could isolate it for export and cleaning. In this case, we’ll include everything. Click Start Export.
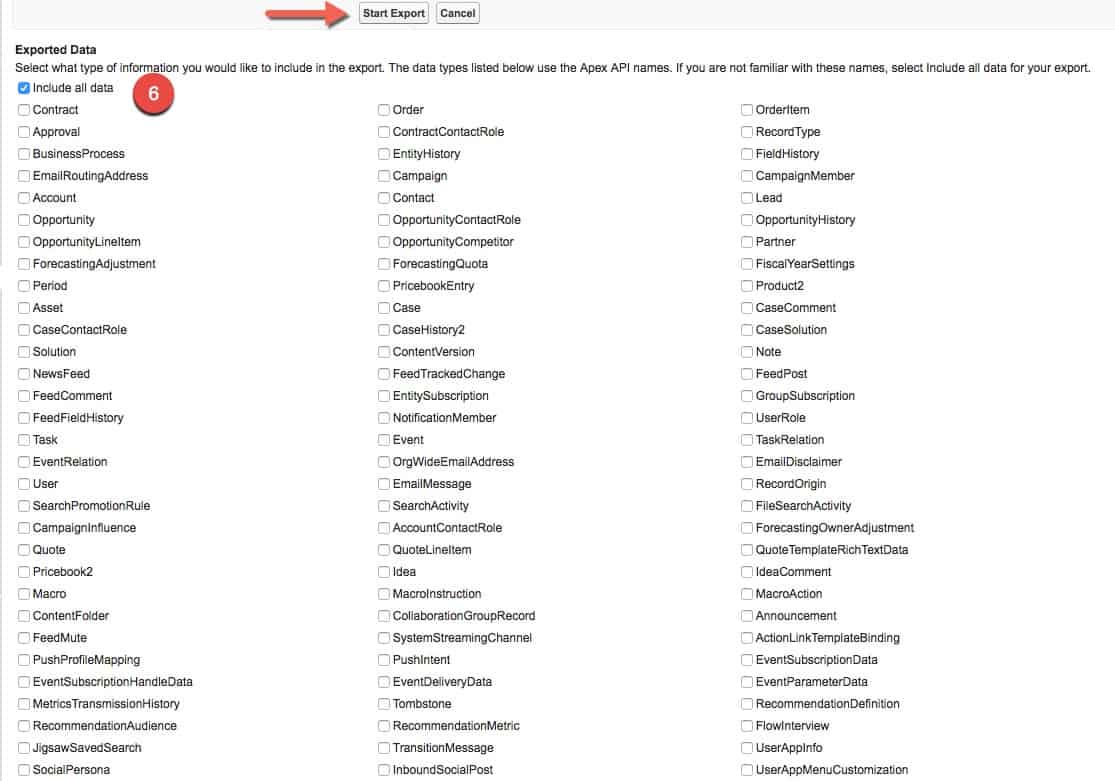
- Salesforce then creates a zip archive of CSV files by category and emails it to you. Small exports come in one file, and large ones arrive in separate files. Open the link in your email to download the file as soon as you can, because these files are deleted from the server in just 48 hours.
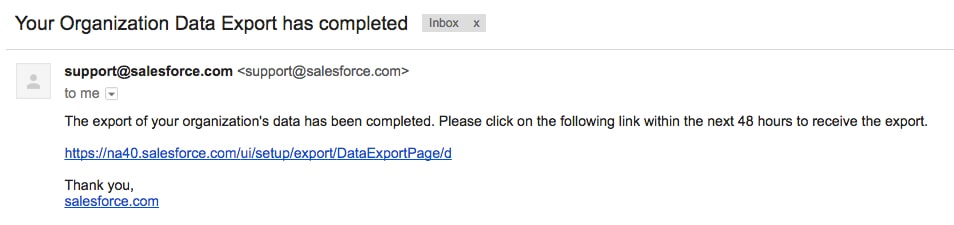
You can also download it from your Salesforce dashboard.
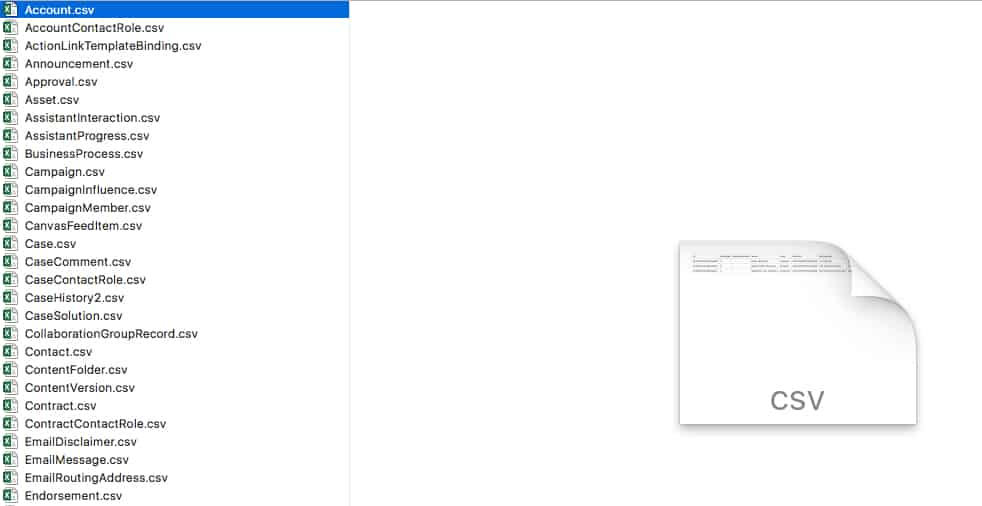
- Unzip the file on your desktop to see that it is broken out into every single data category you’ve selected - in this case, all of them. Open your .csv file in Excel, and take a look at it.
Transforming
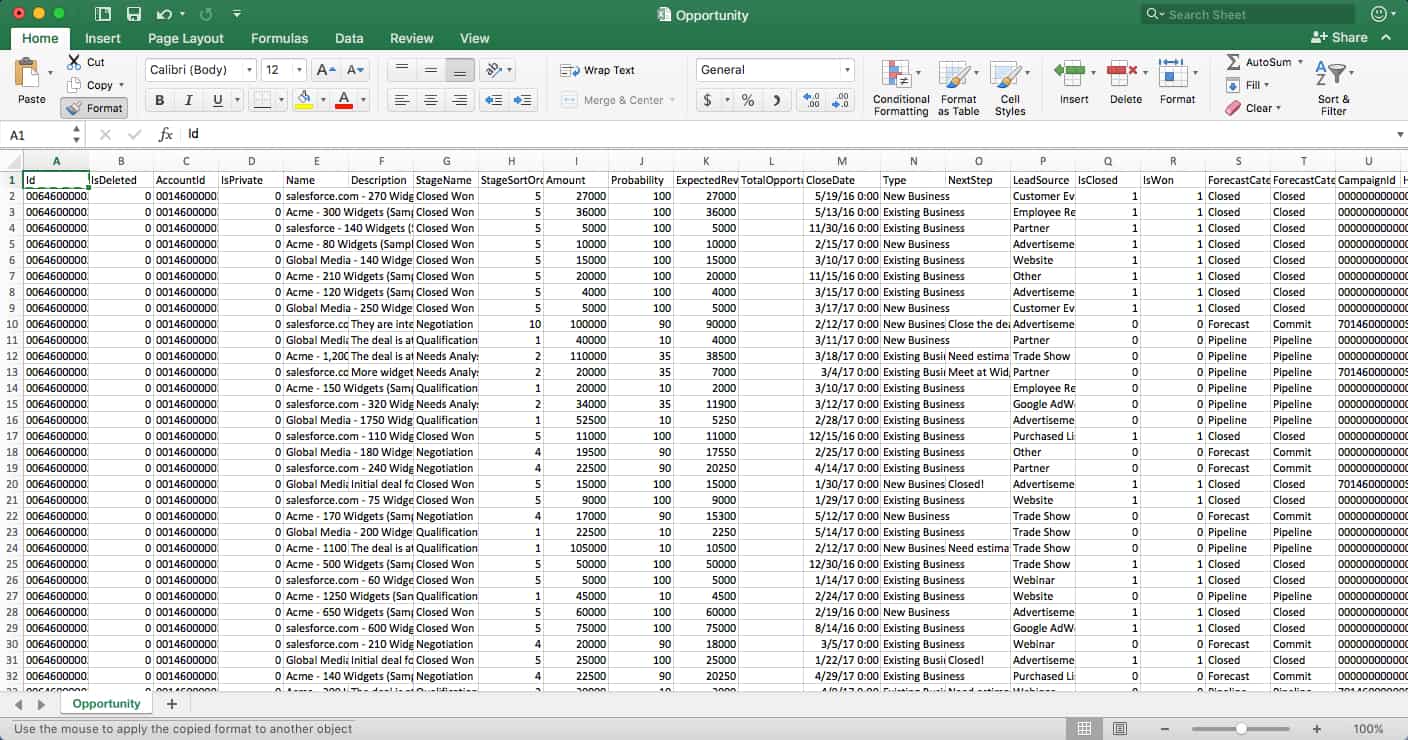
The Excel file displays your data in a raw, but well-organized way, where each row is an individual record, and every column is a different field. Every field is a standard object in Salesforce - if it were a custom object you created yourself, you’d have to use the Data Loader external application built by Salesforce. Now we’ll look at a number of ways to manipulate and clean the data in Excel, without using any additional applications.
Sorting & Filtering
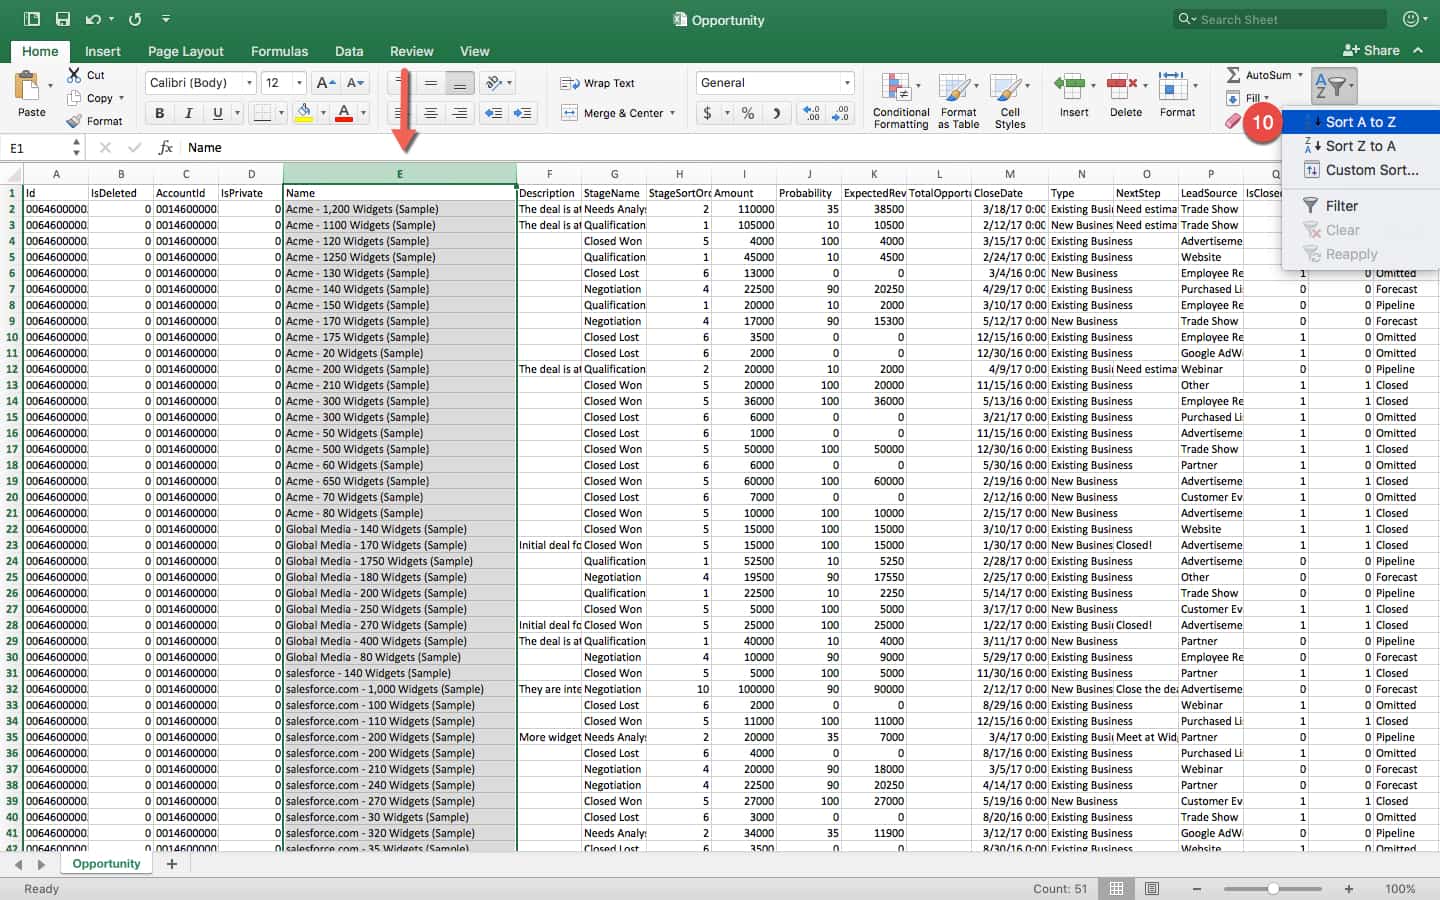
- In your Opportunity.csv file, select a field column to sort by for improved organization. We’ll go with Name for convenience’s sake. Click the Name field column and sort it from A to Z. This method is an ideal way to spot duplicates from the get-go. You’ll see them side-by-side as you manually go through your spreadsheet.
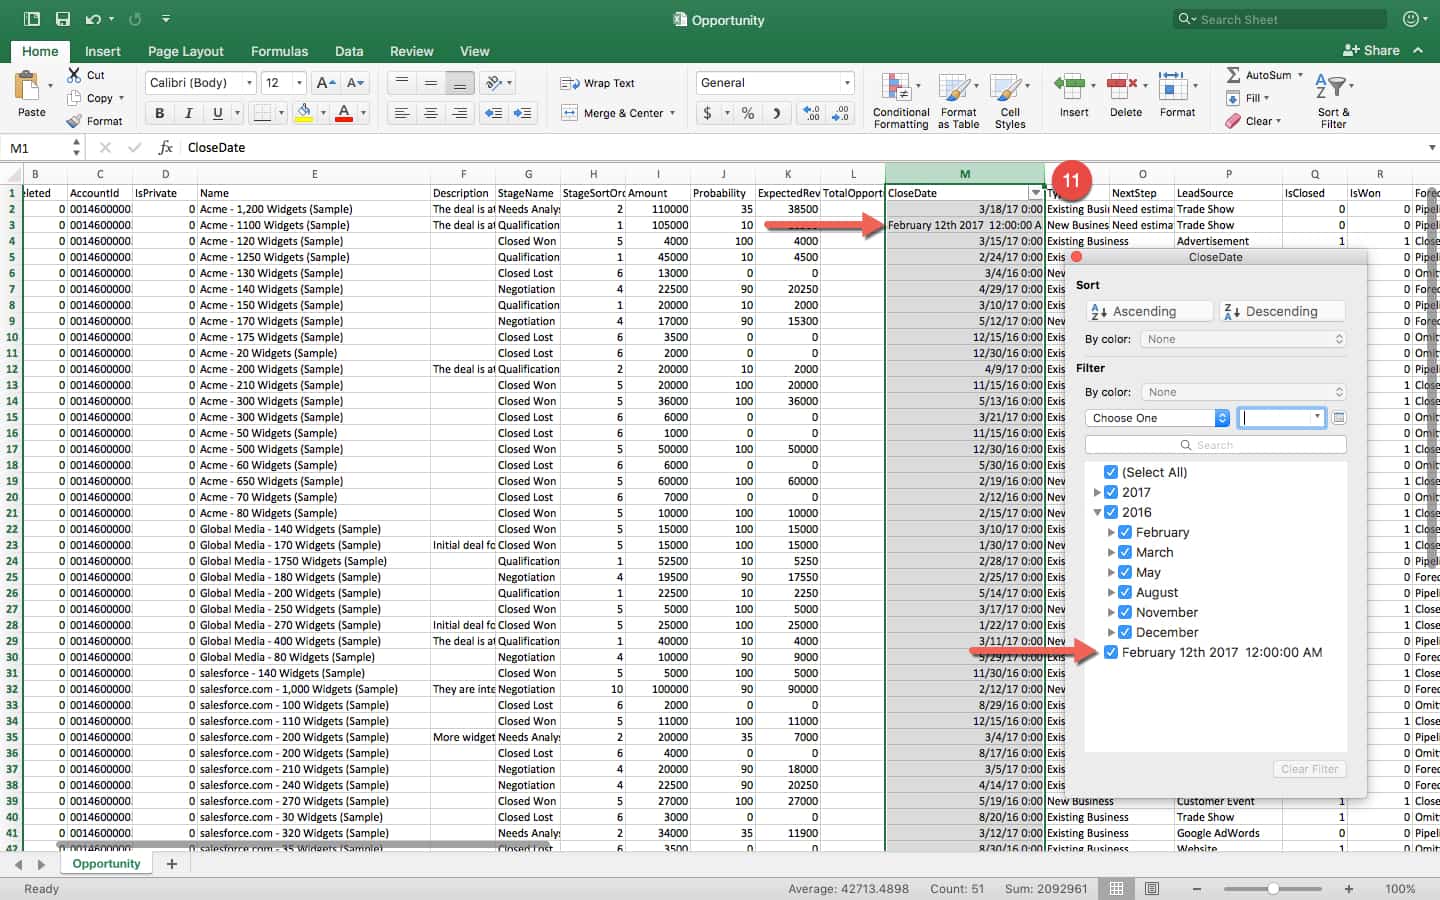
- Now you can start applying filters to isolate groups of data, which can help when applying naming conventions, filling in blanks, and standardizing format for things like Address and Phone Numbers. When you select Filter, drop down menus appear at the top of each column. For this one, we’ll filter the Close Date column to identify where formatting deviates. In this short list of data, there is a glaring problem: most of the dates appear as numbers, but one has the month spelled out. Filtering is a quick way to notice irregularities, and manually fix them. It’s also an excellent way to spot entries with missing data by selecting to filter by empty cells.
VLOOKUP
A technique for quickly adding data is to use the VLOOKUP function, which is great for matching things like user IDs to record owners, or parent records to child records.
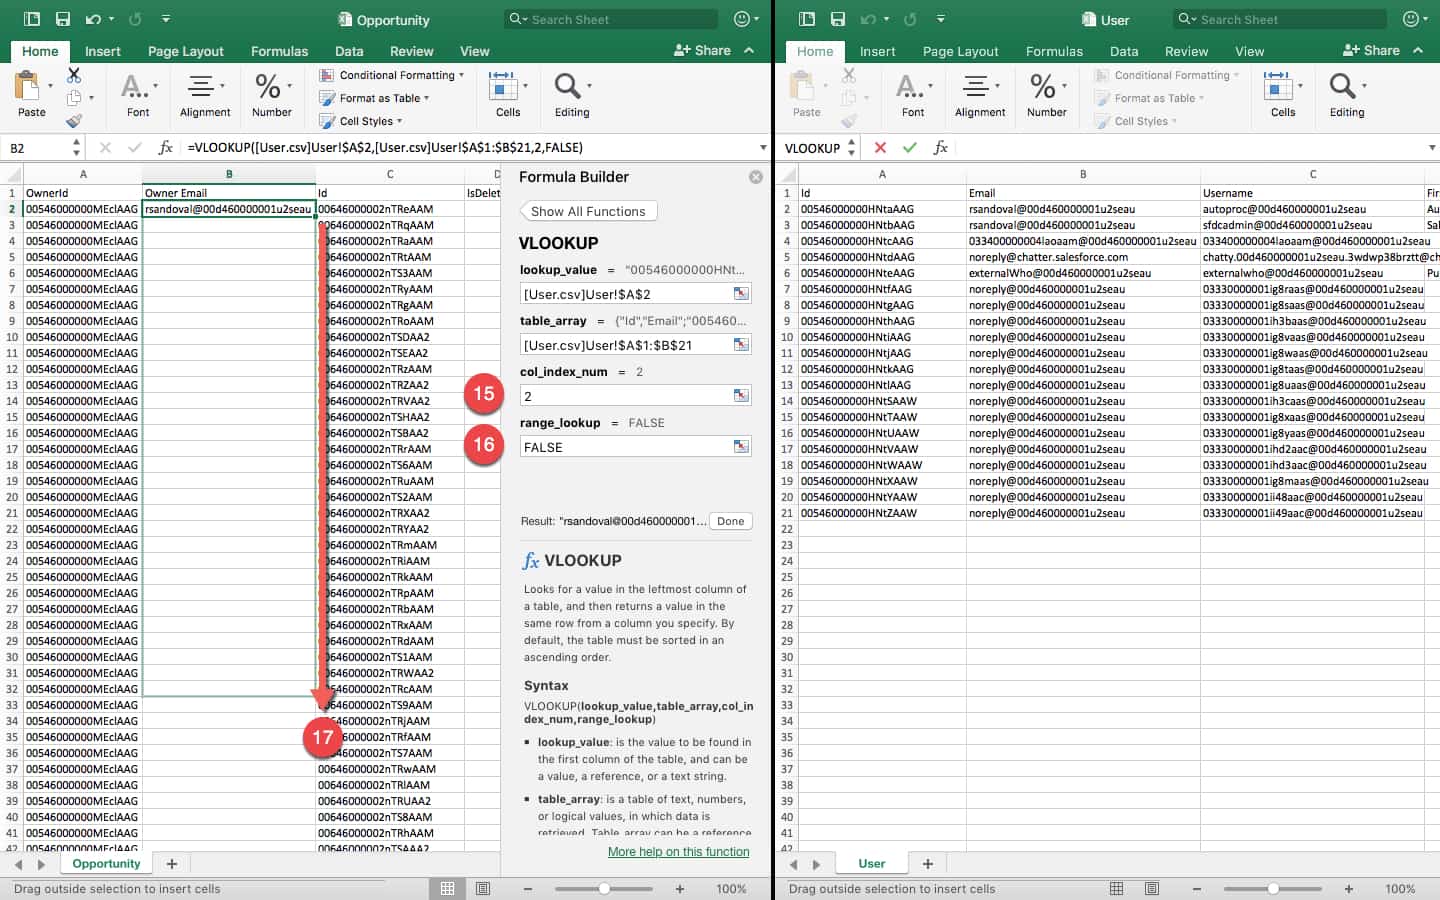
- Pull up another exported dataset, User.csv and open it side-by-side with Opportunity.csv, so you can work with them together. We’re going to make sure that the opportunity records all have the correct owner’s email address. In this case, our opportunities have the User ID of each owner, but all lack an email address. This issue could prevent them from receiving reminders to follow up with their opportunities.
Arrange your two spreadsheets so that the column that matches (in this case, the owner ID) is on the far left. Sort these columns on each sheet in ascending order. VLOOKUP will not function properly, otherwise. Create a blank column for the new Owner Email field.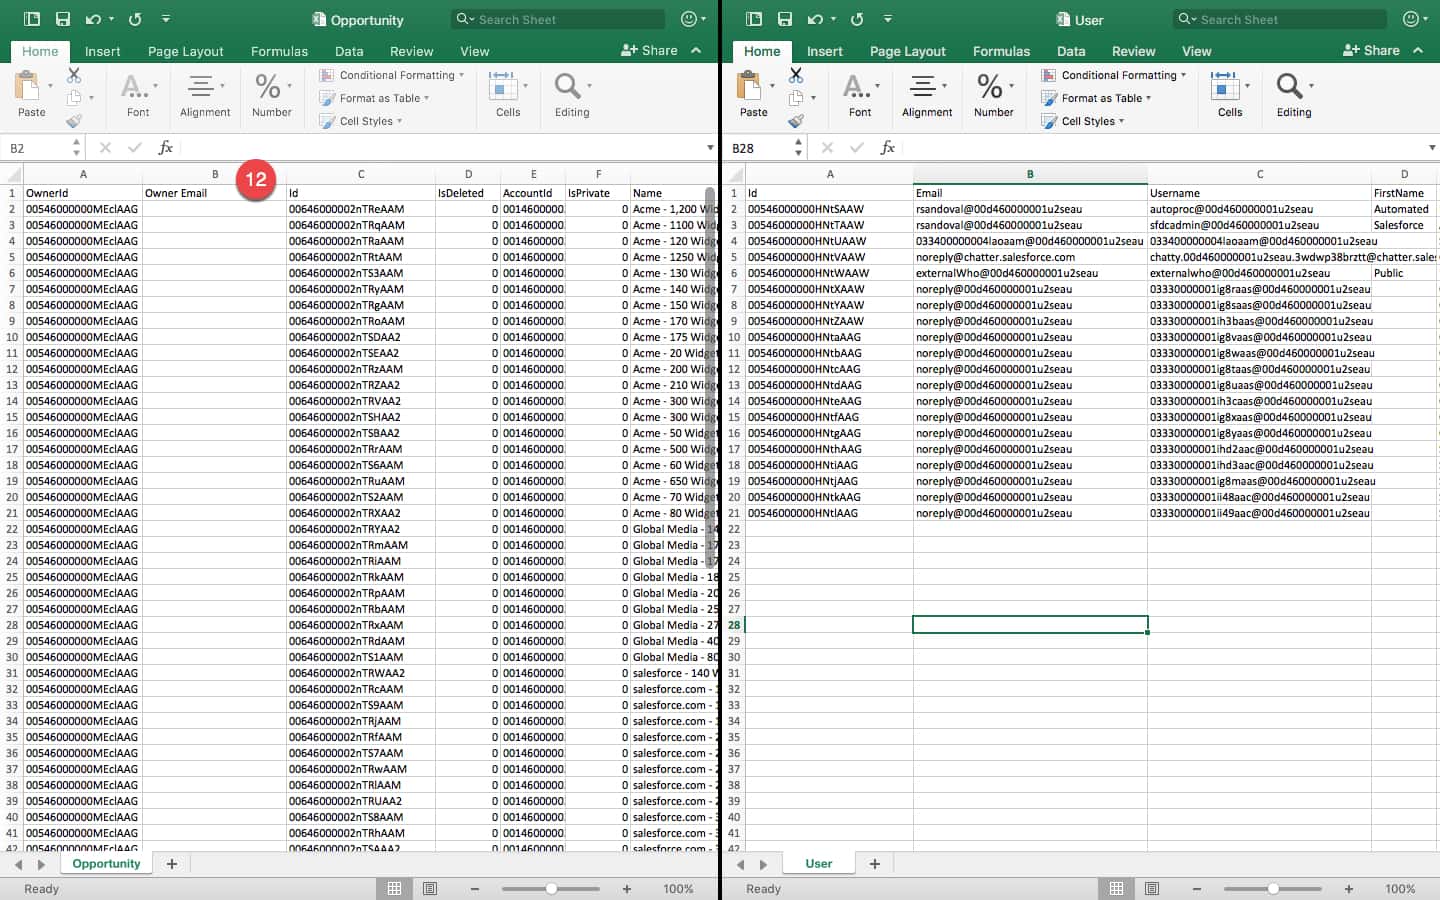
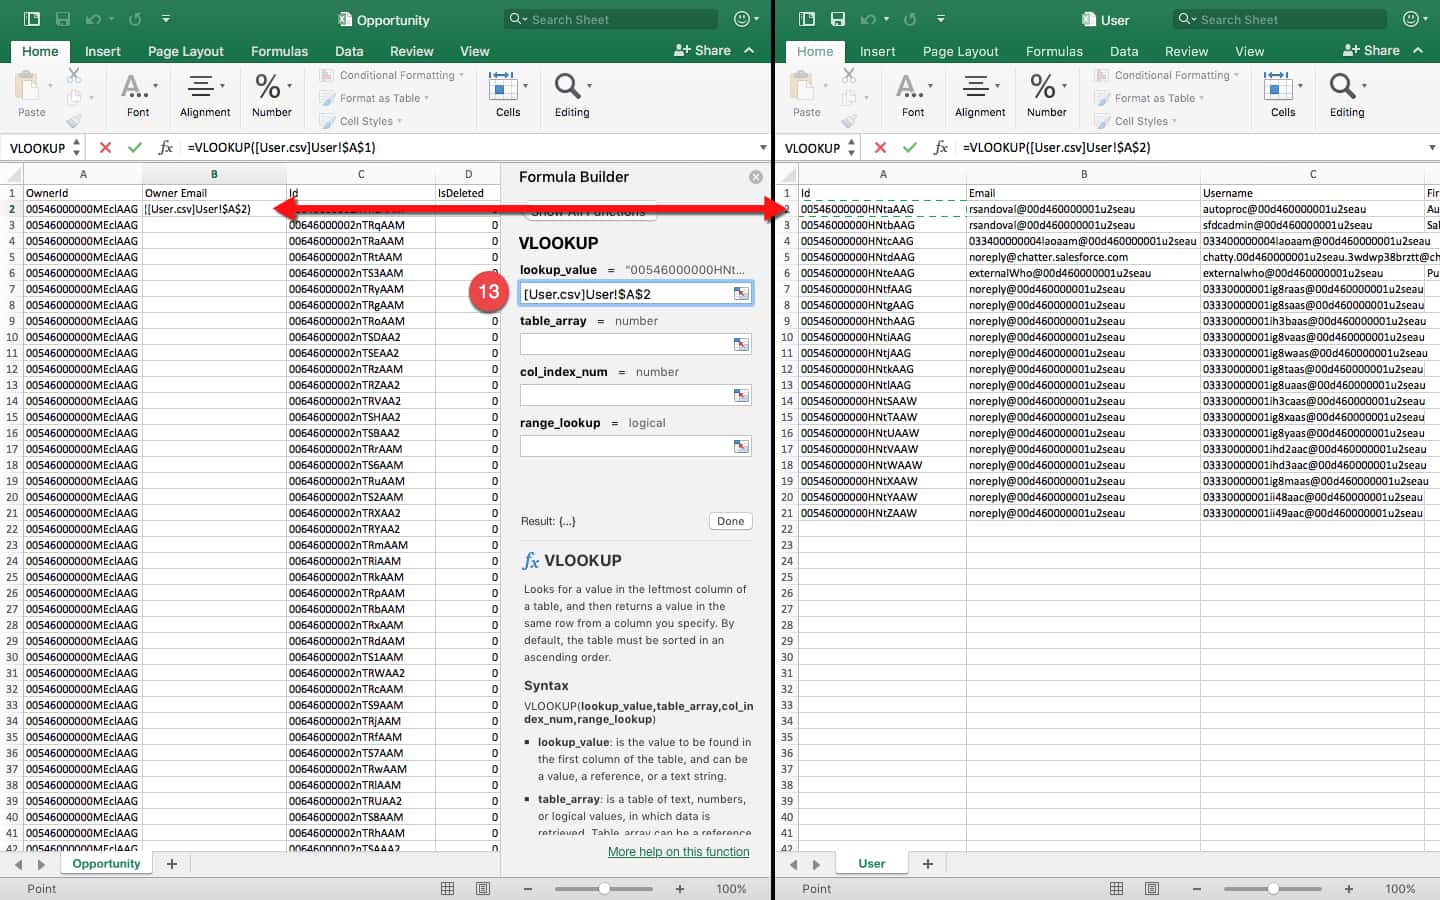
- Select the first blank cell in the new Owner Email column, click function and select VLOOKUP. Now you have a short Formula Builder form to complete. The Lookup Value should be the first corresponding entry in User.csv.
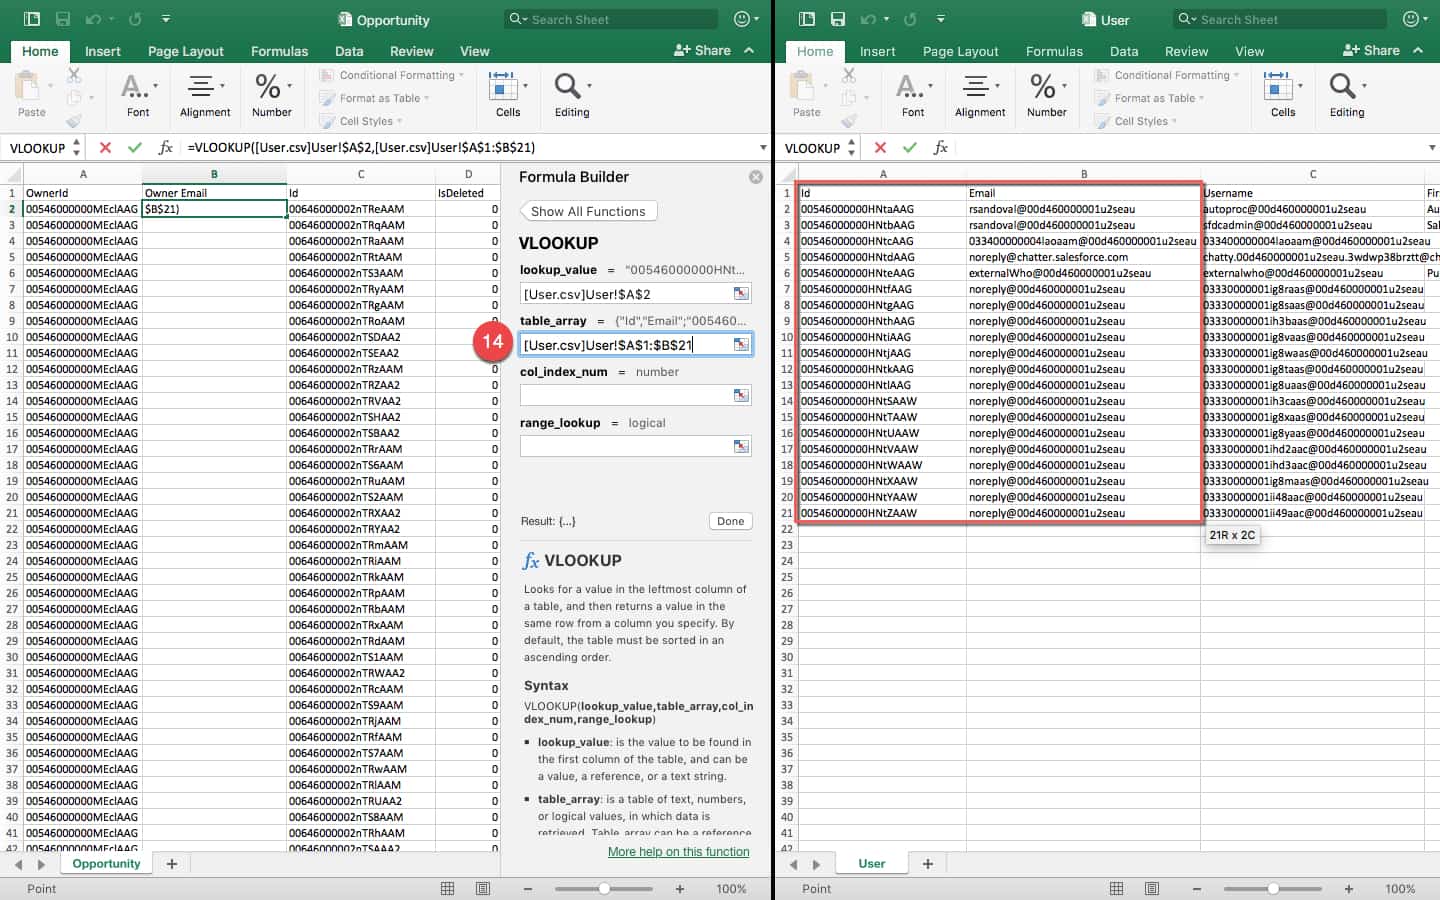
- Let’s pick the Table Array, which is the range of cells we need to refer to. For our simple task, highlight the first two columns down to the end of entries in User.csv.
- Next, let’s identify which column in the table we want returned, which in this case is 2, as in two from the left.
- The Range Lookup field asks if we want an exact match. Since we do, type FALSE, because TRUE would submit a broader selection of cells.
- You should have a perfect VLOOKUP returned in one cell. To duplicate the formula for all entries, drag the bottom right corner of the cell down through the column. Now you have an entirely new field ready to go when you reimport, which will improve functionality and fill in incomplete data in Salesforce.
Paste Special As Values
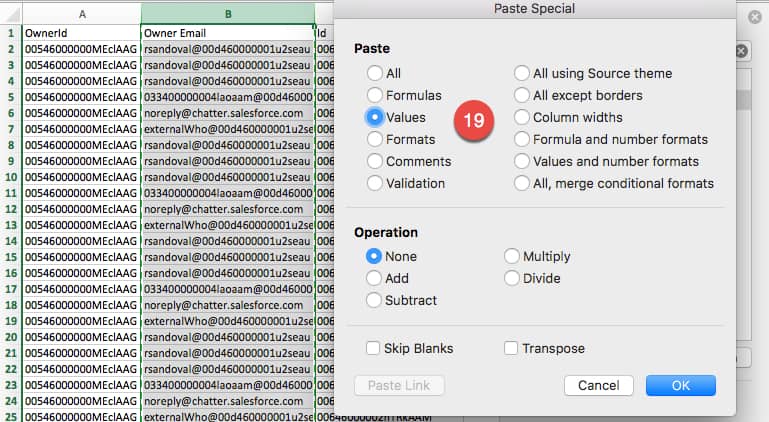
A problem in some .csv files you may encounter is a cell that displays the value you need in Salesforce, but what it actually contains is a formula. An example would be the Owner Email column you just created in Opportunities.csv. In import files, this can be a problem if a column created by VLOOKUP is meant to be the record’s name or ID, because you must remove the reference column and move the VLOOKUP column to the far left in order to do that. This would result in the error “#REF!” on all cells in this column.
To get around this, right-click the entire column, and copy it. Select the entire column again, right-click and select Paste Special, then select Values from the options. Now all your formula cells will contain only the values, making them ready for import into Salesforce.
Format Cells
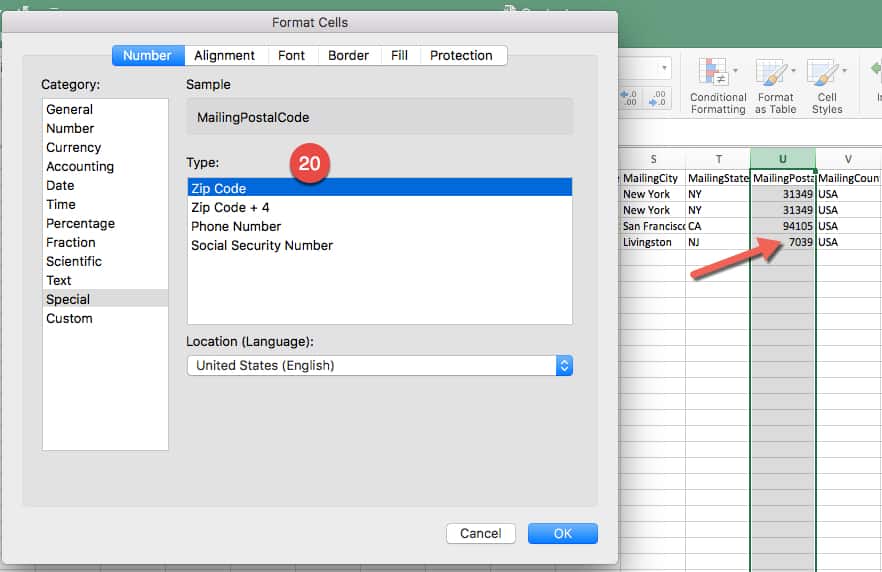
Use this function when you have data that is incomplete due to formatting errors, such as phone numbers or zip codes that start with 0. Zip codes beginning with 0 might appear in export files with only 4 digits, which could result in errors upon reimport. To fix these kinds of issues, select the column with problems, right-click it, and select Format Cells. Under the Number tab, select Special and click Zip Code - all data will be formatted accordingly. There are countless formatting options, so that you can get all your data consistent and ready to import into Salesforce.
Find & Replace
An essential spreadsheet tool, Find & Replace allows you to find all instances of a selected value or partial value, and replace them with another value or completely remove them. The latter is helpful when there are errant dashes or empty spaces mucking up your data. For example, if phone numbers in Contacts.csv have extra characters, like “.” “-” “()” or blank spaces surrounding some numbers, but you just need pure seven-digit phone numbers, this can be cleaned up.
- Highlight the Phone Number column, click the magnifying glass and click Replace. In the pop-up window, start by entering “(“ for Find What: and leave Replace with: blank. This step removes all instances of “(“ for your selected column.
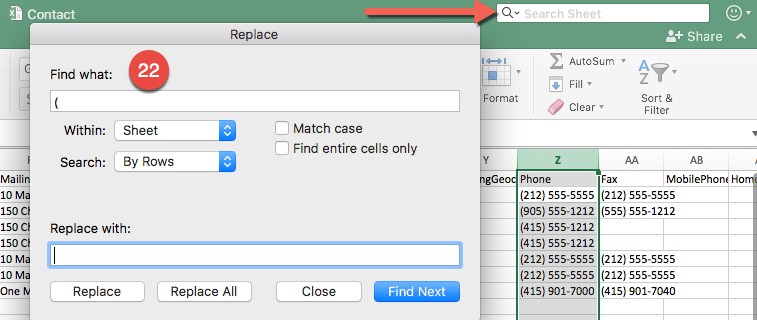
- Repeat with each unwanted element in the column, including single spaces and -. You now have clean, pure numeric phone numbers ready to import into Salesforce.
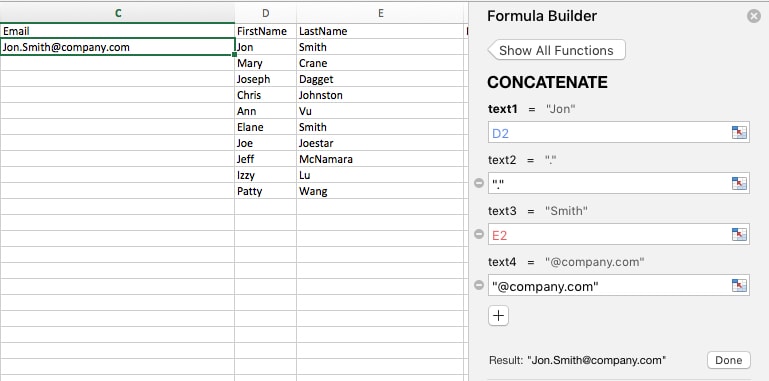
Concatenate
This function allows you to combine raw data from different columns into a single complete field ready for import into Salesforce. For example, you may have a standard email address format for all users, like “FirstName.Lastname@company.com.” With concatenate, you can combine different name columns into an email list.
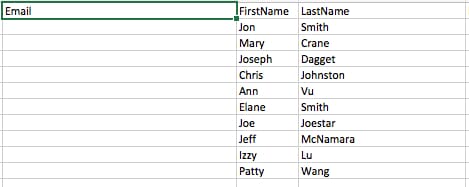
- Click the first cell in your blank Email column. Then click Function, and find Concatenate. Now you can build your formula, adding a text area for each individual element of the email address. Start with the FirstName column, then “.”, then the LastName column, then @company.com. Now you can apply this formula to the entire section to quickly give everyone their properly-formatted email address.
- Don’t forget to follow the steps in Paste Specials As Values to turn the formula cells into pure text values, before you import this data.
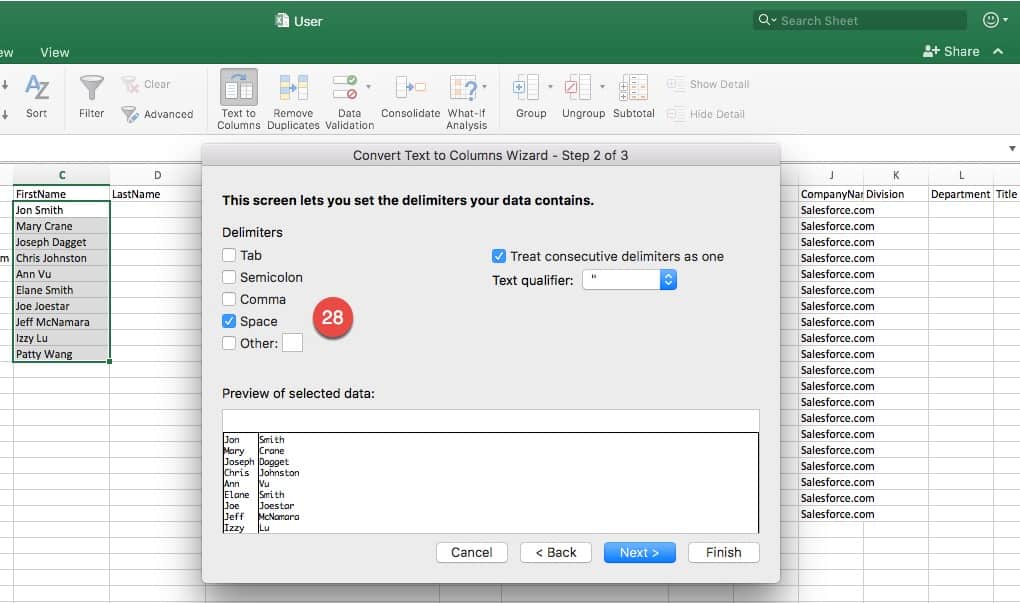
Text to Columns
Now let’s go the other way around. Using Text to Columns, we can separate data that is already put together, in this case a Name column, into multiple columns - one for First Name, one for Last Name.
- First, change the current Name column to First Name, and create an empty column to the right of it with the Last Name heading. Select all cells under the First Name column, then under the Data ribbon, click Text to Columns.

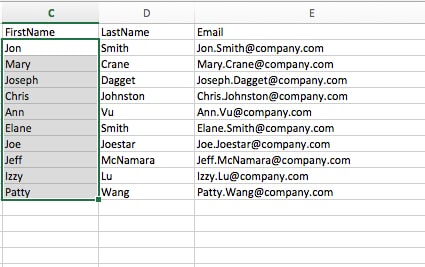
- In the Text to Columns window, choose I, and click the Next button. Click the Space delimiter, or others as appropriate for your data, and click the Next button. Finally, select the format you want for each column, in our case just Text. Click the Finish button.
- The selected column will be filled with the first name, and the adjacent column will consist of the last name values. You’ve just separated one column into multiple, ready to be imported as Salesforce fields.
Save as CSV
The final stage of preparing any Excel spreadsheet for import into Salesforce is making it into a .csv file. Only the sheet displayed in your workbook will turn into a .csv, not the entire workbook. This action also converts all formulas to values, and strips out formatting like bold or italics.
Click File, Save As, and select format CSV, and you’re ready for data import.
Loading
Now it’s time to learn how to bring .csv files into Salesforce Classic. For our example, we’ll use the built-in Data Import Wizard, which supports imports of 50,000 records or fewer at a time. If you have more than that you want to import at once, or need to write code to automate the process, Data Loader is the way to go.
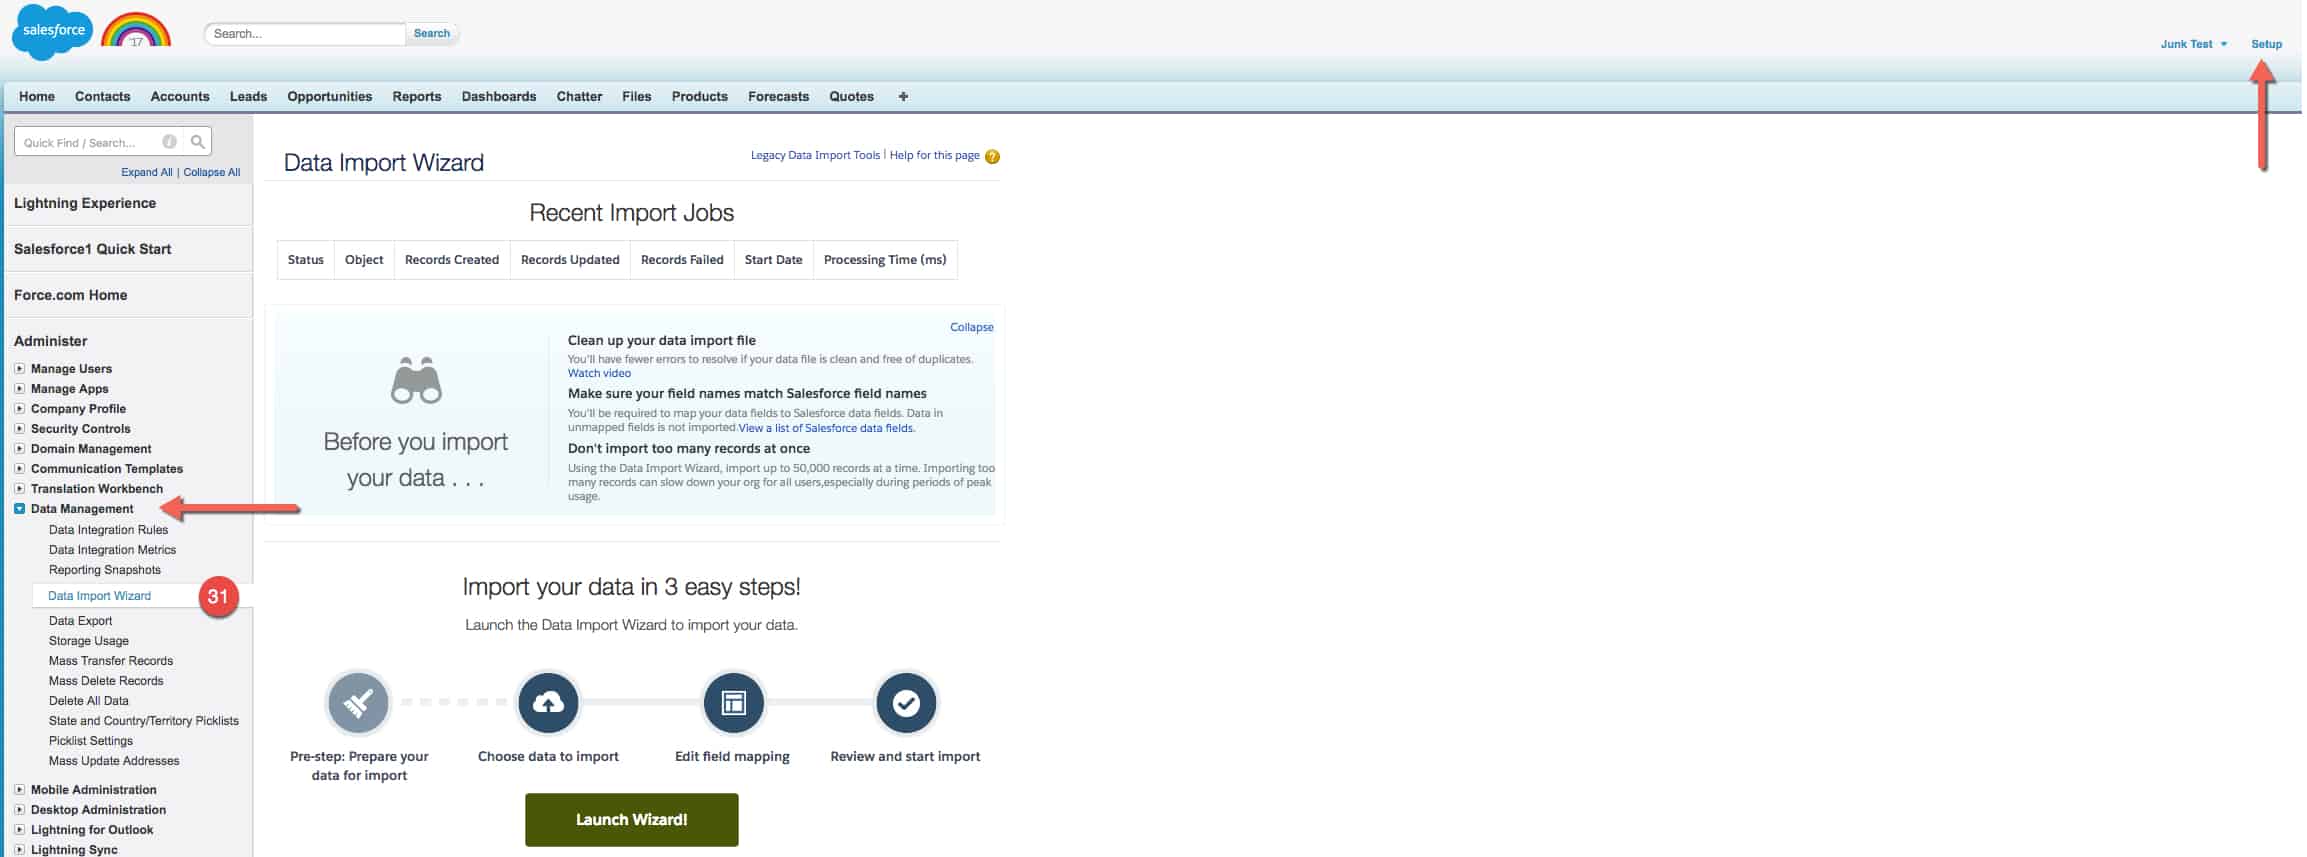
1. Click Setup in the top right corner, then open Data Management on the left rail and click Data Import Wizard. On this page, click the Launch Wizard button.
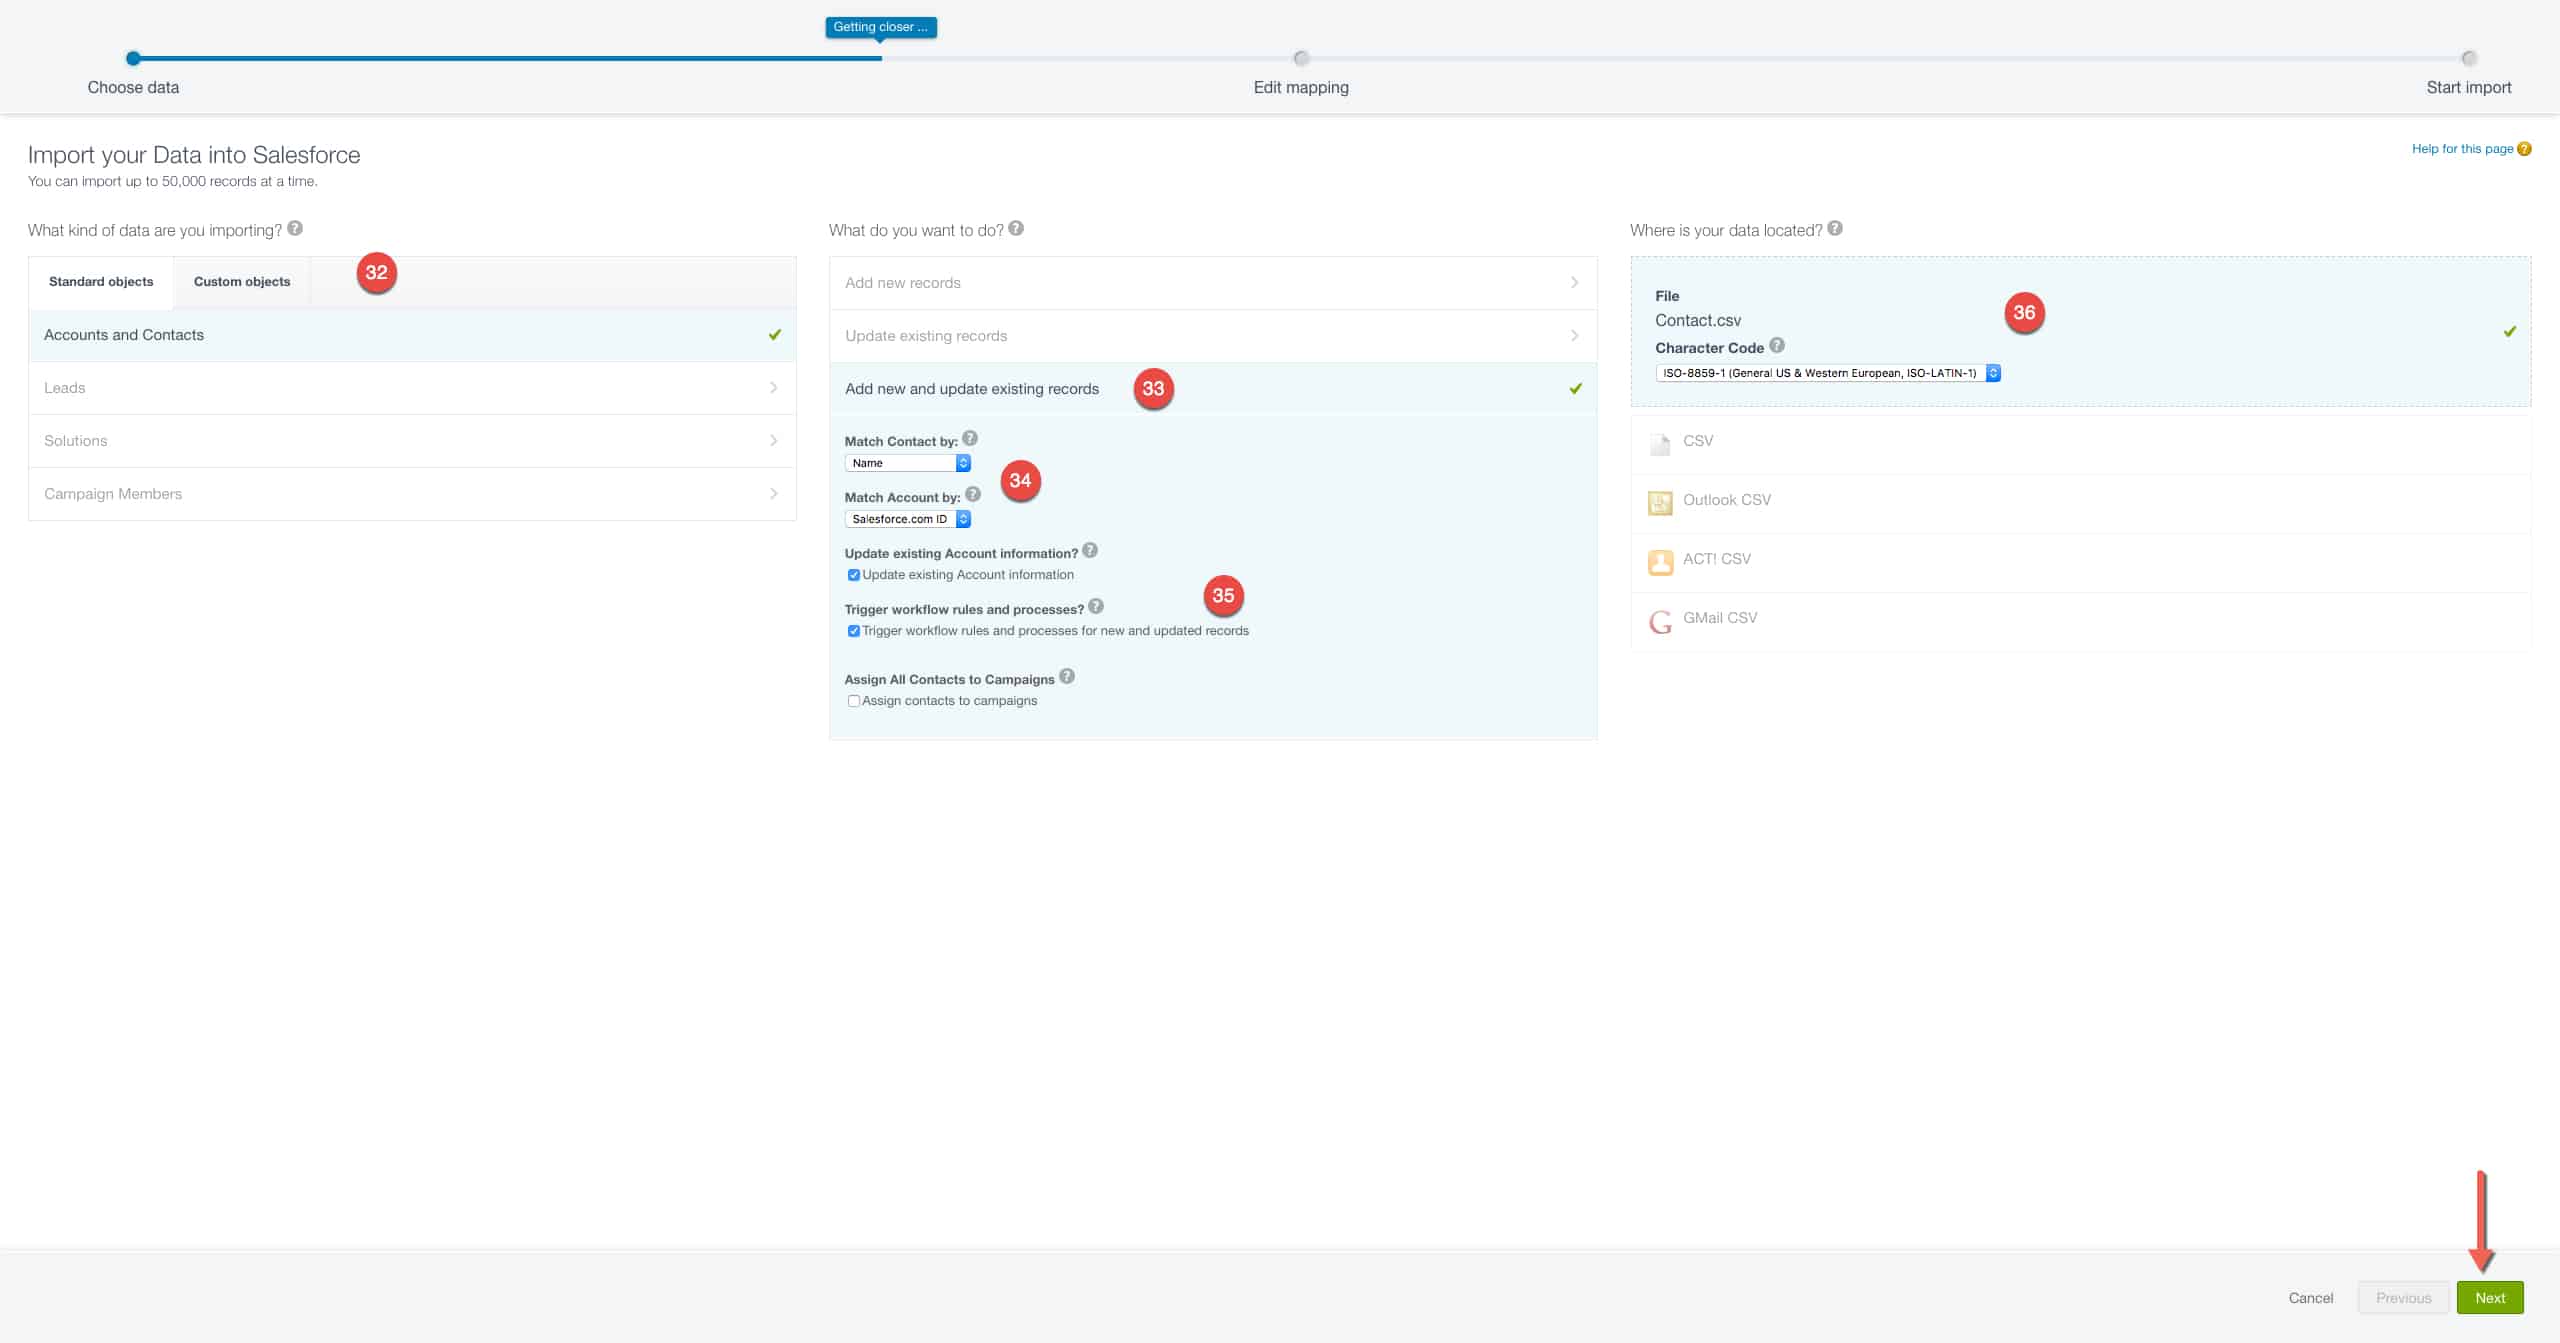
2. You are now in the most recent version of the Data Import Wizard. This is actually part of the updated Salesforce Lightning Experience UI, rather than Salesforce Classic, but that doesn’t affect what data it works with. Choose the data you want to import in the left-hand column (select Standard Objects for accounts, contacts, leads, or solutions, or select Custom Objects for anything else).
3. In the next column of the wizard, select whether you want to Add New Records, Update Existing Records, or do both at once. We’ll select the latter to cover the broadest use case.
4. Now you need to help Salesforce identify records, by selecting how to match records in Salesforce with records in your .csv file. Since we’ve selected Accounts and Contacts, we have to help match both of them. You can select to match them by Salesforce ID, Name, or Email, whichever of these you choose should be the leftmost column in your import file.
5. You’ll also see checkboxes on this form. One determines whether new information in your import file will overwrite existing Account information. Another determines whether new records will trigger workflow actions should they meet pre-set criteria. And another determines if imported contacts should be assigned to existing campaigns. Choose whatever is appropriate for the data you’re importing.
6. On the third column, drag and drop your .csv file. You can only import one file at a time, even if it has less than the 50,000 record limit. Now click Next.
7. The next page of the wizard helps you preview how your data is mapped. It presents all of your columns in a vertical list, showing which have successfully auto-mapped to existing Salesforce fields, and which have trouble due to syntax or not having an appropriate equivalent in Salesforce.
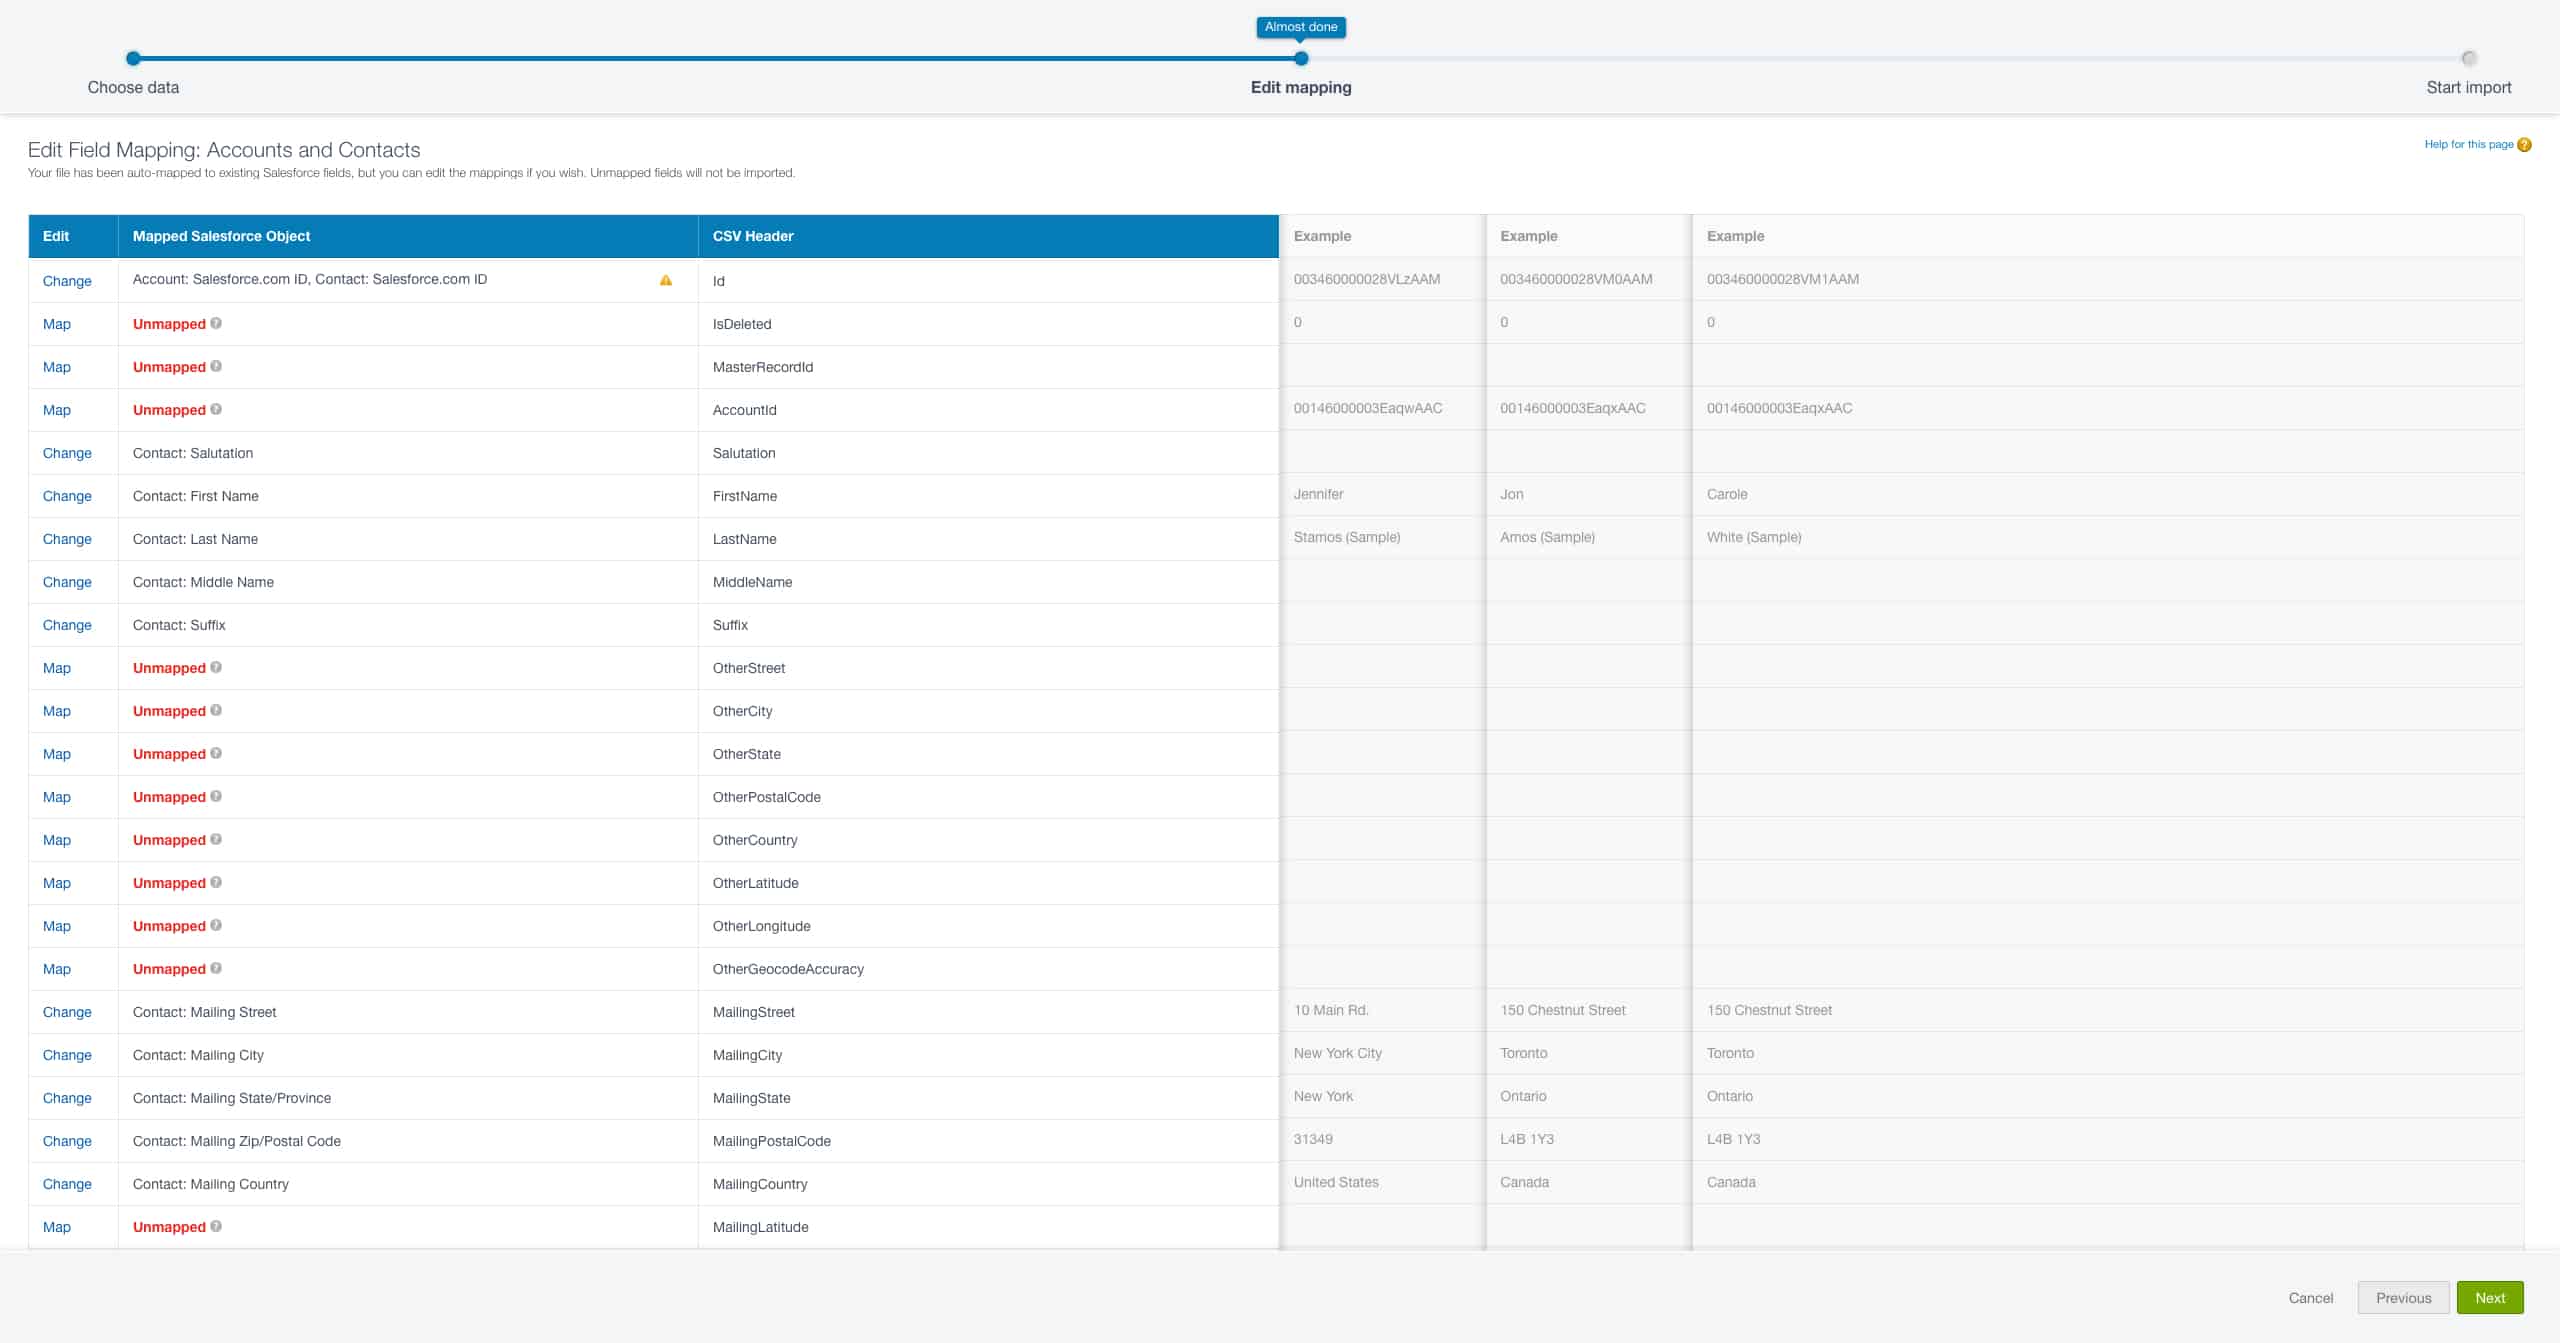
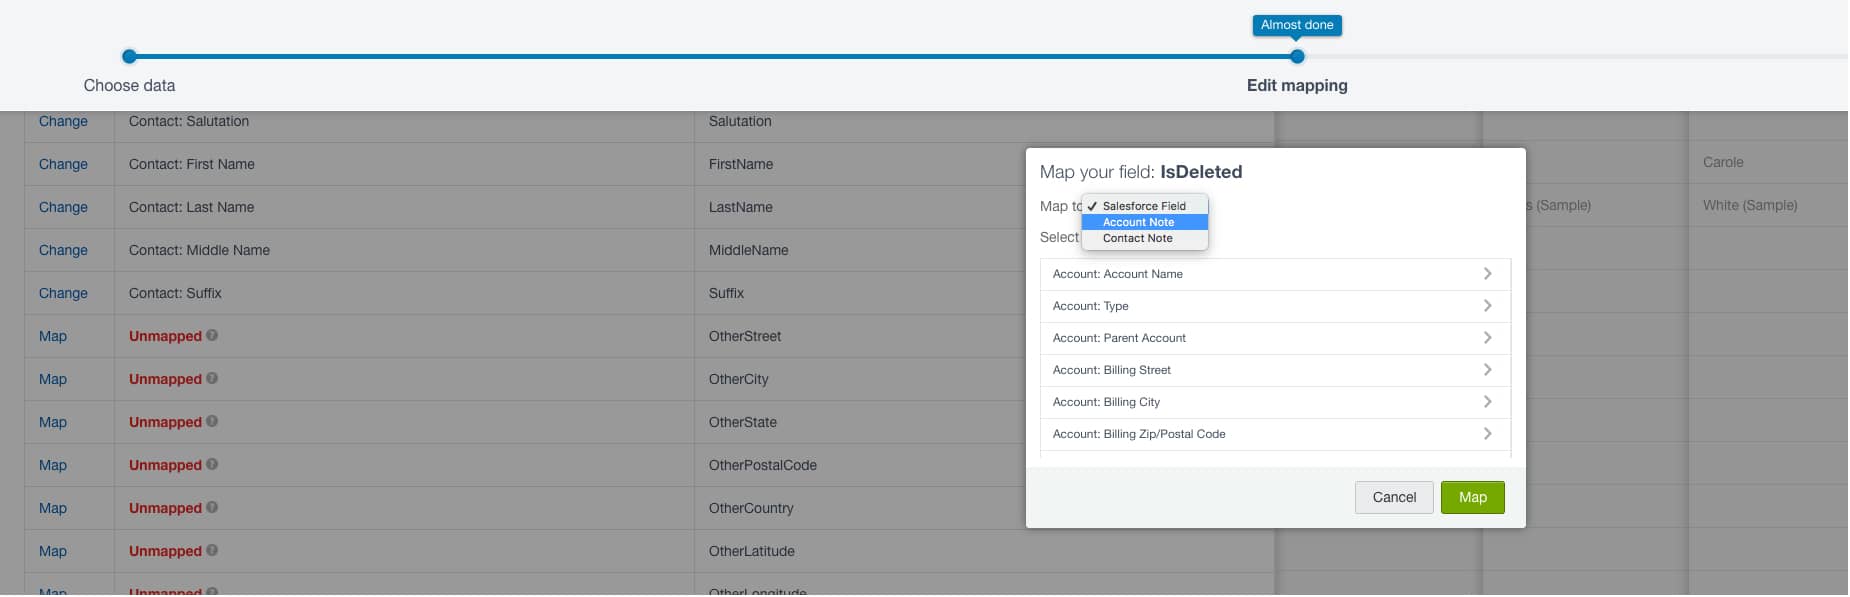
8. You need to deal with Unmapped data on a case-by-case basis. Click the Map button to choose where it goes. You can either select an existing Salesforce field, or slot it under a general Notes section for the record. It doesn’t import anything left unmapped.
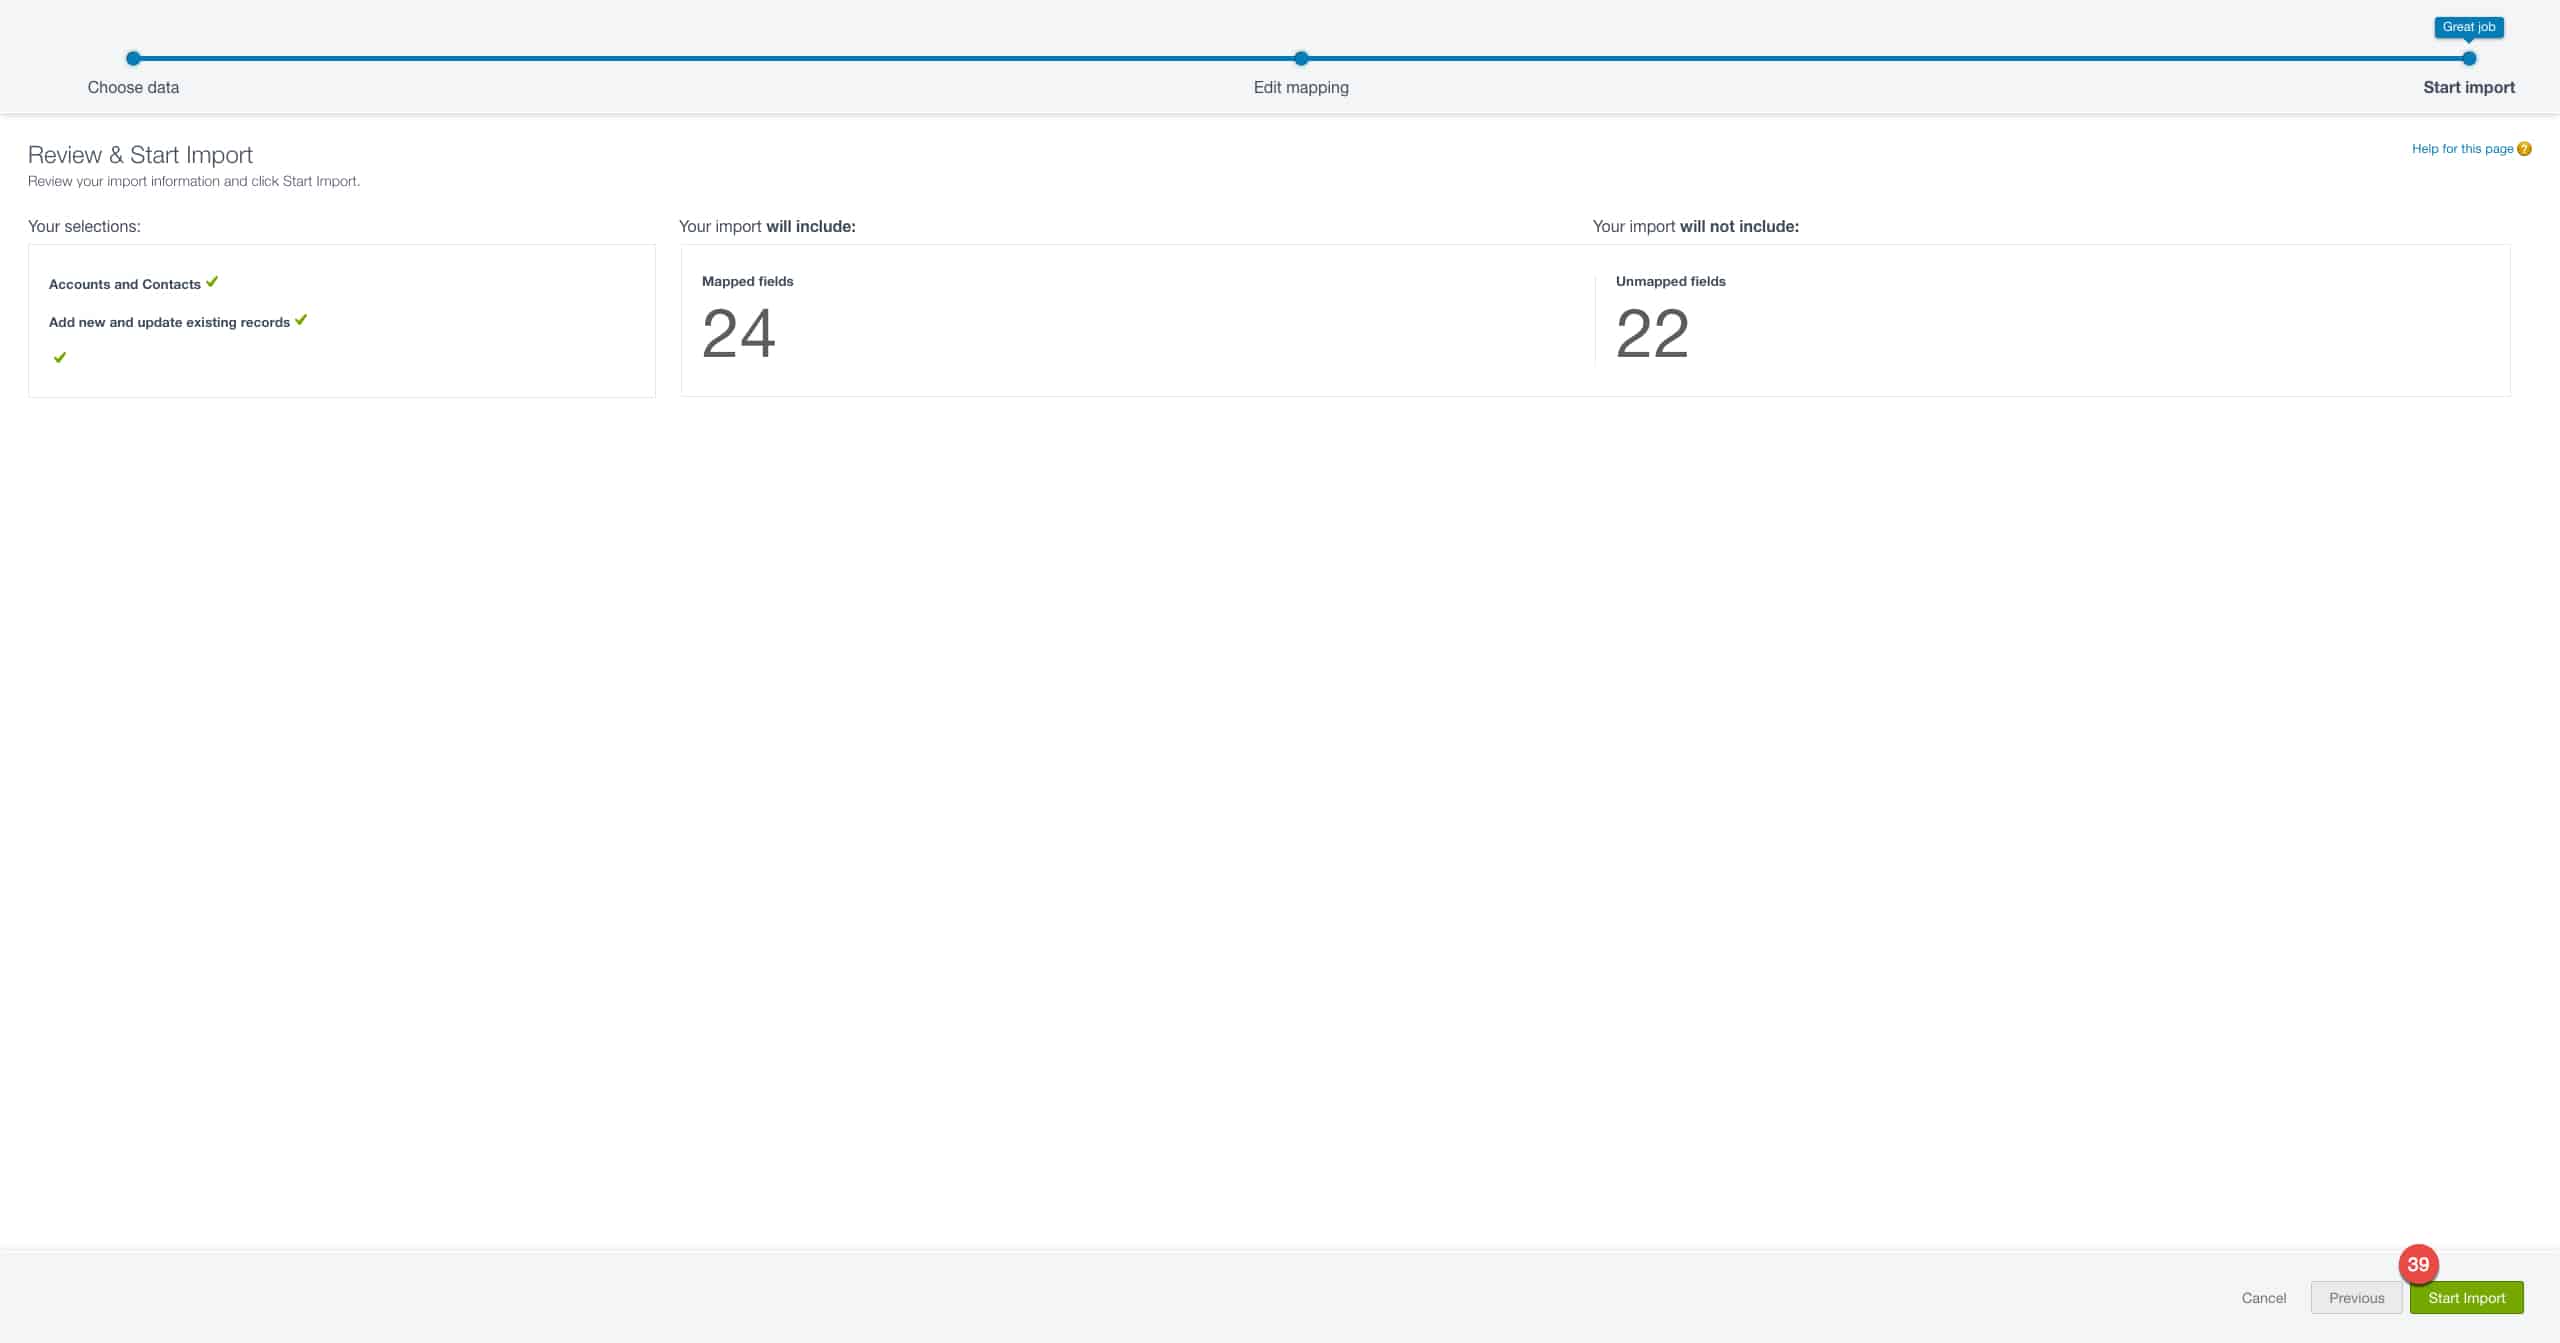
9. On the final page, you can review your import, see how many fields are mapped and are not, and then click Start Import. Review your data in Salesforce as necessary once it’s all loaded, and then you’re good to go.
You now know everything you need to know to export, clean, and import data using Salesforce Classic.
Extracting, Transforming, and Loading Data in Lightning Experience
Lightning Experience is the current look-and-feel for Salesforce, which is now standard and necessary for newer add-ons and updates. There is no functional difference between managing ETL functions with Lightning Experience. Salesforce Classic uses the Lightning Experience’s Data Import Wizard, manipulating exported data in Excel is the same regardless of which version you use, and the Data Export Wizard from Classic is couched in the Lightning Experience’s Data Export menus. If you can do one, you can do the other no problem.
How to Improve Data Management in Your Organization
It’s all well and good to know the basics of data management, but you don’t just want to be competent, you want to excel,There are a few boxes you should check off to improve data management in your organization.
Assess the Current Quality of Your Data
Through whatever means available, figure out if your data is reliable or not. You could use third-party ETL tools (covered below), or handle it manually using Excel as described in the previous section.
Determine Success Metrics and Build Dashboards
First, determine what success looks like, and then build a dashboard that provides an at-a-glance understanding for any stakeholder in your organization. Here are a few ideas for dashboard metrics that you’ll want to have, all available in Salesforce.
For your sales department:
- Win/loss rates
- Forecast by sales rep
- Activities by sales rep
For your marketing department:
- Top revenue earning campaigns
- Leads by campaign
- Campaign conversion funnel
For your customer service department:
- Cases by source
- Average time to case resolution
- Case volume trends
Establish a Backup and Archiving Plan
No amount of data scrubbing can go off without a hitch, so establish a standing process for archiving data. You’re already exporting Salesforce records at least once a month, so store them in secure servers with redundant backups. Make sure the records are clean for immediate loading into Salesforce, should the worst happen. Relying on Salesforce’s proprietary data recovery tool could cost you $10,000 or more.
Document Everything End-to-End
Whether you’re a lone-wolf Salesforce admin or one of a vast enterprise team, it’s important to document not only what processes ought to be, but the real world cases that occur. This way, organizations can identify what went wrong to fix problems, follow up after disasters are resolved, and teach others during onboarding or succession.
Begin Integration with Other Services
Salesforce provides a lot of powerful tools for entire organizations, but they don’t come cheap. Unless you’re working with an unlimited budget, it doesn’t hurt to explore third party integrations for every possible function, from project management to data visualization and IT. Putting your data to work for the whole company is true data mastery.
First-Party Data Management Assistance
Salesforce has a number of “Accelerators” available for an extra fee that make data management a snap without needing to leave their system. They involve using certified Salesforce specialists to guide you for a month, and have prerequisites like sponsorship from your executives and the presence of IT stakeholders. Here are three of the most prominent options:
Customer Master Data Harmonization Accelerator:
This extension is for enterprise customers who want to improve IT’s productivity and service quality while reducing time spent validating data. It works for cloud multi-domain management, too. It starts by assessing all your data sources for customer information, identifying the original records and ones referencing them, and then defining which should survive. After that, it evaluates all these records and provides recommendations for what their target state should be, and how to improve your process.
Data.com Data Quality Assessment Accelerator:
This accelerator helps assess data quality and provide recommendations to improve data quality. Its prerequisites include being an active subscriber to “Data.com Clean” (also for additional fees), having less than three million records, and less than 30 percent of those being international. It works by first reviewing your account, contact, and lead creation process, then identifying the people entering this data and developing quantifiable success criteria for them. Next, it analyzes the data quality report, and provides steps for understanding your data’s current health and for immediately improving it.
Prevent Duplicate Records Accelerator:
This program requires an organization to have no data migration or custom code required, and is intended to help mid-sized organizations to improve data quality and reduce clerical work by stopping all duplicate records. It does this by reviewing your lead, account, and contact creation process, identifying the people who handle data entry, and developing a success metric for their future work. Then it analyzes its reports and creates new duplicate management rules, configures them for your organization, and disseminates the process up and down the chain.
Third-Party Data Management Apps
In addition to Salesforce’s proprietary accelerator programs, there are more traditional do-it-yourself data management applications available through the company’s famous AppExchange marketplace. Some of these are free, some are paid, and they all help to make ETL tasks easier and more automatic. Explore some of them here:
Apsona
Company: Apsona
Price: $450 for up to three users per year
This app allows for quick export and import with automatic lookup across objects, meaning you don’t have to use VLOOKUP anymore. It allows for mass updates and upserts of filtered data with any number of records.
Backupify
Company: Datto
Price: Starts at $199 per company per month
This app automatically backs up your entire Salesforce dataset daily. This covers you for metadata, attachments, Chatter messages, and even custom objects. It maintains most any security protocol while doing so, including HIPAA.
Case Merge Premium
Company: Internet Creations
Price: $720 per org per year, for 10 users
This app helps you merge Case objects with their related records. It automatically re-associates Child objects like attachments and comments for duplicate Parent cases.
Cloudingo
Company: Symphonic Source
Price: Starts at $1,096 per company per year
This app helps you “effortlessly eliminate and manage duplicate data,” by auto-merging and deduping import files with their all-in-one dashboard. It has audit trails so you can track all the changes, and address validation built in as well.
Dataloader.io
Company: MuleSoft
Price: Free
This app helps users securely import, export, and remove unlimited data, quickly. You can pull out related objects simultaneously, so you don’t have to re-associate them once in Excel. You can schedule imports and exports down to an hourly basis, too.
DemandTools
Company: CRMfusion Inc.
Price: Custom
This enterprise-ready app helps enable higher data quality, with standardization, validation, and deduplication modules to improve admin productivity. Mass load and manipulation from any AppExchange program, with side-by-side comparison of external data to Salesforce data. It has built in address verification, too.
DupeBlocker 3
Company: CRMfusion Inc.
Price: $5,000 per company per year
This app prevents duplicate creation in real time on Force.com, including from Web to Lead forms. It supports custom objects, opportunities, and has a Bypass and Insert option.
DupeCatcher
Company: Symphonic Source
Price: Free
This app lets users identify, block, and dedupe standard objects in records at the point of data entry in real time. It can run in the background to identify duplicates before reporting on the data to users. It works with custom fields, too.
EBX5
Company: Orchestra Networks
Price: Custom
This is not available on the AppExchange, but is a whole platform for MDM (multi-domain management) within organizations with multiple Salesforce instances. It enforces data quality at the point of entry, and helps create hierarchy between the instances to limit certain data to certain types of roles. It is a complete data governance solution for complex organizations.
Informatica
Company: Datto
Price: Custom
This platform helps organizations optimize Salesforce clouds, consolidate data from multiple instances, differentiate cloud structures like Oracle and SAP, and improve sandbox management. It assists with duplicate data, and provides analysis of hierarchies across your enterprise.
Jitterbit
Company: Jitterbit, Inc.
Price: Free
This data migration app helps users automatically import and export data between flat files, databases, and Salesforce. It uses drag-and-drop mapping, with no coding required, and allows for scheduling, automation, and monitoring.
PeopleImport
Company: CRMfusion Inc.
Price: Custom
This app imports external Lead and Contact lists into Salesforce, without dupes at the point of entry. Not only that, but it also creates new Events, Tasks, and Campaign links for the original person record that may have been associated with duplicate people records.
RingLead Data Cleanse
Company: RingLead
Price: Custom
This simple app helps beginners spot and merge duplicates in Salesforce with no training. It doesn’t promise to be perfect, just fast and easy, removing 95 percent of duplicates with no effort.
RingLead Duplicate Solutions
Company: RingLead
Price: Custom
This “complete data quality suite” removes duplicates and prevents new ones from forming through web forms, manual entry, and list imports alike. It merges Lead, Contact, and Account dupes, too.
A More Efficient Way to Manage Data Using the Smartsheet for Salesforce Connector
Empower your people to go above and beyond with a flexible platform designed to match the needs of your team — and adapt as those needs change.
The Smartsheet platform makes it easy to plan, capture, manage, and report on work from anywhere, helping your team be more effective and get more done. Report on key metrics and get real-time visibility into work as it happens with roll-up reports, dashboards, and automated workflows built to keep your team connected and informed.
When teams have clarity into the work getting done, there’s no telling how much more they can accomplish in the same amount of time. Try Smartsheet for free, today.