What Is the Critical Path Method (CPM)?
CPM is a step-by-step project management technique to identify activities on the critical path. The approach breaks a project into work tasks, displays them in a flow chart, and then calculates the project duration based on estimated time frames for each. It identifies tasks that are critical, time-wise.
The text, A Guide to the Project Management Body of Knowledge (PMBOK® Guide), an internationally recognized collection of processes and knowledge areas accepted as best practice for the project management profession, defines the critical path as “the sequence of scheduled activities that determines the duration of the project.” It is the longest sequence of tasks in a project plan that must be completed on time in order for the project to meet its deadline. If there is a delay in any task on the critical path, then your whole project will be delayed. Although many projects have only one critical path, some projects may have multiple critical paths.

Dr. Larry Bennett, a civil engineer, project manager, and author of four books, including a guide on critical path written in 1978 and titled, “Critical Path Precedence Networks,” explains that the critical path method helps manage projects in two different ways: “It produces a planned schedule to guide the project team, and it forms the basis for tracking project schedule performance by comparing actual with planned task progress.”
The Critical Path Method According to Two Experts
We asked two critical path users for the best way to explain it. Here's what they had to say:

"The critical path is just a fancy way of saying 'How long does each task take before you can finish the project? Use this information to figure out the project's end date.' If a task takes longer than anticipated, the end date is pushed back. There are some tasks that don't immediately impact the project's end date that can be pushed back for some time. There are a whole bunch of calculations that go into figuring out what-ifs, forecasting, and scheduling, but that's where project management software comes in and makes everyone's lives easier. "
Rachel Burger, Capterra Construction
Twitter: @CapterraBuilder

"Some of the activities must happen in parallel. For example, if you tried to make a fried breakfast by doing one task at a time, and one after the other, things would go wrong. The plates need to be warming while other activities are going on. The toast needs to be toasting while the sausages are frying, and at the same time the bacon and sausages are under the grill. The eggs need to be fried last. A critical path analysis is a diagrammatical representation of what needs to be done and when. Timescales and costs can be applied to each activity and resource."
Terence Jackson, Ph.D and CEO/Managing Partner at WEpiphany LL
“To learn about combining CPM with PERT for more comprehensive scheduling option, see this guide to combining PERT and CPM.”
Project management that adapts to your needs
Work with flexibility and security—from small projects to large-scale processes and entire portfolios.
Smartsheet helps you break down projects into tasks, track progress, and manage resources, budgets, and workflows—all in one unified platform for seamless collaboration and delivery.
Background & History of Critical Path

Dr. Bennett is no stranger to critical path. He has applied critical path scheduling to a wide variety of projects since 1965. He has also spent 29 years on the engineering faculty at the University of Alaska Fairbanks, teaching undergraduate and graduate courses in technical management, including project management and scheduling.
In addition to his books, he has written more than 50 professional papers and articles on topics ranging from construction management to network techniques for project scheduling.
Dr. Bennett points out that critical path has come a long way. In fact, the original critical path method was done by hand. As Dr. Bennett describes it:
“The original critical path method used arrows to represent tasks and tied them together by connecting their beginning and end at nodes, so that proper sequencing was developed. This approach persisted for a decade, when a different method, with the same results, became popular. Professor John W. Fondahl, a professor of construction management at Stanford University, proposed in a 1961 paper that each task be represented by a node – square, circle, or oval – and the nodes be tied together with lines or arrows representing the sequence between tasks. This approach, referred to as the activity-on-node (AON) or precedence method, caught on rapidly and has supplanted the earlier activity-on-arrow (AOA) method in nearly all uses.”
How the Critical Path Method Was Created
Using the critical path method to schedule projects began in the late 1950s, with two simultaneous, unrelated projects. The US Navy’s Fleet Ballistic Missile (Polaris) Program was behind schedule and needed help resolving the problem. The suggested solution was to divide the project into several thousand tasks, represent each task by an arrow, connect the arrows in proper sequence, estimate the duration of each task, and calculate the project duration and the degree of schedule criticality of each task.
At about the same time, the EI DuPont de Nemours Company, an American chemical company, was experiencing delays in its plant turnarounds, a project to rearrange production facilities for different products. They, too, needed help and the proposed answer was similar to that of the Polaris Program.
The developers of the Polaris Program’s approach called their solution the Project Evaluation and Review Technique (PERT), while the DuPont method was called Critical Path Method (CPM). Although these methods are similar, they used different techniques for estimating task duration.
The PERT method used three different time estimations for each task duration and calculated the probability of project completion by any given time. The DuPont approach used one time duration for each task; it was concerned not only with project completion time, but also with analyzing the extra costs that would accrue if the project duration were decreased.
Dr. Bennett says that today, “the terms PERT and CPM are used interchangeably, both meaning any network scheduling method and PERT having lost its inclusion of three time estimates and probabilities.”
The Everyday Advantages of Critical Path
Although it originated in the late 1950s, critical path is still incredibly important to project managers today. It provides a visual representation of project activities, clearly presents the time required to complete tasks, and tracks activities so you don’t fall behind. The critical path method also reduces uncertainty because you must calculate the shortest and longest time of completion of each activity. This forces you to consider unexpected factors that may impact your tasks and reduces the likelihood that an unexpected surprise will occur during your project.
According to Dr. Bennett, the critical path method also has three main benefits for project managers:
- Identifies the Most Important Tasks: First, it clearly identifies the tasks that you will have to closely manage. If any of the tasks on the critical path take more time than their estimated durations, start later than planned, or finish later than planned, then your whole project will be affected.
- Helps Reduce Timelines: Secondly, “if, after the initial analysis predicts a completion time, there is interest in completing the project in a shorter time frame, it is clear which task or tasks are candidates for duration reduction,” said Dr. Bennett. When the results from a critical path method are displayed as a bar chart, like a Gantt chart, it is easy to see where the tasks fall in the overall timeframe. You can visualize the critical path activities (they are usually highlighted), as well as task durations and their sequences. This provides a new level of insight into your project’s timeline, giving you more understanding about which task durations you can modify, and which must stay the same.
- Compares Planned with Actual: And lastly, Dr. Bennett says the critical path method can also be used to compare planned progress with actual progress. “As the project proceeds, the baseline schedule developed from the initial critical path analysis can be used to track schedule progress. Throughout a project, a manager can identify tasks that have already been completed, the predicted remaining durations for in-progress tasks, and any planned changes to future task sequences and durations. The result will be an updated schedule, which, when displayed against the original baseline, will provide a visual means of comparing planned with actual progress.”
Experts Share the #1 Advantage of Critical Path

"For me, the biggest advantage of the critical path method is that it makes risk assessment easy. If I’ve got dependencies laid out and plans change, it’s very easy to say, 'Because you missed that deadline, the next deliverable is going to be late by X days, and that puts us beyond our plan by Y days.' Simple. That said, I don’t think you have to fully adopt a method like critical path to do this on projects. It’s best to adopt the parts of any method that work for your project and your team—being adaptable as a PM will help you find true success."
Brett Harned, digital project management consultant, writer, speaker, and community builder.
Twitter: @BrettHarned

"Two issues that continue to plague projects are the competing priorities of cross functional team members and distractions from 'noise' on the project. With so much activity, the critical path enables a clear, pointed view of what must happen next and 'who is on the clock' for meeting project commitments."
Robert Kelly, co-founder of @PMChat and managing partner of Kelly Solutions, a project management firm.
Twitter: @rkelly976

"I especially like the 'unintended benefits' critical path (CP) analysis brings, including discoveries of hidden dependencies and resource conflicts. CP analysis also often leads to better prioritization and redistribution of team-members. And CP can expose the needs / opportunities for inserting lags / leads to further improve the schedule."
Jeff Furman, PMP, author of "The Project Management Answer Book"
Twitter: @PMAnswerBook

"The critical path method brings an important level of clarity to your project. It is a visual depiction of the fragility of the balance of your constraints: If one of the activities on the path gets delayed, your project gets delayed. It is also a great way to determine where to invest resources if the project has fallen behind schedule."
Cesar Abeid, host of the Project Management for the Masses Podcast
Key Steps in the Critical Path Method
There are six steps in the critical path method:
Step 1: Specify Each Activity
Using the work breakdown structure, you need to identify each activity (or task) involved in the project. This activity specification list should only include higher-level activities. When detailed activities are used, the critical path analysis may become too complex to manage and maintain.
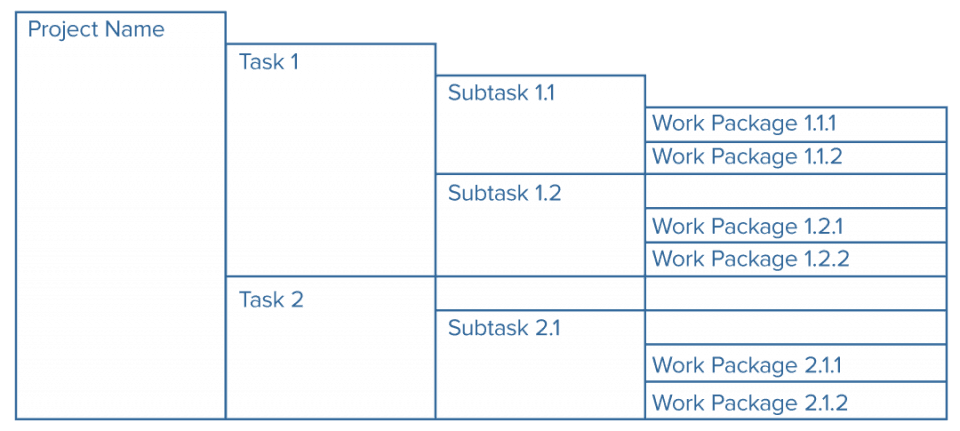
A work breakdown structure breaks down projects into manageable sections.
The first step is to identify the main deliverables of a project. Then you can start breaking down the high-level activities into smaller chunks of work.
You can choose how to display your work breakdown structure. Some people use a tree structure, while others use lists or tables. An outline is one of the easiest ways to represent a work breakdown structure.
Step 2: Establish Dependencies (Activity Sequence)
Some activities will depend on the completion of others. Listing the immediate predecessors of each activity will help you identify the correct order. To correctly identify activities and their precedence, ask yourself these three questions for each activity on your list from step one:
- Which task should take place before this task happens?
- Which tasks should be finished at the same time as this task?
- Which tasks should happen right after this task?
Step 3: Draw the Network Diagram
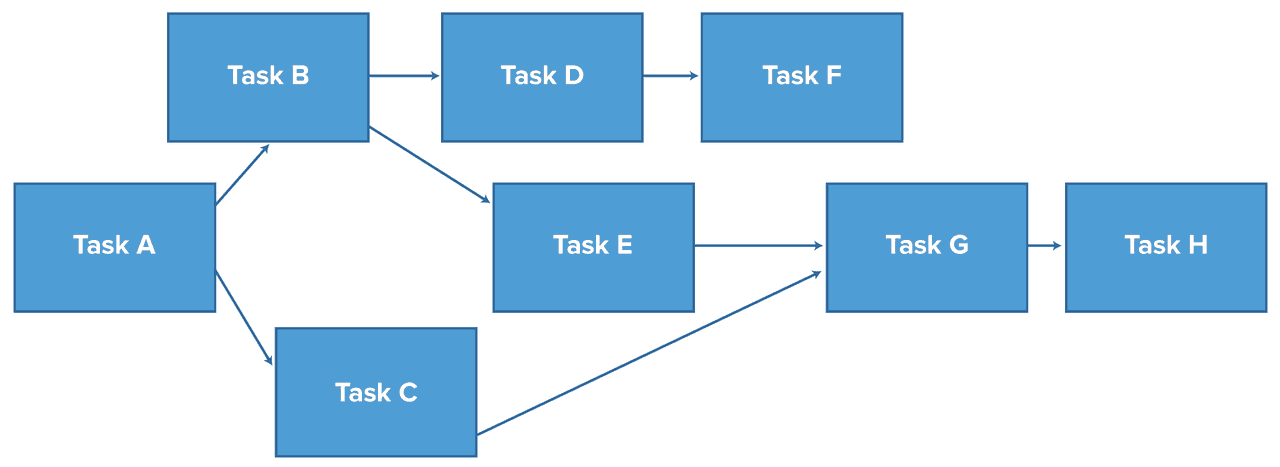
Once you have identified the activities and their dependencies, you can draw the critical path analysis chart (CPA), known as the network diagram. The network diagram is a visual representation of the order of your activities based on dependencies.
This critical path diagram used to be drawn by-hand, but there are now software programs that can create this diagram for you.
Step 4: Estimate Activity Completion Time
Using past experience or the knowledge of an experienced team member, you must now estimate the time required to complete each activity. If you are managing a smaller project, you will most likely estimate time in days. If you are working with a complex project, you may have to measure time in weeks.
If you don’t feel comfortable using your best-guess estimates, you can use the 3-point estimation method, which is designed to put more weight on the most realistic timeframe.
In three-point estimation, you must come up with three time estimates for every task, based on prior experience or best guesses. The estimation method is presented in formulas in order to calculate the time duration more accurately.
a = the best-case estimate
m = the most likely estimate
b = the worst-case estimate
These three values identify what happens in an optimal state, what is the most likely, and what happens in the worst case scenario.
Once you’ve identified these values, you can use them in two different formulas. The first is used to find the Weighted Average, which puts more weight on the “Most Likely” value. The formula is as below. E stands for Estimate, and the 4 and 6 represent the standard method to place more weight on the most realistic value.
E = (a + 4m + b) / 6
The second way of using these values is known as Triangular Distribution. The main difference is that this method doesn’t put more weight on the “Most Likely” value. The formula is as below. E stands for Estimate, and the 3 represents the standard method.
E = (a + m + b)/3
Step 5: Identify the Critical Path
There are two ways you can now identify the critical path. You can eyeball your network diagram and simply identify the longest path throughout the network -- the longest sequence of activities on the path. Be sure to look for the longest path in terms of longest duration in days, not the path with the most boxes or nodes.
You can also identify critical activities with the Forward Pass/Backward Pass technique, identifying the earliest start and finish times, and the latest start and finish times for each activity.
If you have multiple critical paths, you will run into network sensitivity. A project schedule is considered sensitive if the critical path is likely to change once the project begins. The more critical paths in a project, the higher the probability of a change in schedule.
Step 6: Update the Critical Path Diagram to Show Progress
As the project progresses, you will learn the actual activity completion times. The network diagram can then be updated to include this information (rather than continuing to use estimations).
By updating the network diagram as new information emerges, you may recalculate a different critical path. You will also have a more realistic view of the project completion due date and will be able to tell if you are on track or falling behind.
Other Scenarios in the Critical Path Method
One of the biggest benefits of the critical path method is identifying the crucial tasks that, if missed, will impact your project’s completion date. It will also provide visibility into your project’s status, allowing you to see if you are on track.
Shortening Your Schedule
As you’re going through the critical path method, you may find that you want to intentionally shorten the duration of your project or that you need to compress your project schedule in order to meet the deadline. There are two ways to do this: fast tracking or crashing.
Fast Tracking
In fast tracking, you look at the critical path and decide which activities can be done parallel to each other, to move the project along faster. You only need to review the activities on the critical path because all the other activities have float (if you shorten the duration of those activities, you’re only giving them more float).
While fast tracking reduces your project timeframe, it also involves risk because you are performing parallel activities that were originally planned to be performed in sequence.
Crash Duration
Crash duration, or crashing, refers to the shortest possible time for which an activity can be scheduled. This happens by adding more resources to completing that certain activity. However, crashing the critical path results in lower quality of work because the goal in crash duration is speed.
Managing Resource Constraints
As you manage your project, you may also run into resource constraint issues that could change the critical path. If you try to schedule certain activities at the same time, you may find that you need more people than are available. As a result, those activities will need to be rescheduled. Resource leveling is the process of resolving these conflicts.
Resource Leveling and Expansion
With resource leveling, you can resolve conflicts over allocating resources. A resource-leveled schedule may include delays due from resource bottlenecks (a resource being unavailable at the necessary time).
Resource leveling may also result in a previously shorter path becoming the longest or most “resource critical” path. This happens when the tasks on the critical path are affected by resource constraints.
A similar concept is called the critical chain, which protects activity and project durations from unexpected delays due to resource constraints.
Assessing the Final Project
These scenarios demonstrate all the unexpected changes that can occur when managing a project, and how they can affect the critical path. While things are always subject to change, the good news is that you can measure the variance from your original project schedule and track how it impacted your final project.
Flexibility and Assessing Delays
A schedule created from the critical path method naturally involves a lot of fluctuation because you have to use best-guess estimates to calculate time. If one mistake is made in activity completion time, your whole critical path schedule could change. Or, you may need to purposefully delay project activities due to resource constraints.
Sorting out these delays and determining what caused them can help you avoid similar issues in the future. An important part of your post-project plan is the As Built Critical Path, which analyzes the specific causes and impacts of changes between the planned schedule and actual schedule implemented. The As-Built Critical Path is a schedule that shows the dates that the activities actually occurred and allocates time by determining the responsibility for the delays on the critical path.
Critical Path Software
When the critical path method was first developed, you had to identify the critical path by hand, drawing the network diagram with “nodes” to present the stages of a project and connecting the nodes with arrows or “arcs.”
However, drawing nodes, tables, and arrows can be a time-consuming, difficult task, especially when things are constantly changing at the beginning of a project.
Rather than relying on hand-draw diagrams, there are a number of project management software programs available today that will do the work for you and identify the critical path with the click of a button.
Identify the Critical Path in Seconds with Smartsheet
Smartsheet, a work management and collaboration tool in a spreadsheet layout, offers a pre-formatted Gantt chart template to make it even easier to find the critical path.
With this pre-made Gantt chart template, complete with sections, sub-tasks, and sub-sub-tasks already formatted, all you need to do is enter your own project planning information. A Gantt chart will automatically be made for you, and with the click of a button, you can identify the critical path on the Gantt chart.
Here’s how to find the critical path in Smartsheet, using a Gantt chart template:
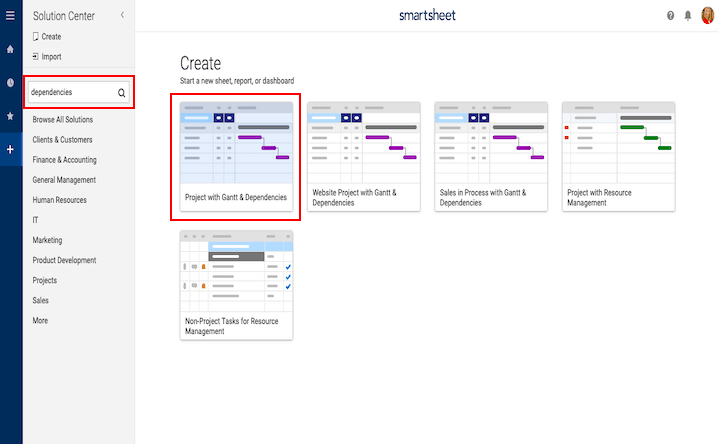
1. Choose a Gantt Chart Template
- Go to Smartsheet.com and login to your account (or start a free 30 day trial).
- From the Home screen, click Create New and choose Browse Templates.
- Type “dependencies” in the Search Templates box and click the magnifying glass icon.
- Select the Basic Project with Gantt & Dependencies and click on the blue Use Template in the upper-right corner.
- Name your template, choose where to save it, and click the OK button.
2. List Your Task Information
A pre-made, formatted template will open with sample content filled in for reference. This section is where you add your activities, or tasks, from your work breakdown structure. This is also where you can show the hierarchy, or relationship, between tasks.
The yellow cells at the top are there simply for instructional reference. To delete them, right-click on each yellow box and select Delete Row.
- Add your tasks under the Task Name column.
- Use the cells named Section 1, Section 2, and Section 3 to establish hierarchy (for more information on hierarchies, click here).
- If you need to delete a row, right-click on the cell in the row you’d like to delete and select Delete Row.
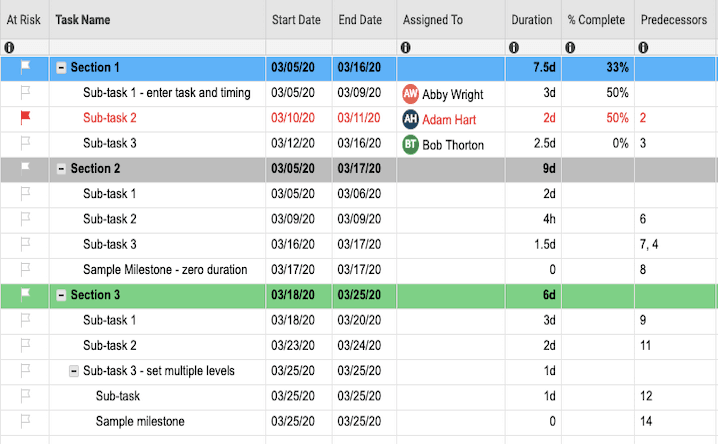
On the left side of each row, you can attach files directly to a task or start comments with a colleague about a task, adding more context to your project.
3. Provide Start and End Dates
Add start and end dates for each task. If you click and drag either end of a green task bar on the right in the Gantt view, Smartsheet will automatically change the matching dates in the task table.
- Select a cell in the Start Date or End Date column.
- Click on the calendar icon and choose a date.
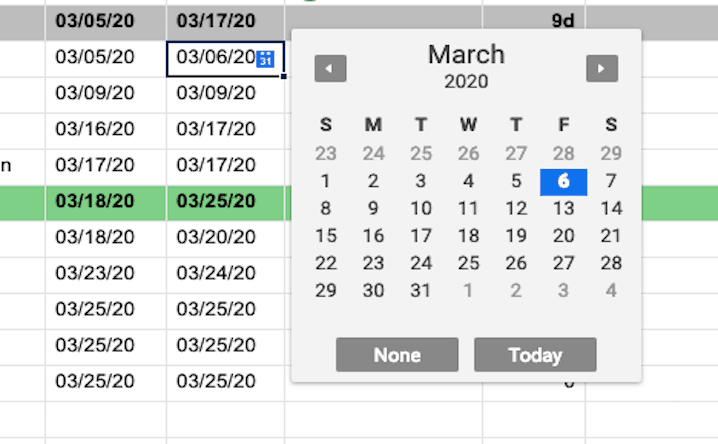
You can also manually enter a date in the cell. Smartsheet will automatically calculate the duration of each task for you.
4. Add % Complete and Assigned To Information
The % Complete and Assigned To columns provide more context around your project. In the Gantt view on the right side, you can quickly see how much of a task has been completed by the length of the thin grey bars inside the task bars.
The Assigned To column allows you to assign the task to a particular team member, providing visibility into who is doing what.
- In the % Complete column, enter the percentage of work complete for that task. Enter a whole number and Smartsheet will auto-fill the percentage sign.
- In the Assigned To column, choose a name from the drop-down menu or manually enter a new name.
5. Establish Predecessors
Predecessors are used to create dependencies between tasks (identifying which tasks need to happen before or after another task).
- On the far-left of the sheet, each row is assigned a number. In the Predecessor column, enter the row number that represents the row of the preceding task. This will create a link from the current row (the dependent task) to the specified row (the predecessor task).
- Enter the row numbers of all other predecessors in the Predecessor column.
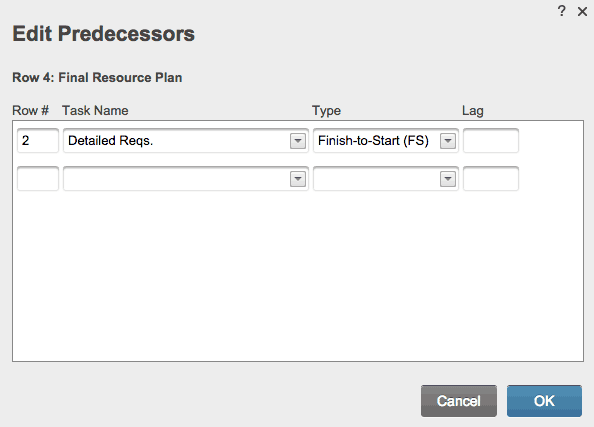
You can also create predecessor dependencies from the Gantt chart on the right. Drag the bottom, right-corner of a Gantt bar down to the Gantt bar of the task that should follow it. The Predecessor column will be automatically updated.
6. Identify the Critical Path
Now that you have created a Gantt chart in Smartsheet, you can identify the critical path on the Gantt chart with the click of a button.
- On the right side of the screen, where your Gantt chart is displayed, click the far-right button that depicts a critical path (the two red Gantt bars).
- On the Gantt chart, the tasks that are on the critical path will be outlined in red.
How to Import a Microsoft Project File (.MPP) into Smartsheet
Smartsheet works with Microsoft Project, so if you already have your project planning information stored in Microsoft Project, you can easily import that directly to Smartsheet.
- Click the Home tab and click the grey Import button.
- Choose the Import MS Project File.
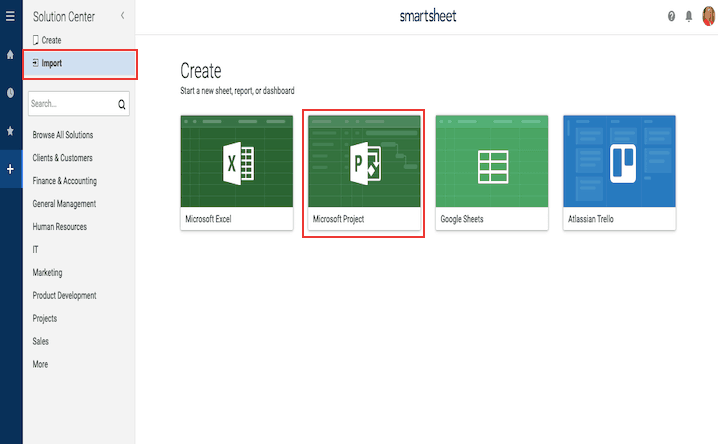
- Click Select, choose the file you would like to import, and click Open.
- Click Continue and an Import Settings form appears. Select the row in the form that contains your column headers (it will probably be the first row) and click Import.
- The imported file will appear as a new sheet within Smartsheet. Click on the sheet name to open it.
Studying for the PMP® Exam? Here’s What You Need to Know about the Critical Path Method

To earn your Project Management Professional (PMP)® credential, you need to pass the PMP exam, a 200-question, multiple choice test offered by the Project Management Institute (PMI).
Critical path is an important part of the PMP Exam and there will certainly be questions about it on the test. You’ll need to be able to draw a network diagram, identify the critical path, use the Forward Pass/Backward Pass technique, and calculate slack.
Here is an overview of the most important things to know about the critical path method to help you pass the PMP exam:
How to Draw a Network Diagram
On the PMP Exam, you will be asked to draw a network diagram. The exam will list all the activities in a project and will tell you when the activities can start. With that information, you’ll be asked to identify the critical path and its duration.
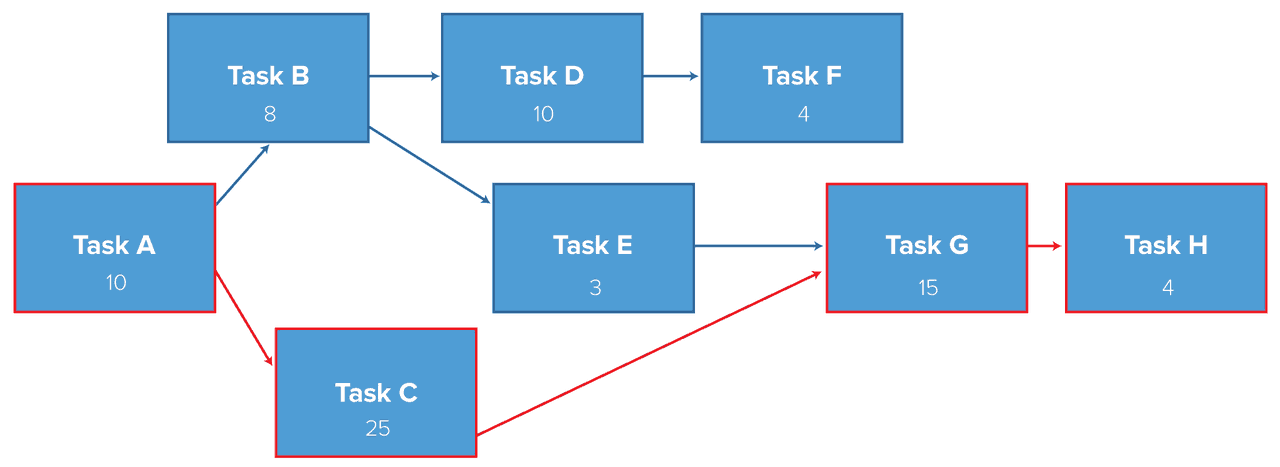
To explain how to draw a network diagram, Bennett has created a sample eight-task project:
- Design Tank Project (10 days) can start right away.
- Construct Tank Foundation (25 days) and Select Tank Supplier (8 days) can start as soon as Design Tank Project is finished.
- Manufacture Tank Components (10 days) can start as soon as Select Tank Supplier is finished.
- Deliver Tank to Jobsite (4 days) can start as soon as Manufacture Tank Components is finished.
- Prepare Installation Drawings (3 days) can start as soon as Select Tank Supplier is finished.
- Assemble Tank (15 days) can start as soon as Deliver Tank to Jobsite, Prepare Installation Drawings and Construct Tank Foundation are all finished.
- Test & Commission Tank (4 days) can start as soon as Assemble Tank is finished.
- After Test & Commission Tank is finished, the project is complete.
To answer the question, you’ll need to draw a network diagram.
Here’s how:
- Draw a box and label it as your first activity (Design Tank Project). In the box, make sure to write the duration in days (in this case, it is 10 days).
- Begin your diagram by drawing the relationship between Design Tank Project, and Construct Tank Foundation and Select Tank Supplier. You can do this by drawing a box for the other activities, and drawing arrows to these boxes from Design Tank Project.
- Continue drawing boxes to represent activities, and arrows to represent when an activity can begin.
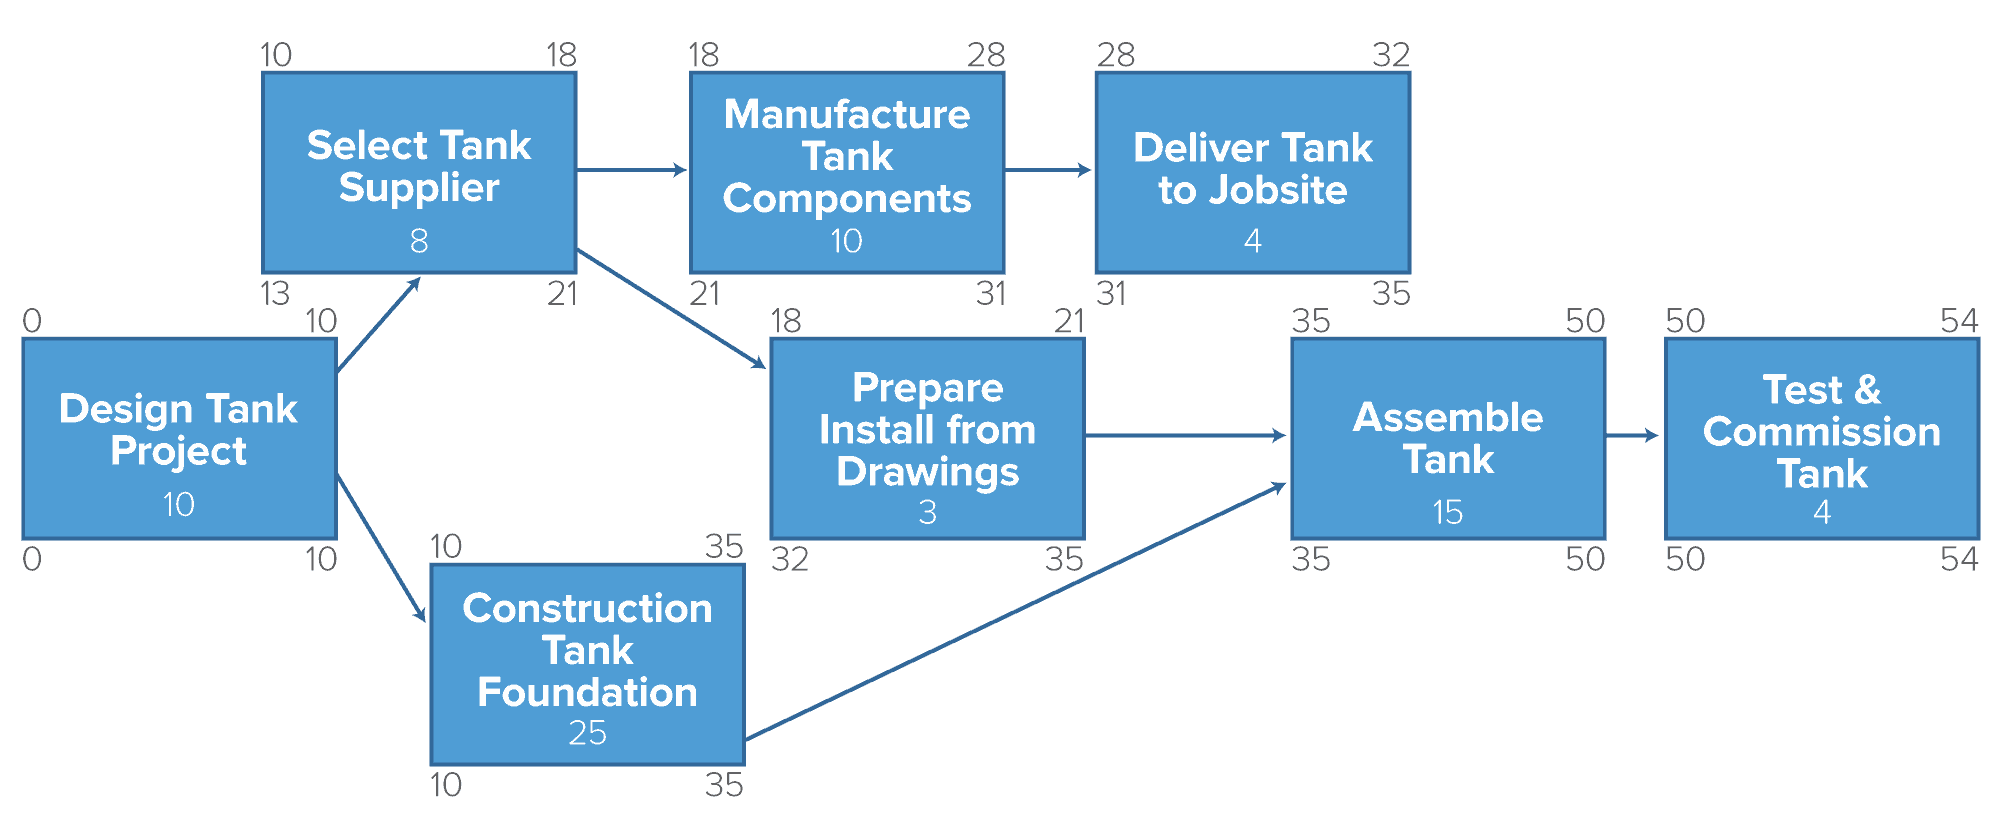
After you have drawn the network diagram, you will be able to find the critical path. Remember: the critical path is the longest duration path throughout the network in days, not the path with the most boxes.
In this example, the critical path is Design Tank Project, Construct Tank Foundation, Assemble Tank, and Test & Commission Tank, with a total duration of 54 days.
You can identify the critical path by eyeballing the diagram to find the longest duration in days, or you could use the Forward Pass/Backward Pass Technique outlined in the next section.
How to Use the Forward Pass/Backward Pass Technique
The Forward Pass/Backward Pass technique is another way to find the critical path. It is best used when you have multiple branches, or multiple entry points, for an activity.
You may also need to use the Forward Pass/Backward Pass technique if you are asked to identify the earliest start or finish times, or latest start or finish times, for an activity. Or, to find the slack (or float) for each activity.
Before you start using the Forward Pass/Backward Pass technique, here are some terms that you first need to understand:
- Earliest start time (ES): The earliest time an activity can start once the previous dependent activities are completed.
- Earliest finish time (EF): The earliest start time for the activity plus the time required to complete the activity (the earliest an activity can be completed).
- Latest finish time (LF): The latest time an activity can be completed without delaying the entire project.
- Latest start time (LS): The latest finish time minus the time required to complete the activity.
As you run the Forward Pass/Backward Pass technique through your network diagram, arrange each value according to the following legend (SL stands for slack, which we’ll cover in the next section).
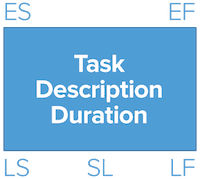

How to Do the Forward Pass: Finding the Earliest Start Time and Finish Time
There are two formulas in the Forward Pass/Backward Pass technique. The first is the Forward Pass formula for you to use as you move from beginning to end in your network diagram (from your first activity to your last). This formula will find the earliest start time (ES) and the earliest finish time (EF) for each activity.
To start the Forward Pass, make the ES of the first task zero. For all other tasks, the ES is the same as its immediate predecessor’s EF.
Use this formula to calculate EF:
EF = ES + Duration
So, for Design Tank Project, the ES is zero and, the EF is 10 (10+ duration of 0). We also know that the ES for Select Tank Supplier is 10 and the EF is 18 (10 + duration of 8). Continue like this throughout the network diagram.
How to Do the Backward Pass: Finding the Latest Start Time and Finish Time
The second formula is for Backward Pass, when you are moving from the last activity to the first activity (you are moving backwards). This formula will find the latest start time (LS) and latest finish time (LF) for each activity.
To start the Backward Pass, make the last activities LF the same as its EF. For all other tasks, the LF is the same as its immediate predecessor’s LS.
Use this formula to calculate LS:
LS = LF - Duration
For the Test & Commission Tank, the LF is 54 and, the LS is 50 (54 - duration of 4). For Assemble Tank, the LF is also 50 and, the LS is 35 (50 - duration of 15 days). Continue this formula throughout the network diagram.
To check that you’ve done Backward Pass correctly, the first activity (Activity A) should have an LS (latest start time) of 0.
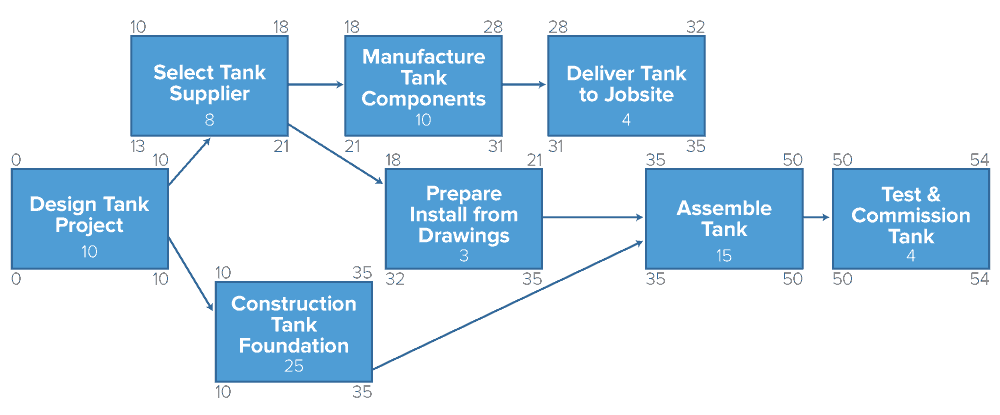
Here’s the completed Forward Pass/Backward Pass technique:
Two Rules to Remember for Forward Pass/Backward Pass
During the Forward Pass, if you find activities that join (multiple activities that flow into one activity), you must run the Forward Pass formula for each entry point and use the highest value from the formulas.
During the Backward Pass, if you have activities that join, you must run the formula for each entry point and use the lowest value.
How to Calculate Float or Slack on the PMP Exam
Now that you have calculated ES and LS for each activity, you can find the float (or slack).
The slack time, also known as float time, for an activity is the time between the earliest and latest start time. Critical activities, activities on the critical path, will always have zero slack.
There are two formulas to calculate slack based on the values you identified in the Forward Pass/Backward Pass technique.
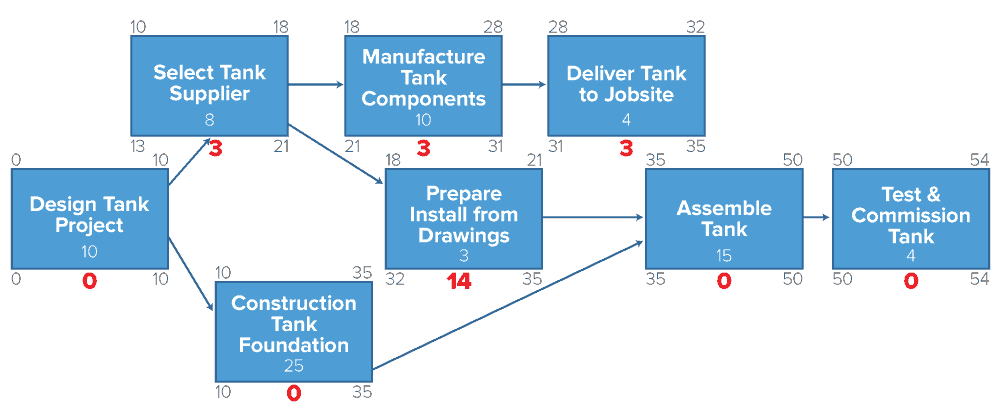
Slack = LF - EF
Slack = LS - ES
You will have to use this process if you are asked to identify an activity’s slack on the PMP exam. Or, if you’re not sure which activities are on the critical path, you could find the slack of each activity, knowing that activities on the critical path always have zero slack.
The final figure below shows the slack values for each task. You can see that the four tasks on the critical path have zero slack -- Design Tank Project, Construct Tank Foundation, Assemble Tank, and Test & Commission Tank.
Key Critical Path Terms for the PMP Exam
Here are the most important terms related to the critical path method that you should understand before taking the PMP exam.
- Critical path method (CPM): The critical path method is a step-by-step project management technique for process planning that identifies critical and noncritical tasks, preventing timeframe problems and process bottlenecks.
- Critical Path DRAG (Devaux’s Removed Activity Gauge): The amount of time that an activity on the critical path is adding to the project’s duration. Or, alternatively, the amount of time the project completion date would be reduced by decreasing a critical path activity’s duration to zero.
- Criticality Index: Used in risk analysis, the Criticality Index shows how often a particular task was on the critical path during analysis. Tasks with a high Criticality Index are more likely to cause delay to the project since they’re more likely to be on the critical path.
- Earliest start time: The earliest time an activity can start once the previous dependent activities are completed.
- Earliest finish time: The earliest start time for the activity plus the time required to complete the activity.
- Latest finish time: The latest time an activity can be completed without delaying the entire project.
- Latest start time: The latest finish time minus the time required to complete the activity.
- Total float: The amount of time an activity can be delayed from its early start date without delaying the entire project.
- Free float: The amount of time an activity can be delayed without delaying the early start date of a successor activity.
- Forward pass: The process to determine the early start or early finish times for activities in the critical path method.
- Backward pass: The process to determine the late start or late finish times for activities in the critical path method.
- Network diagram: A schematic display of the relationships between project activities, always drawn from left to right to reflect the order of the project.
- Network analysis: The process of breaking down a complex project into components (activities, durations, etc) and plotting them to show their interdependencies and interrelationships.
The Easiest Way to Find the Critical Path
Empower your people to go above and beyond with a flexible platform designed to match the needs of your team — and adapt as those needs change.
The Smartsheet platform makes it easy to plan, capture, manage, and report on work from anywhere, helping your team be more effective and get more done. Report on key metrics and get real-time visibility into work as it happens with roll-up reports, dashboards, and automated workflows built to keep your team connected and informed.
When teams have clarity into the work getting done, there’s no telling how much more they can accomplish in the same amount of time. Try Smartsheet for free, today.
*The Project Management Professional (PMP) and PMBOK Guide are registered marks of the Project Management Institute, Inc.