Download a Free Excel Data Entry Form Template
Download Excel Data Entry Form Template
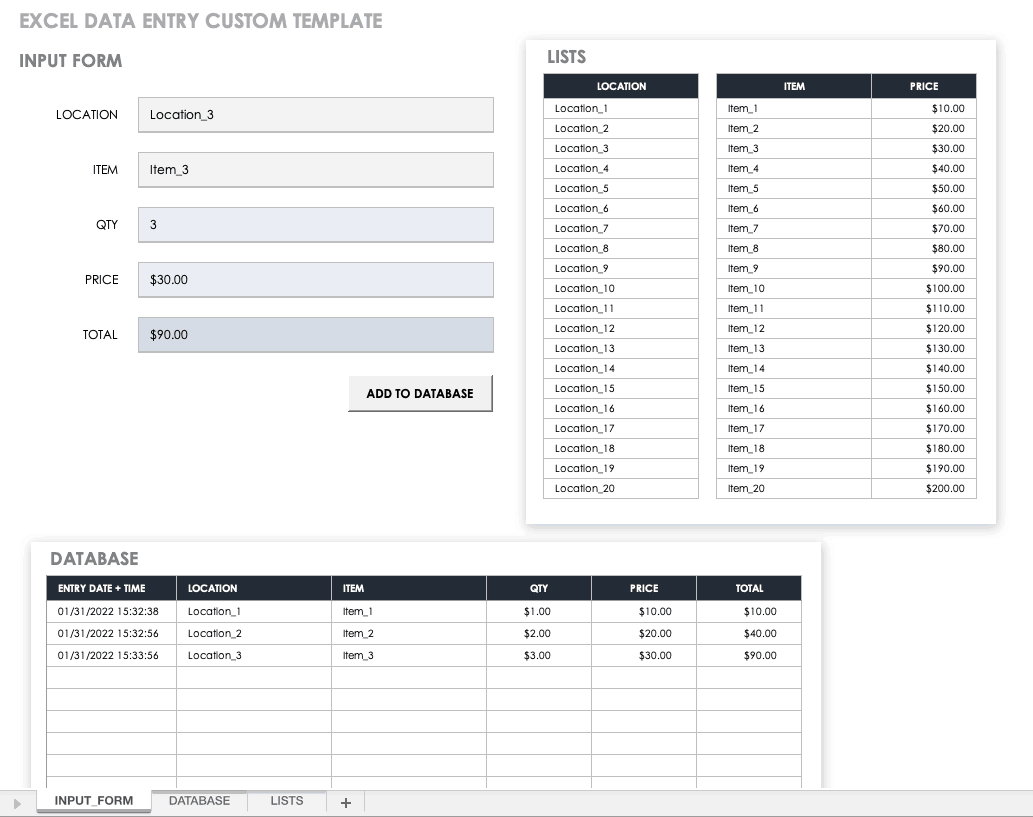
Use this free template to create a customized data entry form that allows you to apply multiple restrictions to a field (such as numeric and five digits long for a ZIP code field), make a field mandatory, or make it unique from all other records (for example, for an order number). Enter the number of fields needed for each record, select a title and options for each field in the record, and then move to the second sheet to start entering data.
Streamline Data Collection with Smartsheet Forms
Turn collected data into actionable insights instantly

Smartsheet forms capture consistent, accurate data and feed it directly into an organized sheet, giving you instant visibility. With customizable branding, conditional logic, and mobile accessibility, Smartsheet forms not only simplify data gathering but also allow your team to take action right away—whether you're tracking requests, collecting information, or managing fieldwork.
What Are Excel Forms?
Excel offers the ability to make data entry easier by using a form, which is a dialog box with the fields for one record. The form allows data entry, a search function for existing entries, and the ability to edit or delete the data.
The example below has two fields per record. The form allows up to 32 fields per record.
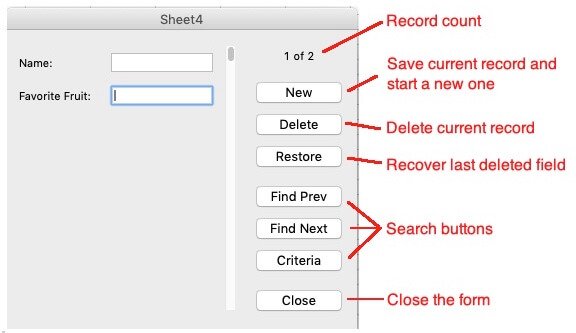
In addition to the navigation buttons, you can use the following keyboard commands to navigate through the form:
- Tab: Move to the next field.
- Shift+Tab: Move to the previous field.
- Enter: Save the record and start a new one.
Benefits of Using an Excel Data Entry Form
In addition to being able to enter data quickly and accurately, the form allows users to see more content without scrolling because the data appears in a vertical format (rather than horizontal). The form can also include data validation, including a dropdown list of pre-selected items in a column or ensuring that an entry meets certain criteria (such as a date or character length).
How Do I Create a Data Entry Form in Excel?
In general, the steps are to select an area in the sheet, insert a table, add titles at the top of the columns, and then find the form option in the data menu. To create a form, see the steps below for your version of Excel.
How Do I Create a Data Entry Form in Excel 2016?
These instructions also apply to Excel 365, and to Excel 2019 for PC. These steps were created with a different version of Excel so the interface will look different, but the steps are the same.
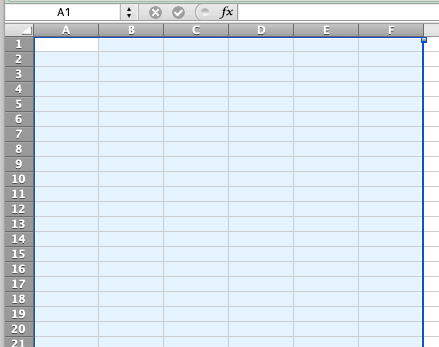
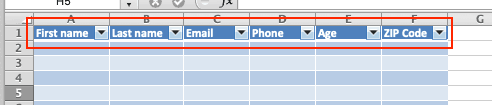
- On the chosen sheet, highlight the number of columns needed.
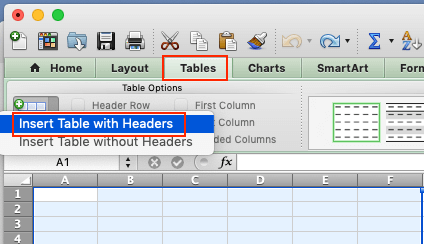
- Open the Tables tab, click New, click Insert Table with Headers.
- Change the default column headers, and adjust the width of columns if necessary.
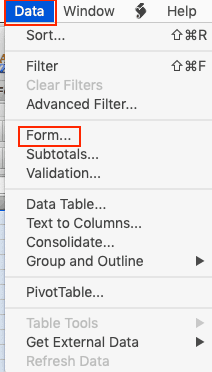
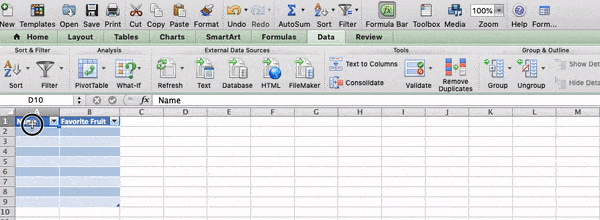
- Open the Data menu and click Form...
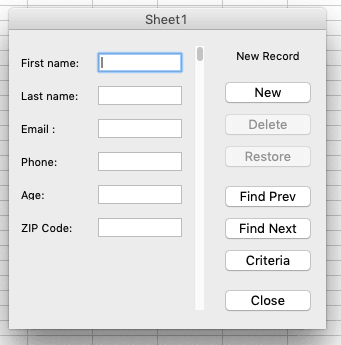
- The form will appear. The number of columns in the table will match the number of fields on the form. The column titles in the table will be the field titles on the form. You are now ready to enter data records into the form.
Inserting a Record
Type data into the first field, tab to the next field, and repeat until all fields are completed. Press Enter on your keyboard to save the data and move to the next record.
Finding a Record
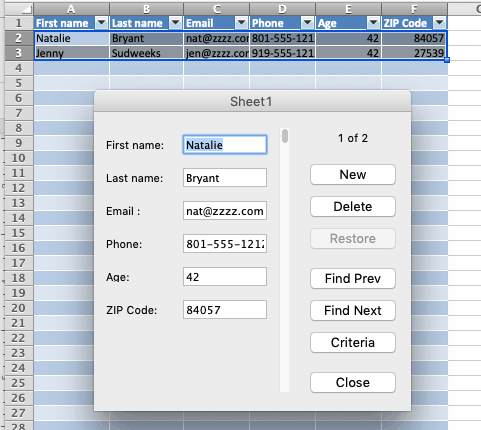
Once you have entered data, you may want to find a record. To do so, click Criteria, enter the search term into the appropriate field (e.g. “Chicago” into a city field). Click Find Next. The first matching record will appear in the form (the records displayed in the sheet won’t be filtered). Click Find Next to scroll through the remaining records, or click Find Previous to scroll upward. You can use wildcard characters such as “*” and “?” when searching the records.
Editing a Record
Once the desired record is displayed in the form, select the field you want to change and edit the text. Hit Enter on your keyboard to save changes.
Deleting a Record
Once the desired record is displayed in the form, click Delete, then click OK.
How Do I Create a Data Entry Form in Excel 2013?
The steps for adding, finding, editing, and deleting a record are the same as for Excel 2016, so follow the steps above. The appearance may be slightly different. In general, the steps are to select an area in the sheet, insert a table, add titles at the top of the columns, and then find the form option in the data menu.
How Do I Create a Data Entry Form in Excel 2010?
In general, the steps are to select an area in the sheet, insert a table, add titles at the top of the columns, and then find the form option in the data menu. You can follow the steps for adding, finding, editing, and deleting a record in Excel 2016 above. Note that the interface may be slightly different.
How Do I Create a Data Entry Form in Excel 2007?
Select an area in the sheet, insert a table, add titles at the top of the columns, and then find the form option in the data menu. Follow the steps above for Excel 2016 to add, find, edit, or delete. The interface may be slightly different.
How Do I Create a Data Entry Form with a Single Click?
- You can save a step by adding a Form command button to the toolbar. To do this, right-click a toolbar, and click Customize Toolbars and Menus…
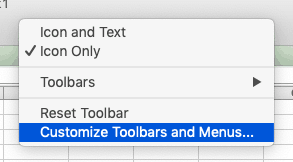
- Next, click Commands, click All Command, scroll to and click Form… Drag it to the toolbar of your choice.

- After you’ve set up the table, select it, and then click the Forms command that you’ve added.
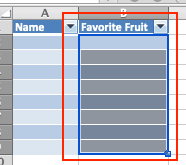
Adding a Drop-Down List to an Excel Data Entry Form
A drop-down menu presents a predefined list of options in a data entry form field. This is useful when you need to enter a set list of employees, products, part numbers, etc. into a field.
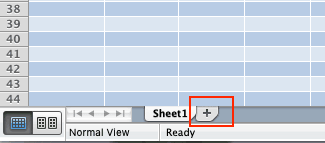
- Add a new sheet to the workbook (you can also use a blank sheet) by clicking the plus sign on the tabs at the bottom of the window.
While not required, it makes sense to change the name of the sheet to something like “data.” Double-click the new sheet’s title tab and type the new name.
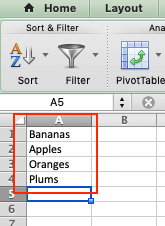
- Enter the list of options into a column in the new sheet. If more than one field in the form needs a dropdown list, repeat the process in another column. If you have more than one field with a dropdown list, the data column for each list can be on the same sheet or on different sheets, depending on your preference.
- Return to the worksheet with the table and select the column that will have the dropdown list.
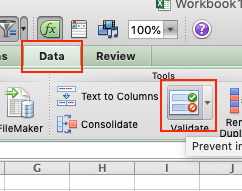
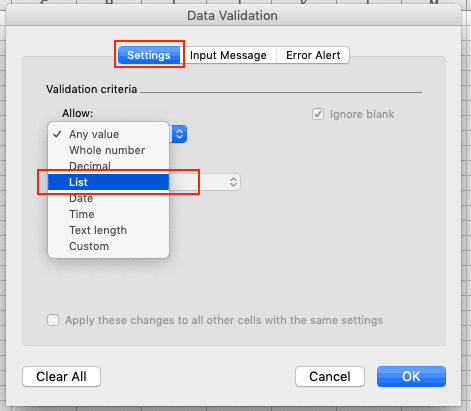
- On the ribbon, click Data, click Validate, click arrow next to the Allow field and click List.
Ensure the In-cell dropdown option is checked and put the cursor in the Source field.
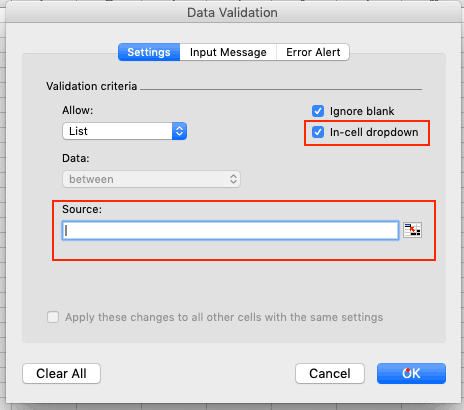
- Click on the tab for the sheet with the list (in our example, the Data sheet), highlight the list of items (the sheet and cell reference will be added to the source field), and click OK.

- Show the data entry form based on the steps above. The field connected to that column will only allow entries from the list on the other sheet.
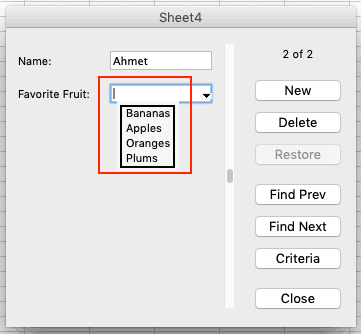
Note: In some older versions of Excel, the dropdown will not appear in the form, but the field will still be restricted to the list in on the data sheet.
Other Types of Cell Validation
In addition to a restricted list, the form fields can have other restrictions. Select the column and click Data on the ribbon, click Validate, click the Allow field, and then choose one of the options below:
- Make a Column a Date or Time: Select Date or Time. If needed, enter start and end values to constrain the starting and ending date or times.
- Make a Column Numeric: Select Whole number or Decimal. If needed, enter start and/or ending values to constrain the range.
- Restrict the Length: Select Text length. If needed, enter start and end values to constrain the range.
How Do I Create a Submit Button in Excel?
A submit button is a user-created control button that runs a macro when clicked. The macro can be any valid macro, such as sorting data, removing blank rows, or saving a sheet as a PDF.
There are two ways to create a button. One uses ActiveX, the other uses Visual Basic (VBA), so they are beyond the scope of this article. If you have experience with ActiveX or Visual Basic, Microsoft's support site offers instructions.
How Do I Insert a UserForm in Excel?
A UserForm is an Excel tool that is similar to a data entry form. However, it is more flexible because it allows the use of checkboxes, radio buttons, multiple selections, and scrolling lists to enter data in addition to text boxes. Creating Userforms requires knowledge of Visual Basic. If you have experience with Visual Basic, a tutorial for creating UserForms can be found here or here.
How Do I Create a Data Entry Form with VBA?
A data entry form can be created with VBA in the same way as a UserForm in Excel.
Streamline Data Collection with Smartsheet Forms
Empower your people to go above and beyond with a flexible platform designed to match the needs of your team — and adapt as those needs change.
The Smartsheet platform makes it easy to plan, capture, manage, and report on work from anywhere, helping your team be more effective and get more done. Report on key metrics and get real-time visibility into work as it happens with roll-up reports, dashboards, and automated workflows built to keep your team connected and informed.
When teams have clarity into the work getting done, there’s no telling how much more they can accomplish in the same amount of time. Try Smartsheet for free, today.