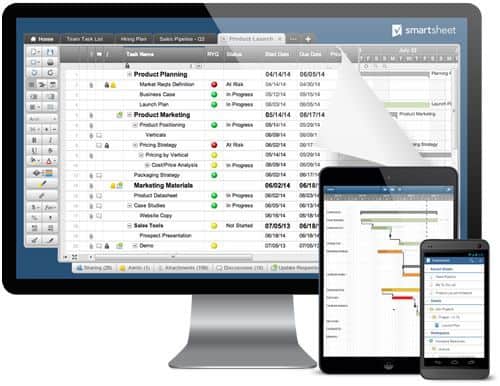
Day 1: Recreate Your To-Do List in Smartsheet
A to-do list should make your life easier, not harder. But, if you’re tracking tasks in various places or sticking Post-it notes all over your desk, you’ll spend more time finding and organizing your to-dos than actually completing them.
For your first task in our five-day crash course, move your to-do list to Smartsheet. You can set due dates and automatic reminders, and experience the joy of clicking the “Done” check-box when you’re done with a task.
Here’s how to recreate your to-do list in Smartsheet:
- Go to Smartsheet.com and login to your account.
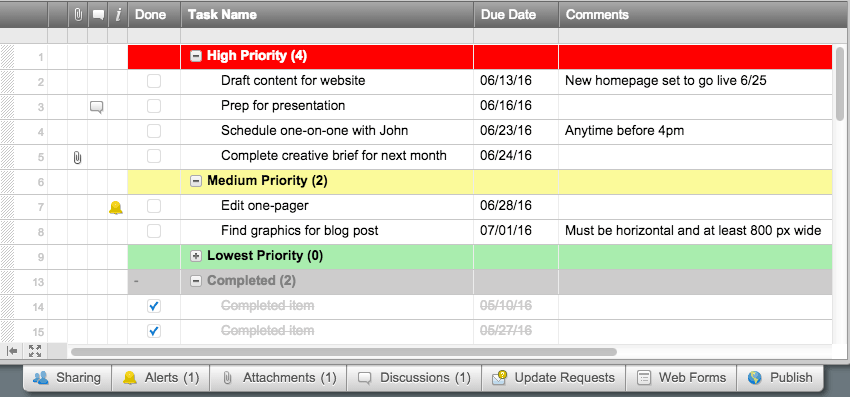
- Click the blue Create New button and select Task List. You’ll see a blank template with the column names already populated.
- Itemize your current to-do list and type each task under the Task Name column.
- Enter due dates and comments if appropriate.
- If you’re delegating tasks, enter the name of the person the task is assigned to in the Assigned To column.
- You can always add, delete or rename columns.
Bonus features:
- Set reminders for important tasks to receive automatic emails so you don’t forget a thing.
- Attach drafts to corresponding tasks to track progress and status.
- Switch to calendar view and see your due dates on a calendar.
Day 2: Make a Centralized Team Contact List
What do you do if you’re at an off-site event and something goes wrong? Or, you’re running late to a client meeting? Who do you call and do you even have your colleague’s contact information?
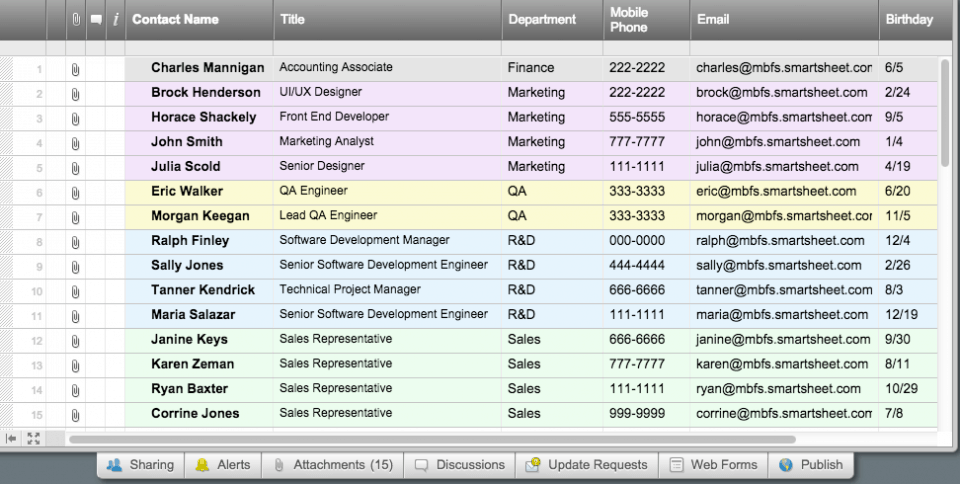
Instead of wasting valuable time searching your inbox for a phone number, create a sheet with everyone’s name, title, department, and phone number, and share it with the whole company. Anyone can access this list at any time, at the office or on the go.
Create an always up-to-date team contact list:
- In Smartsheet, click Home, Create New > Blank Sheet.
- Rename the columns to show Contact Name, Title, Department, Desk Phone, Mobile Phone, Email, Birthday and Reports To.
- Share the sheet with your team or company, or publish the sheet to an internal website, like an intranet, wiki, or Google Site.
- Bookmark it to your smartphone so it’s always just one click away.
Bonus features:
- Control who can view, access, and edit the contact list (we recommend making the sheet View Only so the information remains accurate).
- Attach headshots of each employee to the corresponding rows.
- Send Update Requests to new employees so they can fill in their information as part of their onboarding.
- Set reminders before each employee’s birthday so you never have to plan a celebration at the last minute again.
Day 3: Streamline Meetings
We all want productive meetings. We schedule stand-ups to reduce time, create an agenda to stick to a schedule, and take notes to track action items. But, how productive are we if six people are replicating the same work, with each person taking their own set of notes? And how much time do you spend organizing all these notes into one master document?
Hold truly productive meetings by centralizing information and creating one go-to spot for all meeting notes, action items, and ownership.
Here’s how to hold more productive meetings:
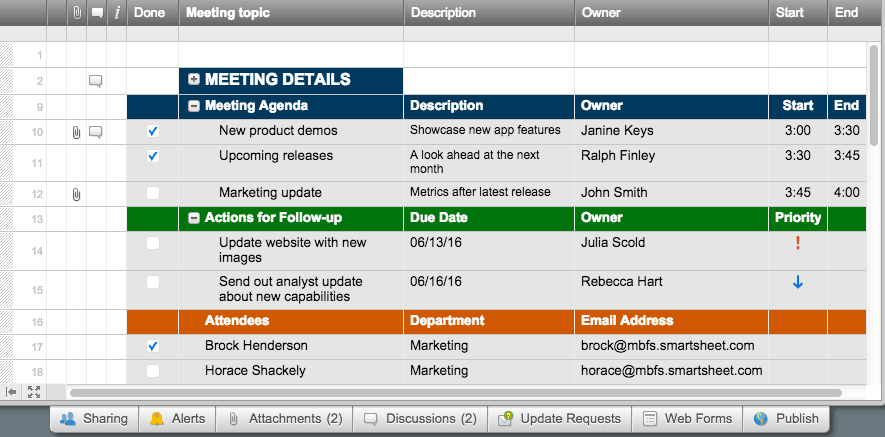
- Use our Meeting Agenda, Attendance & Follow-Up template.
- Share the sheet with everyone who will attend the meeting.
- Enter your meeting details and meeting agenda, description, and schedule.
- During the meeting, enter action items and assign the tasks to people on your team under the Owner column.
- Keep track of who did and didn’t attend by entering the names of attendees under the Attendees column.
Bonus Features:
- Attach any external meeting notes for everyone to access.
- Send Update Requests to have team members update the status of their action items.
- Use symbols to quickly convey priority.
Day 4: Import an Excel File and Improve a Workflow
Before: Excel
After: Smartsheet

How much time do you spend emailing around the same Excel file for edits? Everyone makes their own changes and emails you back a new version, that you then need to compile into one master, updated file. And, to make matters worse, if one person forgets to email out some changes, your whole team could be out of sync.
For your day 4 task, it’s time to take an existing process or workflow you currently have in Excel and make it better in Smartsheet. No more emailing files back and forth, and no more version control issues.
Here’s how to import an Excel file into Smartsheet:
- In Smartsheet, click Home, Import > Import Excel File.
- Select the Excel file you’d like to upload, click on the row that contains your column headers, and click Import.
- Your Excel file will be uploaded into Smartsheet. You can now insert, delete or rename columns and change font size and color.
Bonus features:
- Add hierarchy to create relationships between rows and organize your sheet.
- Attach drafts to corresponding tasks that everyone can access and edit in real time.
- Have discussions directly in the sheet to unclog your inbox.
- Set a notification to receive an automatic email when changes are made by other collaborators.
Day 5: Organize a Team Lunch or Company Event
It’s your last task of the week! Hopefully, many members of your team have been exposed to Smartsheet and the various ways this single tool can change the way work gets done. For day 5, we suggest organizing a team lunch to discuss your current processes and choosing one or two workflows to migrate next to Smartsheet.
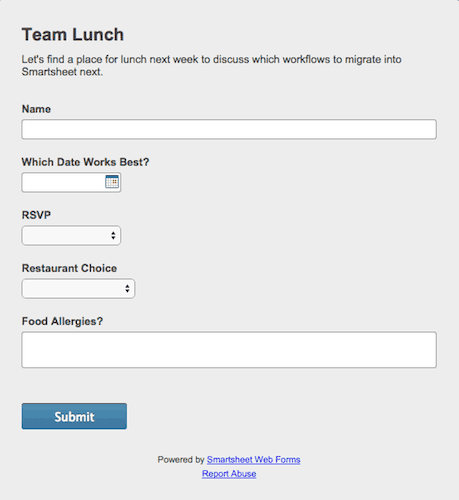
Smartsheet makes it easy to coordinate any type of event, from a group meal to a holiday party. The secret is to use web forms, which quickly gather information and feed it into one master sheet. This sheet and web form combination give people a quick way to RSVP and/or submit meal requests, and let you keep all the information in one place.
Here’s how to coordinate a team lunch in Smartsheet:
- In Smartsheet, click Home, Create New > Blank Sheet.
- Rename the columns to show Name, RSVP (select a column type of Dropdown list and enter Yes, No), Restaurant Choice (you could also choose a column type of Dropdown list if you have a set number of restaurants to choose from), date choice, and any other information you’d like to gather.
- At the bottom of the sheet, click Web Forms. You can then add, delete, or rename fields (for more information on customizing your web form, click here).
- Once you’ve created the web form, a URL will be generated that you can send out to team members. All their responses to the web form will be auto-populated in the sheet (note: during the 30-day free, trial, you cannot send a web form URL to external collaborators not shared to the sheet. This ability is enabled once you have a paid plan).
If you’re planning a large event, like a company party, check out our Event Management solution for pre-built event templates.
Bonus features:
- Have discussions directly in the sheet to centralize all communication.
Challenge: Migrate a Complex Workflow
Congratulations! You’ve successfully onboarded your team in five short days. You know how to create sheets, add or edit columns, send Update Requests, set notifications, collect data in web forms, and more.
Now you’re ready to migrate your day-to-day work processes into Smartsheet to boost collaboration, productivity, and efficiency.
And, we’re here to help along the way. If you need assistance with sheet layout and design, workflow configuration, automation, or API integrations, read about our Smartsheet Services. You can spend one-on-one time with a Smartsheet expert, schedule onsite consulting, or attend interactive product training sessions.
To jumpstart a new project or help migrate your workflows to Smartsheet, visit our Solution Center for dozens of pre-built templates based on industry best practices. You can find templates for everything from sales pipeline to department budgets.