Scrum Methodology and the Scrum Master
Within Scrum methodology, the Scrum Master acts the group leader who encourages communication and participation from all other team members. Some people opt to enroll in a Scrum Master training or certification program to refine their skills and learn the best practices for guiding a Scrum team, but this is not necessary. If you are tasked with being Scrum Master for your software development team but have no formal Scrum Master training or certification, you can still be an effective Scrum Master.
Your first step is creating a Scrum board that all team members will refer to and collaborate on throughout the project. Your challenge is to build an online Scrum board that, at a glance, demonstrates workflow status and progress and exposes any blockages to workflow progress, all while instilling a sense of collaboration and trust among your team members. This is especially important if your team includes both onsite and remote workers.
Richard Lawrence, co-owner of Agile for All, is a Scrum Alliance Certified Enterprise Coach and Certified Scrum Trainer. He offers some tips on selecting an effective online Scrum board tool: “For online tools, as with physical boards, I recommend focusing on what decisions the team and stakeholders need to make and what info they need to make those decisions. Many online tools make the mistake of copying the appearance of a physical board rather than solving the actual problem.”
Of course, you may attend a training course or program later on but in the meantime, your customer or product owner wants you to start managing sprints and facilitating daily Scrum meetings as soon as possible in order to increase productivity and improve efficiency.
Prioritize and organize projects visually with Smartsheet Board View
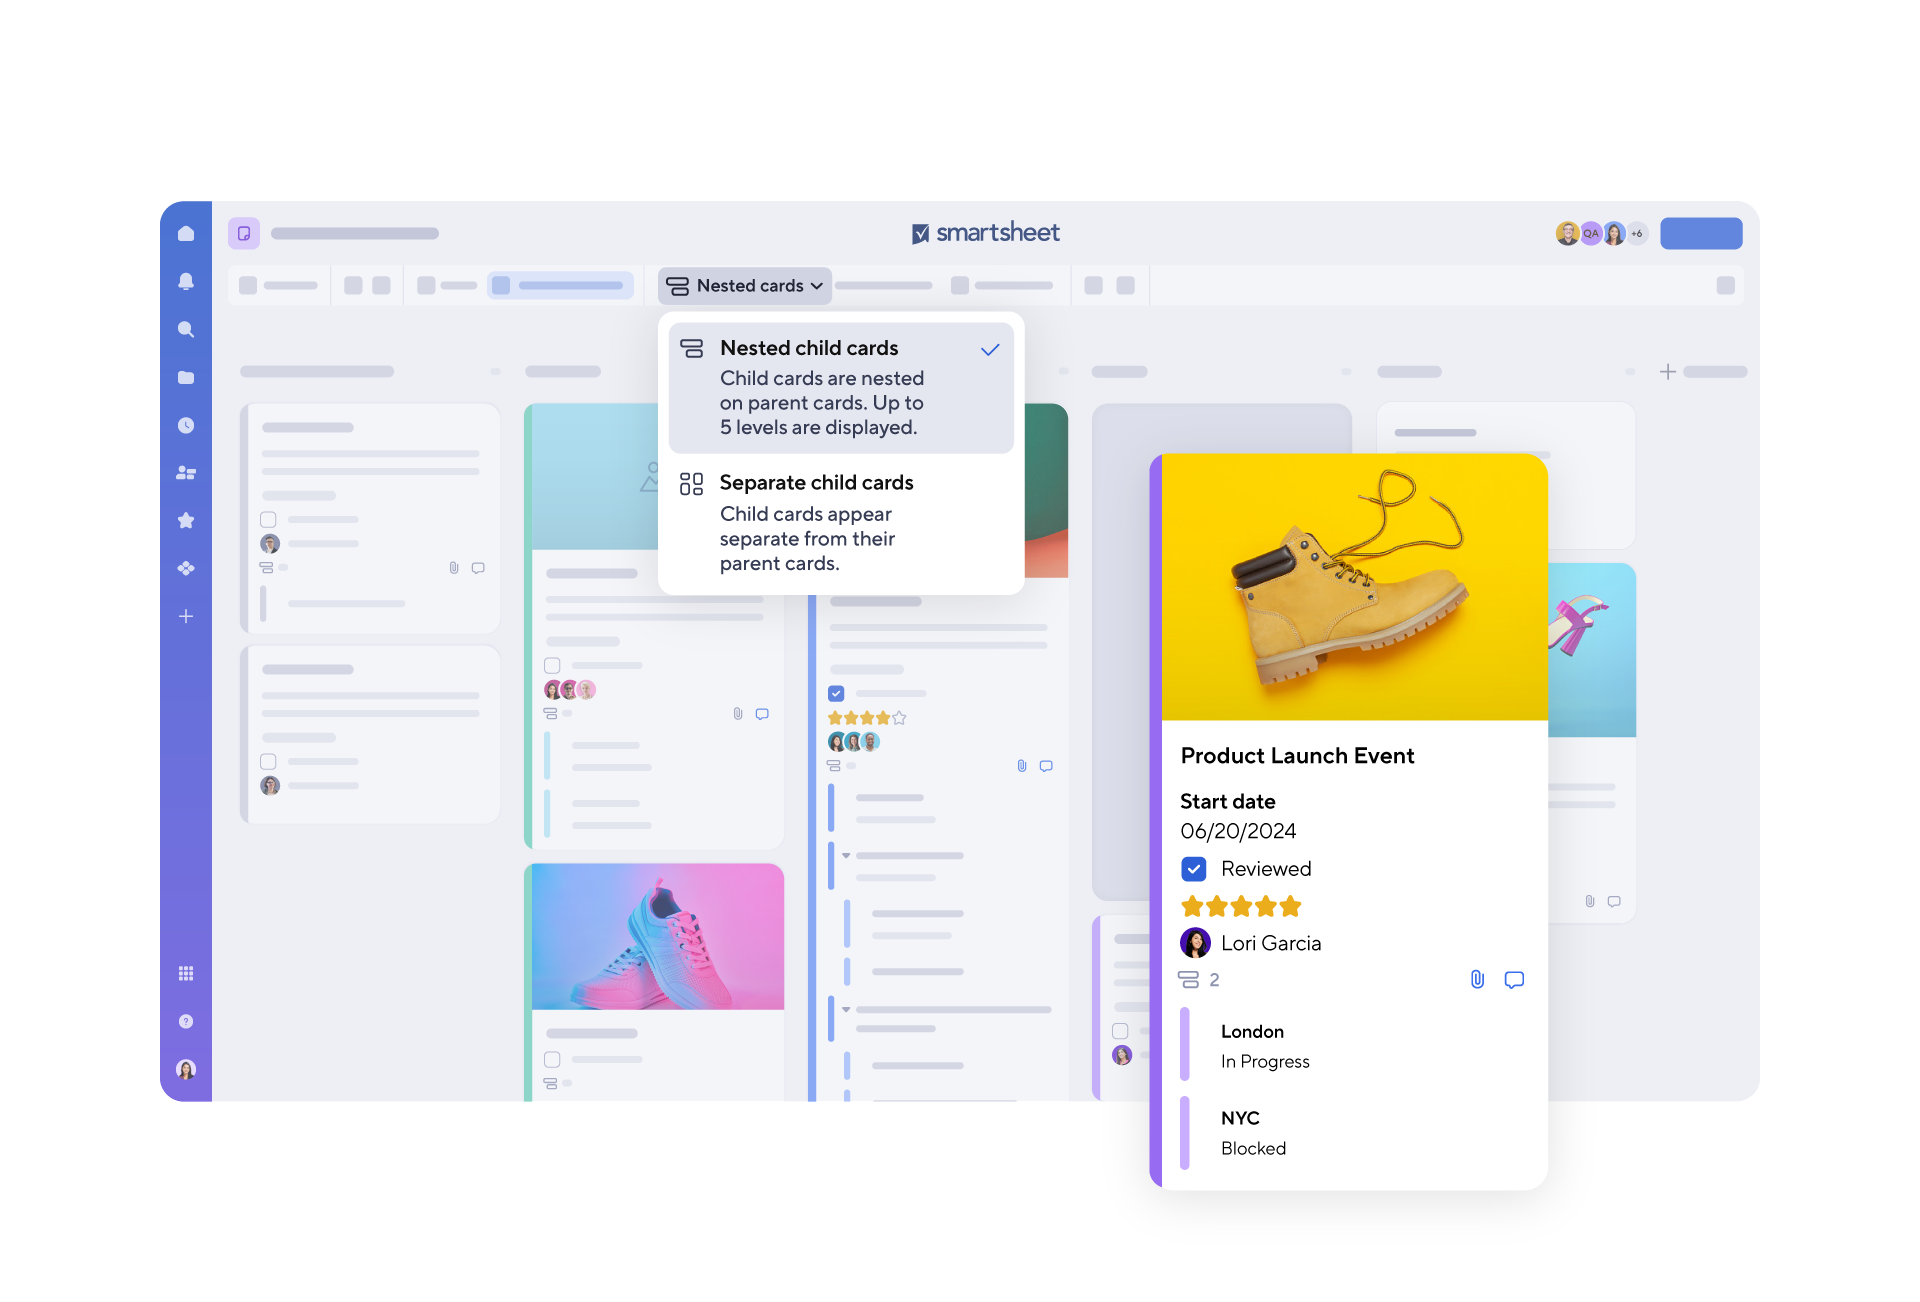
Smartsheet offers a dynamic, visual approach to managing tasks and projects, making it easy to track progress, update statuses, and prioritize work in real time. With customizable Kanban-style lanes and drag-and-drop functionality, teams can stay organized, aligned, and focused on what matters most.
Explore the full range of robust features when you try Smartsheet free for 30 days.
Physical vs. Online Scrum Boards
When creating a Scrum board, you will have to decide if you want to create a physical or online tool. Both options have their benefits (outlined below), but understanding the differences of the two tools will help choose the correct one for your team and project. Selecting the appropriate type of Scrum tool - physical or digital - will ensure that your team maximizes productivity.
Physical Scrum boards create a visual focal point for team members during daily scrum meetings and throughout the workday and project cycle. Physical boards rely on face-to-face interaction, which encourages brainstorming and spontaneous communication. Cards on the physical Scrum board will only contain necessary data, and team members will manually move the cards across the board as work gets done. This can create a feeling of task ownership among team members.
To set up a physical scrum board, many teams use a whiteboard and sticky notes. Draw the desired work stage columns (To Do, Work In Progress, Done, plus any others you want to include) to create the workflow on your board. Then, write tasks on sticky notes - which will act as your Scrum ‘cards’ - and place them in the appropriate stage column on the whiteboard. Physically move the sticky notes across the board to reflect their stage. These in-person updates will help foster more communication among your team, which is essential for effective Scrum workflow.
However, in today’s work environment, many teams opt to use online Scrum boards, also known as virtual or digital Scrum boards. Online Scrum boards allow distributed or remote teams to access the board and collaborate with each other 24/7, and also customize the board for their business or specific project. While Online Scrum boards may sacrifice the in-person element, they offer many more benefits to Agile teams: they provide anytime, anywhere access and can often enhance workflow using graphics, charts, views, status tracking, and more. Some tools allow you to expand cards on your board to include more detailed information and notes, or even attach relevant documents, links, or reports. Additionally, if you are new to Scrum or acting as a Scrum Master without training, many online tools provide templates that make it easy to get started.
Both physical and online Scrum boards will help implement Scrum method, but it is important to choose the tool that best fits your team’s needs.
Using Smartsheet as a Scrum Board
Smartsheet is a cloud-based project management tool that can be used to plan, organize, and manage workflow. It can also be used to facilitate Scrum methodology, and help the Scrum Master prioritize tasks and customize sprint data that will ultimately help the product owner and additional stakeholders make difficult decisions. With their intuitive setup and organization, Smartsheet’s templates make it easy to get started with your Scrum board.
The default view in Smartsheet is a typical spreadsheet look, but the web application also offers several other ways to view your work - Gantt, calendar, and Card View. Smartsheet’s Card View is designed to facilitate Agile project management methodology, and can be applied to both Scrum and Kanban boards to help organize and display your data. To create a Scrum board in Smartsheet, you will use Card View, a highly visual, flexible interface that allows for easy collaboration.
The following step-by-step instructions provide an introduction to Smartsheet’s layouts and collaborative tools, along with an in-depth look at Card View, the view type in Smartsheet that you will use to create your Scrum Board.
How to Set Up a Scrum Board with Smartsheet
Step 1: To begin creating your Scrum board in Smartsheet, you will create a board from Smartsheet’s Kanban Template.
- Click the + icon, then type board in the search bar.
- Click on the template of your choice, then click Use. For this example, we will use the Sprint Planning Board template.
- Name your sheet and click OK.
- The page that opens is a blank sheet in Card View. The sheet already contains columns - called Lanes - that you will fill in to start using your Scrum board: Backlog, Planning, In Progress, and Complete.
Step 2: Add cards to your Scrum board
- To add a card to any column, simply click the “+” button at the bottom of the respective card lane. Each card will represent a different task or to-do item on your Scrum board.
- Enter a title and description to the appropriate fields on the card.
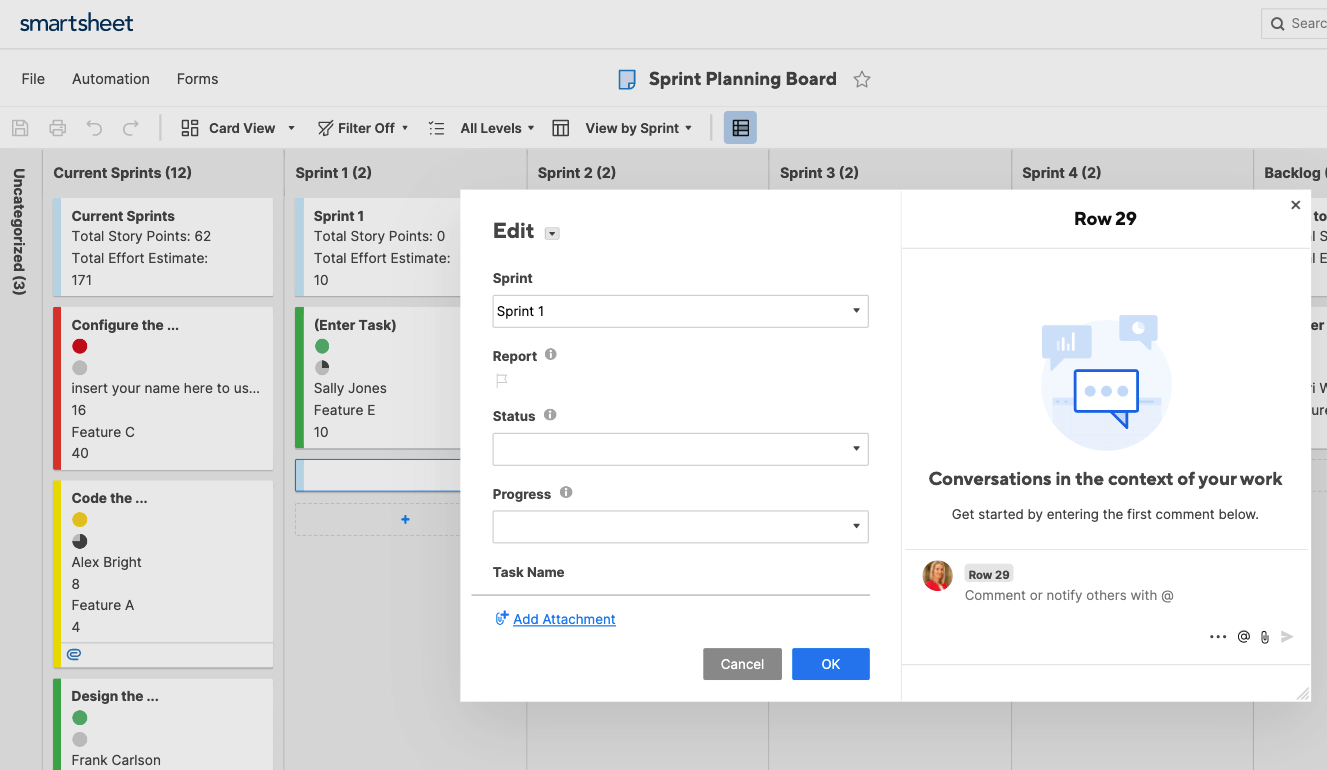
- You’ll also see three preset drop down lists on your card: Size, Priority, and Assigned To. Select the appropriate values for your task. The values from these drop down lists will give you different ways to organize the lanes of your board, which you’ll use later on.
- You can also add attachments (relevant documents, links or reports) or add any additional comments directly onto your card.
- Click OK. Your newly created card will now be visible on your Scrum board.
- Repeat the above steps to add as many cards as you’d like to your board.
- To edit a card, click the drop down menu on the lower right hand corner of a card and select Edit. Now, you can edit the fields in the card.
Step 3: Move cards through the workcycle
- As with a physical Scrum board, you will move your cards through the work cycle columns as they become complete.
- Drag and drop the card to the next lane when you have completed the next step.
- Cards can also be moved vertically within a lane if there are multiple cards in a single lane.
- Work In Progress (WIP) limits are a useful tool when managing work in the Scrum method. Using WIP limits helps eliminate bottlenecks and ensures that team members only assume tasks that they have adequate bandwidth for. To use WIP limits in Card View, only move a card into your In Progress lane if you can realistically complete it amidst your other In Progress tasks.
Step 4: Adjust the View of Your Scrum Board
Adjust the information displayed on each card.
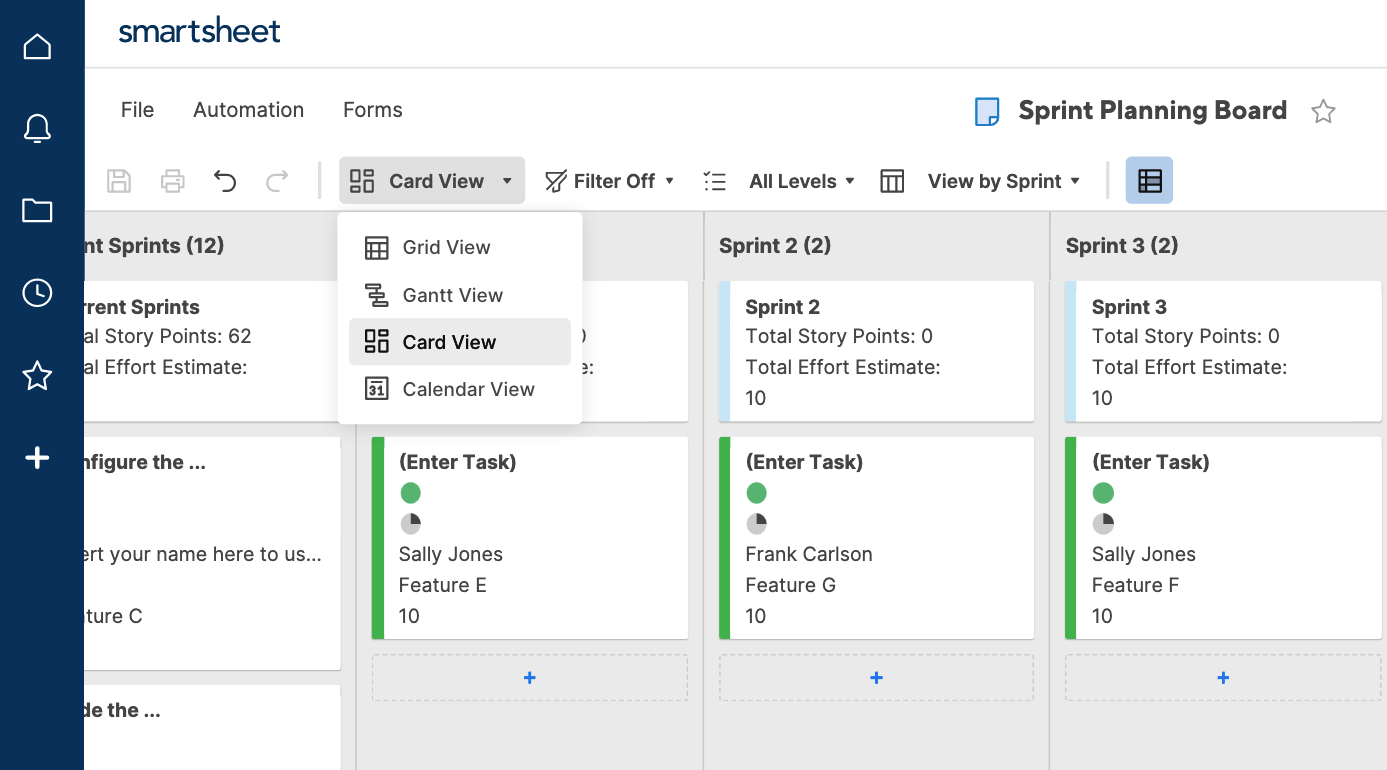
- Click on a Card View view-type by selecting on an icon in the upper right corner of the Card View.
- Delete fields you don’t want displayed on your Scrum board, or add custom fields for displaying additional information about a task.
Change the lanes to organize your work by different criteria
- The lanes on your Scrum board will default to Status when you use the Kanban template. However, you can also organize your lane by any other criteria, as long as you create a dropdown list field for it.
- Select the “View by: Status” menu in the top right hand corner of your Scrum board.
- You’ll see options to organize your lanes by other criteria - such as Owner. Select the criteria you want to organize by.
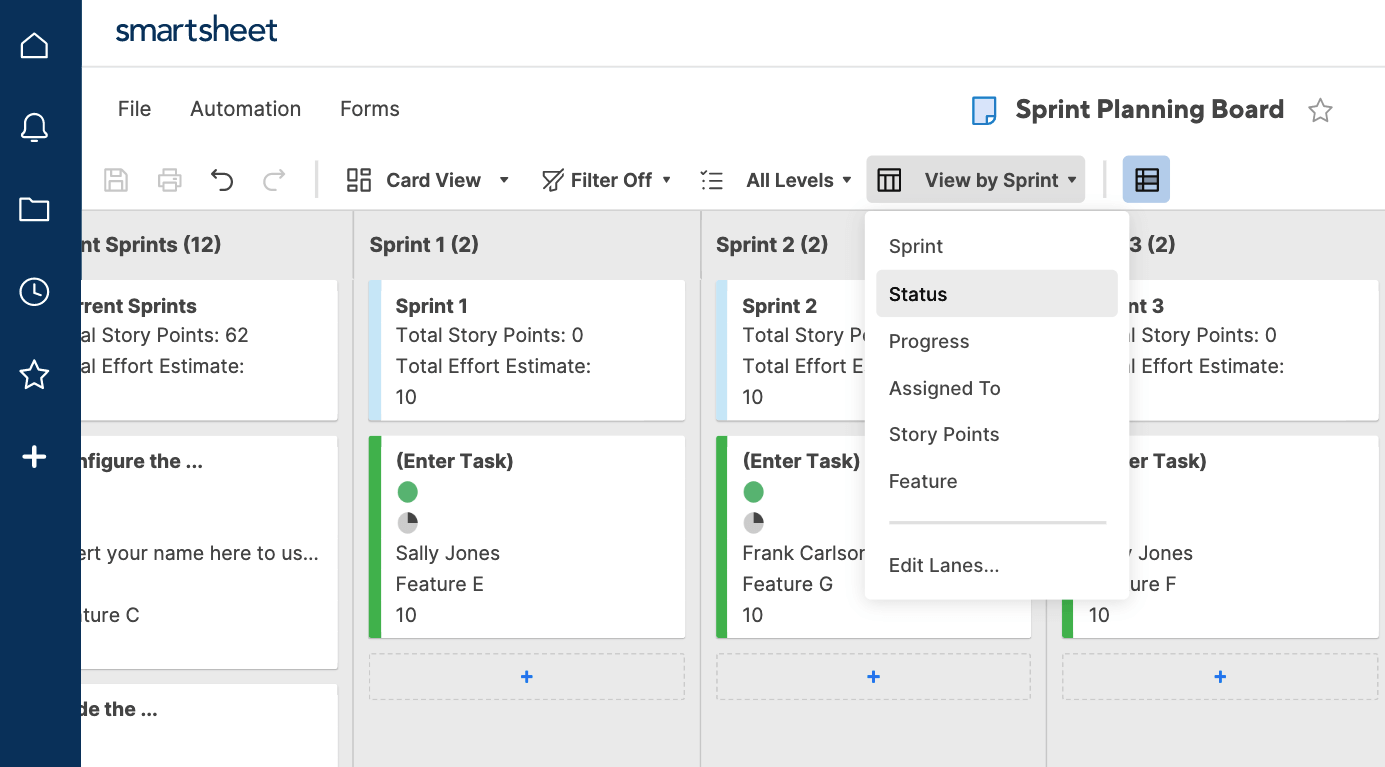
- Your Scrum board will “pivot” to display work organized under new lanes. Each card will still contain the same information, but the view is different - this comes in handy if you need to track a certain aspect of any task.
View your Scrum board in other Smartsheet Views
- While you’ll create your Scrum board in Card View, you can still view your work by any other of Smartsheet’s views - traditional grid, Gantt, or calendar - by clicking the appropriate view icon on the toolbar.
- In grid view, the Primary Column becomes the card or task name, and all other fields from your cards become columns in your sheet.
Step 5: Share Your Scrum Board
Share your Scrum board with an infinite number of collaborators to keep everyone on the same page.
- Click Sharing at the bottom of your board. You can now add the emails of those you want to share your board to.
- Select the appropriate permission level for each collaborator: Viewer, Editor, or Admin.
*Note: if you are acting as Scrum Master for your team, you will want to retain Admin permissions.
Step 6: Export Your Scrum Board
All information in Smartsheet is automatically stored in the cloud, but you can also back up your data by exporting to Excel, MS Project, or a .pdf.
- Right-click the title tab in the Project Sheet or Card View and select Export > File Type. Choose the file type you want to export to, and then email to project stakeholders or print for reference.
Discover a Flexible Online Scrum Board Tool With Smartsheet
It’s easy for tasks to get lost in the madness of your everyday work. What you need is a better, more visual way to track and manage tasks.
Empower your team with board view in Smartsheet — a user-friendly task tracking solution that ensures seamless task prioritization, enhanced project visibility, and effortless agile collaboration.
Whether managing projects, optimizing workloads, or tracking to-dos, board view helps eliminate unnecessary status meetings by letting team members track project progress, completed tasks, and upcoming work with task cards.
Discover the intuitive drag-and-drop cards, real-time collaboration, and organizational card nesting that drive your organization to adapt and deliver more effectively.
Learn more about board view in Smartsheet.