Benefits of Jira
Jira offers many team and cross-team advantages. For one, it’s easy to create, fine-tune, and customize projects, dashboards, workflows, and workflow properties in Jira to meet your group’s needs. Internal and external users can easily log issues and detail information about bugs and tasks. You can view all work items to understand the issues that arise and to ensure they are correctly logged. Finally, Jira provides a high-level view into whether your process is working.
What Is a Jira Workflow?
Your team follows certain business processes to take an idea, a work item, a bug, a task, or even a project from start to finish. A workflow represents that sequence of events. Work items have certain states, which represent their status in the workflow at a given time. For example, Not Started, On Hold, and In Progress might be states. To move from state to state or status to status, a work item goes through a transition.
Using a workflow in a tool such as Jira means that you can enter and track all details related to a work item in one platform. The information is accessible by everyone who has the right to see it. In addition, Jira provides a graphical overview of progress — for example, when it’s displayed on a Kanban board. As a work management platform, Jira can also provide email and other notifications so that work details and updates aren’t scattered across other programs.
A simple workflow in Jira might begin when a user creates a work item as an issue and designates the status as To Do. When work begins, the status shifts to In Progress. When the item is complete, the status is Done.
But you can also create your own when your process is more complex, and work items might be routed to another path. But before you start building in Jira, you need to stop and think about what your process looks like in the real world.
Jira Workflow Best Practices
Stellman says one of the biggest problems people make in creating workflows is adding unnecessary states and transitions. “When you use an actual feature, build a value stream map to see exactly how it works, and use that as the basis for your workflow, you tend to include only the statuses and transitions that you actually need,” adds Stellman. “This is a highly effective way to create a streamlined workflow that's tailored to the way your team works.” By identifying the correct states, you allow Jira to provide the optimal level of visibility into a project.
When planning a workflow, don’t simply ask what information is needed in an issue screen and what are the best fields to capture it. Instead, also consider such questions as whether a workflow is needed for urgent items. Should you allow users to undo some or all statuses — in other words, can they revert an issue to a previous state? Do you need a step for every component of your process? Do different issues require their own workflow? Do you need one large workflow or more individual workflows? Should each issue type, bug, or development item have its own workflow? Your workflow should reflect your business process, minus unnecessary efforts.
At a higher level, you may want to consider standardizing similar workflows within your team and across your organization. When you have similar processes and, thereby, similar Jira workflows, you can increase cross-team cooperation (especially if you want to share dashboards) and employee movement into different roles.
How to Find Your Own Jira Workflow
Andrew Stellman is a developer and architect for organizations such as as Microsoft and MIT. He’s also a Jira expert. He says that teams often think that finding a workflow should be easy, but then the questions begin.
“Coming up with a single workflow that works for all of the issues in your project is hard,” says Stellman. “Is this transition necessary? Don't we need to include a special case for this particular situation? Are we making it too easy to cancel or delay work? Adding too many approval steps?” He believes this is why teams want to streamline and find a one-size-fits-all solution ready-made for their industry.
“But I don't think the approach of finding a generalized ‘template’ Jira workflow and adapting it works particularly well,” notes Stellman.
“A much more effective approach is to take a page from Lean thinking, a way of thinking about organizing projects and activities that more and more teams (especially Agile teams) have been adapting. When you create a Jira workflow, you're making a fundamental change to the way that you and your team do your work and build your projects. Lean thinking tells us that an effective way to improve how a team works is to first see the whole: understand exactly how your team works, including what happens before work arrives and what happens to the finished product after it leaves your team. Once you see the whole, the entire team can use that knowledge to improve how they work together.”
Stellman says one of the biggest problems people make in creating workflows is adding unnecessary states and transitions. “When you use an actual feature, build a value stream map to see exactly how it works, and use that as the basis for your workflow, you tend to include only the statuses and transitions that you actually need,” adds Stellman. “This is a highly effective way to create a streamlined workflow that's tailored to the way your team works.” By identifying the correct states, you allow Jira to provide the optimal level of visibility into a project.
When planning a workflow, don’t simply ask what information is needed in an issue screen and what are the best fields to capture it. Instead, also consider such questions as whether a workflow is needed for urgent items. Should you allow users to undo some or all statuses — in other words, can they revert an issue to a previous state? Do you need a step for every component of your process? Do different issues require their own workflow? Do you need one large workflow or more individual workflows? Should each issue type, bug, or development item have its own workflow? Your workflow should reflect your business process, minus unnecessary efforts.
At a higher level, you may want to consider standardizing similar workflows within your team and across your organization. When you have similar processes and, thereby, similar Jira workflows, you can increase cross-team cooperation (especially if you want to share dashboards) and employee movement into different roles.
Start Here: Sketch the Value Stream Map for Your Jira Workflow
To determine what information you need in your workflow and how it will be captured, Stellman suggests applying Lean thinking to create a value stream map. Teams using all types of project management methodologies, from traditional to Agile, can apply this tool. This example is from Learning Agile: Understanding Scrum, XP, Lean, and Kanban, by Andrew Stellman and Jennifer Greene.
How to Create a Workflow-Inspiring Value Stream Map
Your value stream map won’t immediately translate to a workflow, but you can look to your organization’s history and experience to get started.
- Find an item your team has finished. Stellman advises it’s important that this be a “minimal chunk,” such as a small feature or a bug or other fix.
- Have the team collect all emails and documents pertaining to that work item.
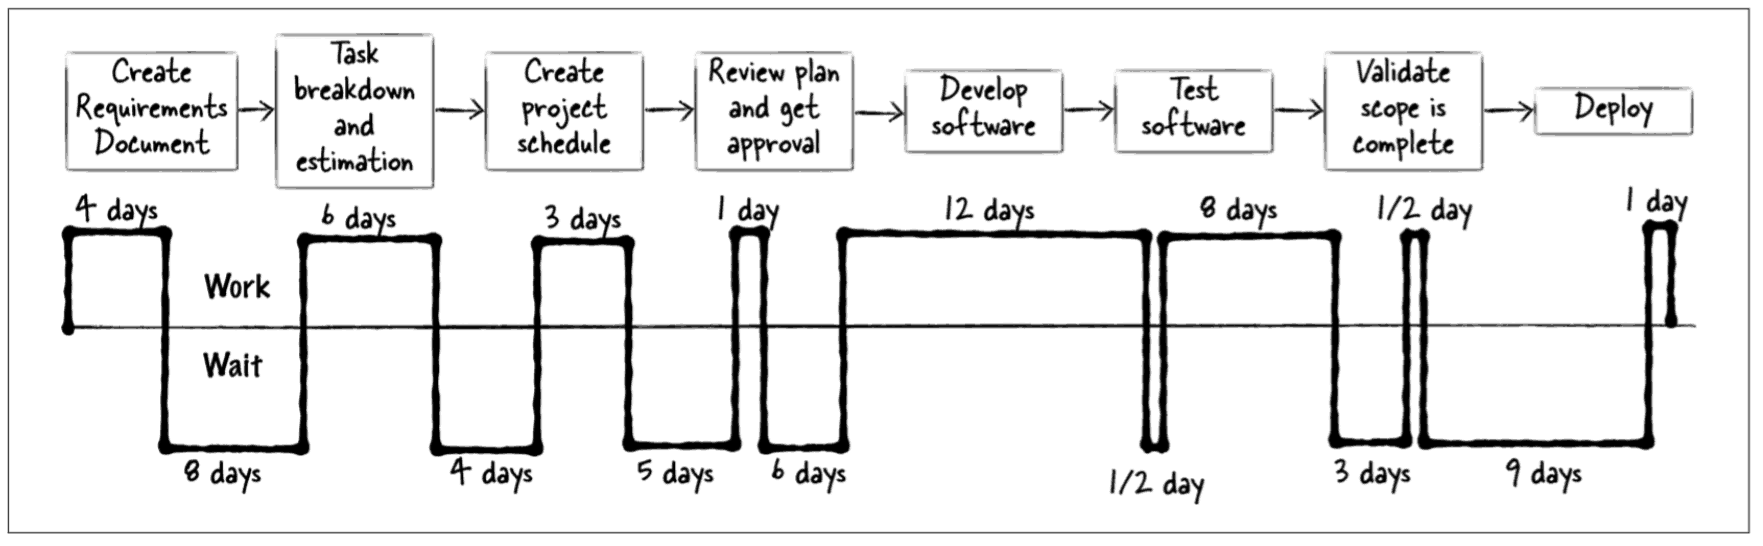
- Create a history for the item. Record how long each step actually took, including downtime when the item sat waiting in someone’s inbox. For example, it might take one day to fix, but five days for the technical writer to add updated information to the product documentation and another day to write up the changes.
- Create your value stream map. Stellman says, “The value stream map is a timeline that shows all of the steps that the work item went through, including the amount of time it spent in each of the steps, and the amount of time that it spent waiting for the next step.” Working time appears above the baseline, and waiting time appears below the baseline.
Draft Your Workflow
Whether or not you create a value stream map, it is helpful to draft your workflow before you begin to work in Jira. Sketch this on paper or on a whiteboard with team members.
- Consider what steps can become statuses in your workflow.
- Where there are long delays in your map, consider adding an extra state.
- Alternatively, add a transition forward from each step.
- If needed, add a transition back from certain states.
The Challenges of Customizing and Implementing Jira Workflows
Jira’s out-of-the-box workflow may not be robust enough for many projects, so you may need to customize a workflow for your team. But it is not a trivial proposition and takes time and effort, usually from the Jira administrator.
You need to be careful not to break existing workflow implementations and ensure that customizations continue to work even with new updates to Jira and any connecting programs. Consider duplicating an existing workflow for individual needs. Furthermore, you need to ensure that your team actually uses Jira to update their work progress. Also consider that different workflows and statuses across teams may impede communication during collaboration. An overly rigid and specific workflow may limit efficiency as well.
What Are the Components of a Jira Workflow?
Whether you use Jira software, Jira Core, or Jira Service Desk, your Jira project will contain work items that are known as issues and are logged in the program, whether as bugs, problems, or tasks. To track the progress of those issues from when they are first logged through to completion, you add them to a workflow.
Jira offers a default workflow, but you can customize the features to meet your organization’s needs. For example, in a Jira workflow, issue statuses are called steps, transitions or issue actions, and resolutions. You can customize these components in great detail. Read on to learn more about how you use these parts to design the workflow you want.
Statuses: Workflow statuses represent the state of an issue at various points in the workflow. Statuses may correspond to some or all of the columns on your Kanban or Scrum boards. Statuses are either resolved or unresolved. We will discuss this further later in this article.
Transitions: Transitions represent the movement of work items between steps. In Jira, transitions go only one way, but with items that may potentially move back and forth between states, you can create two transitions. You may need this with items where, for example, users prematurely begin work.
In addition, you can add or change a screen to a transition so that users can include comments or other information about the issue. You can also specify that all statuses in the workflow transition to one selected status, sometimes known as a global transition. For instance, you might allow all work items to go back to the Open status at the beginning of the workflow, no matter its current state. To do this, select Allow all statuses to transition to this one in the properties panel for that transition. We’ll discuss transitions in further detail later in this article.
Assignees: These are the team members or others responsible for all or part of the effort on a work item.
Resolutions: Resolutions are not statuses. A status represents the state of an open work item in a workflow, whereas the resolution describes why the work item is no longer in the workflow. For example, is it closed or duplicated? In Jira, an item is closed when the user sets a resolution in the resolution field. To enforce a resolution, you can create a post function. See an example of how to set a post function.
Simplified or Advanced Workflows — What’s the Difference?
When you start a project from a template, a default workflow is already attached. When you start a project in Jira Cloud, most of the attached out-of-box templates use Jira Simplified Workflows. Default workflows may be sufficient, especially if you want to track only one project or a few statuses. However, if you need to track more than one project or have several statuses, you’ll need Advanced Workflows. In addition, each team may need its own workflow, or different types of issues may require customized workflows or separate workflows.
Simplified Workflows: A Simplified Workflow is easy to use, but can’t be customized. You’ll find this type of workflow if you create a project from one of the templates, including the Scrum and Kanban templates, or transfer an existing board to a Simplified Workflow. Simplified Workflows have the following characteristics:
- You can drag and drop items between statuses without requiring user input.
- Transitions happen automatically, and no user input is possible.
- Jira automatically sets the resolution to Done when an item moves to the final or successful state.
Advanced Workflows: An Advanced Workflow offers more flexibility in configuration. Your project has an Advanced Workflow if the project was created in Jira Agile, but you can also upgrade a Simplified Workflow. Advanced Workflows have the following characteristics:
- They can have many custom statuses, but three defaults are available: To Do, In Progress, and Done.
- You can set conditions to control circumstances for when items can be moved between states.
- Screens can appear on transitions, which allow for user input.
- Workflows end as Resolve Issue, Close Issue, or Open Issue.
Practical Examples of Jira Workflows
Jira workflows are easy to share with your team to help them understand the process. The following examples show more complex examples for real-world scenarios. You can replicate and adjust these to suit your business needs.
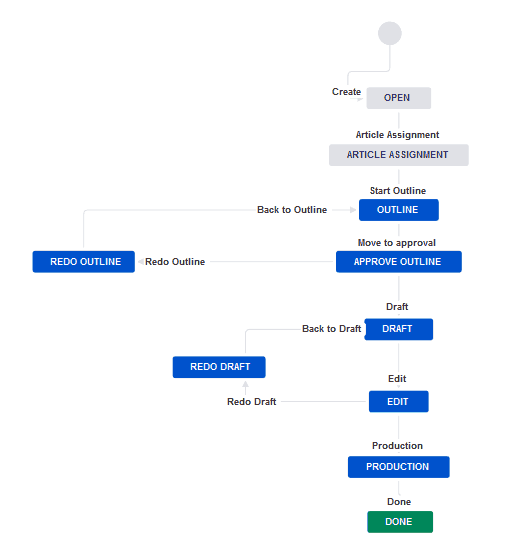
Content Review Cycles
A content workflow may seem too obvious to document: outline, write, edit, publish. But think of the intermediate steps where an artist or a writer creates a piece of content. Now imagine tracking multiple assignments in different states of completion. How can the content lead recognize bottlenecks that may prevent you from meeting your publication schedule?
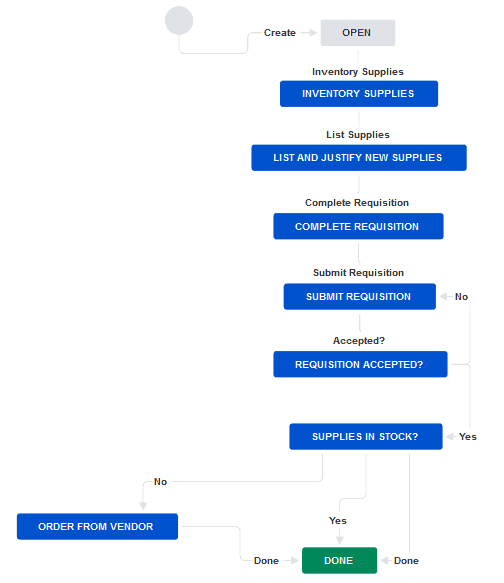
Supply Chain Manufacturing
Organizations need a set process for sourcing and acquiring materials. Here we provide a basic workflow.
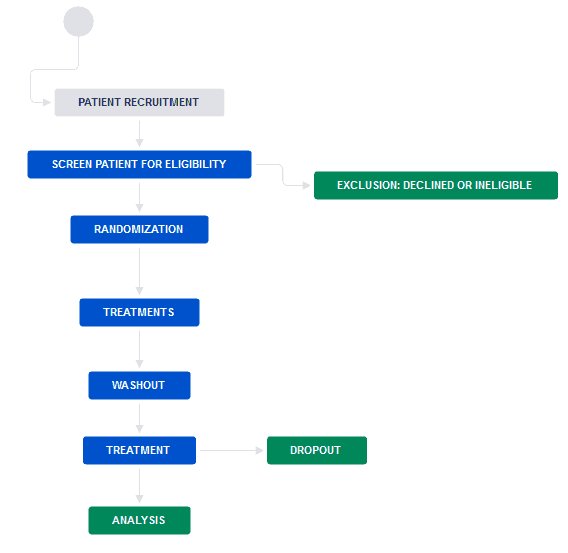
Pharmacological Trials
Pharmacological trials must track patients and their progress from recruitment and eligibility testing through the actual trials. They must also track patients who were excluded or can no longer continue because of adverse reactions or other reasons.
Project Template Structure and Jira Workflows
Not every issue requires the same workflow. With a workflow scheme, you can associate different types of issues with particular workflow statuses and activities that you specify. Every project requires at least one workflow scheme. You can then share the workflow schemes with different projects. Keep in mind that if the schemes are shared, any edits to schemes affect all projects.
However, to get a real advantage, you may need to adjust additional objects in Jira before you begin work on your workflow. In fact, your team may benefit most from a creating a completely new project template. Understanding how project templates come together can help.
Jira Project Structure
Every Jira project is composed of several controls that define at a deeper level how it records and tracks issues. You can customize these controls. Although this article focuses on workflows, it can be helpful and sometimes necessary to understand how the building blocks of Jira projects fit together.
The structure from the smallest level up to your workflow looks like this:
Issues: An issue is a way of describing a task or problem. In Jira, an issue is a means for collecting information. For example, for a content production project, you might have a New Content work item and an Update Content work item for a few months after the article has been published. When creating a custom issue type, consider frequent issues or new projects or experiments versus development. Different issues may require different workflows.
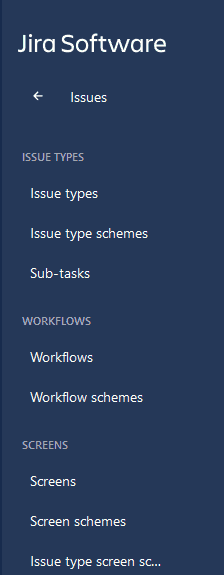
Issue Type Scheme: After you create your issues, you must add them to the issue type scheme. The issue type scheme is required in a project, but only one issue type scheme is allowed for each.
Fields: Your custom issues may require you to log very specific information. Fields gather the individual pieces of information. You may use the generic fields such as summary or comments that appear by default on every screen, or you can create custom fields.
Field Configuration: A field configuration is required and contains all fields in a project. You can add your new fields, remove others, or specify which fields must be filled out.
Field Configuration Scheme: A field configuration scheme maps field configurations to issue types. Only one field configuration scheme is required for each project.
Screens: Screens provide a way for users to interact with issues and move them through the workflow using the fields you map to them. Each issue type usually requires a Create Issue screen, an Edit Issue screen, and a View screen, with additional screens to move work items through transitions. You can reuse screens for multiple issues and different steps.
Screen Scheme: Add all your new screens to a scheme. In the screen scheme, you include either the default Jira screens or your custom screens. The exceptions are transition screens, which you add directly to the workflow.
Issue Type Screen Scheme: Use the issue type screen scheme to associate the screen scheme to an issue types. Only one issue type screen scheme is required for each project.
Workflow Scheme: The final building block in a custom project is the workflow scheme, to which you add each of the workflows in your project. A project can contain only one workflow scheme.
Additional Project Schemes
Fine-tune your project by adding these schemes.
Permission Scheme: The permission scheme is required and controls permissions for each project. To make it easier for Jira administrators to assign permissions, use the scheme to build permissions into project roles.
Issue Security Scheme: One of the optional schemes, the issue security scheme allows you to restrict access to certain types of issues. For example, management might want a view into project, but for compliance reasons, non-team members should not have write access to the project.
Notification Scheme: Also optional, a notification scheme allows users to send email notifications on certain actions.
Build the Project in Jira
When you put all these building blocks together, you create a project. Under Project Administration, take these schemes and map them appropriately: the Issue Type Scheme is mapped to the Issue Types, the Workflow Scheme to the Workflows, the Issue Type Screen Scheme to the Screens, and the Field Configuration Scheme to the Field Section.
What Are Workflow Properties?
Workflow properties can be reconfigured to restrict aspects of steps and transitions. However, proceed carefully. They are advanced settings, and changing them could break bulk operations and other functions. Two properties you may want to change are transition button names, with the properties jira.i18n.title and jira.i18n.description.
Fine-Tune Your Jira Workflow
To add more functionality, configure the advanced settings, triggers, conditions, validators, and post functions. A comment is particularly important if an item reverts to a previous status. For example, when a user transitions a work item between statuses, you may want them to add a comment about why the item is ready for transition.
Transitions
Transitions represent the movement of work items between statuses. In Jira, transitions go only one way: forward. To represent the potential for an item to move back to a previous state, create another transition and specify movement to an earlier state. Transitions also have settings that can help you get practical value out of your workflow:
- Conditions ensure that the user is allowed to transition the work item. They also help to assert business rules.
- Validators ensure that the item has met the right criteria to change status.
- Post functions complete any actions needed after the transition. For example, you can use the post function Update Issue Field to update the Assignee, Description, Environment, Priority, Resolution, Summary, Original Estimate, Remaining Estimate, and Time Spent fields.
- Triggers automatically transition issues when connected tools such as Bitbucket meet the required criteria. You can set triggers in your workflow to automatically transition issues under specified conditions for connected programs, such as code repositories and build managers.
Active and Inactive Workflows
You can use all these procedures to edit existing active and inactive workflows. An active workflow is one that is currently in use by projects. An inactive workflow is not in use by any projects.
Because no issues pass through the workflow, you can edit an inactive workflow directly. Before you can edit an active workflow, Jira first saves a draft copy, which is version where you make changes. To activate a workflow, you must map it to a workflow scheme, which you then map with the issue type scheme.
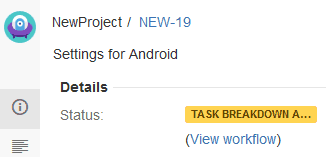
Share the Jira Workflow Diagram
You can share the finished workflow diagram with your team to help them understand what the process for work items will look like. They can view the diagram from any work item page by clicking View Workflow, which appears under the item’s status at the top of the page. As a Jira or project admin, consider reviewing the workflows and other aspects of the Jira setup with project owners regularly to ensure that all configurations serve users well.
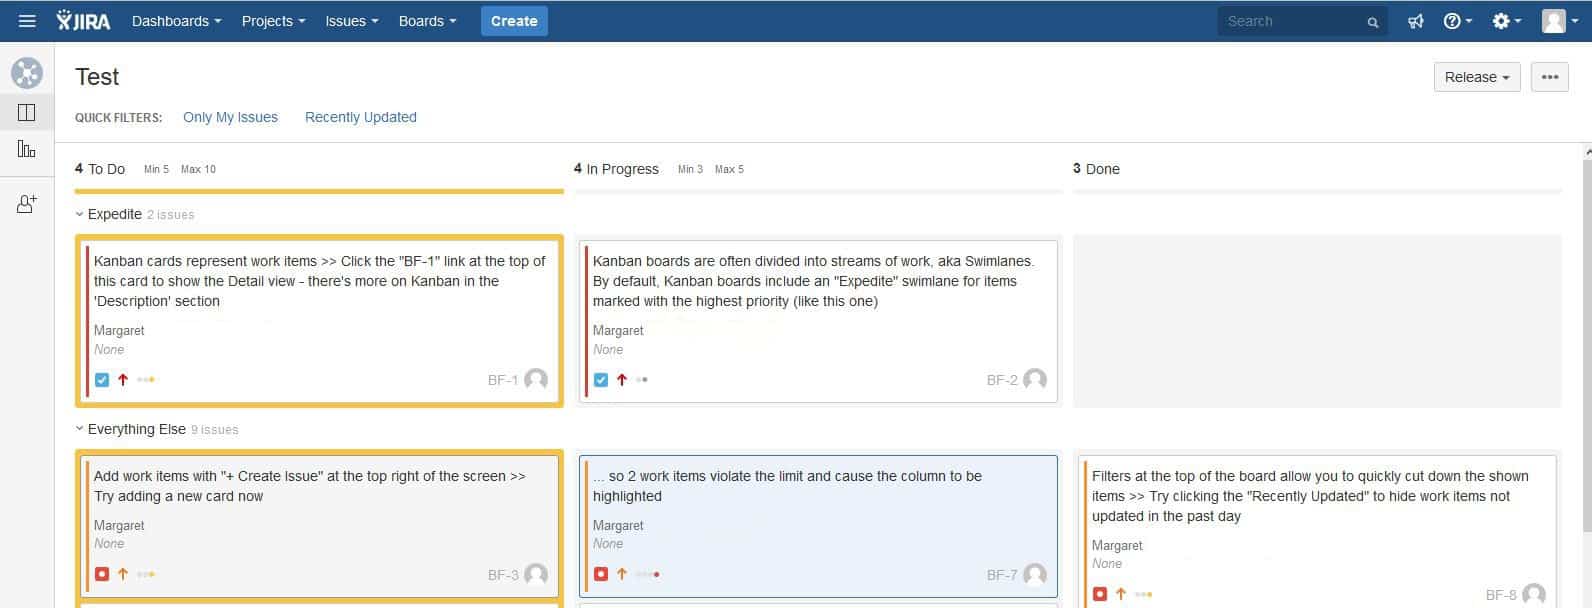
Interact with a Workflow in Jira
Users interact with workflows each time they log, update, and transition work items in text screens, but they can also track progress and make updates through boards. Boards group statuses into categories or columns. Default categories are To Do, In Progress, and Done, which you will find, for example, in Kanban boards. In addition, you can create your own categories.
Generally, you should have no more than six columns on boards to keep cards readable. Steps are color-coded, which also appear in your workflow diagram: Blue statuses indicate beginning states or even exchange of work between teams. Yellow indicates In Progress items. Green indicates completed work. You can customize colors, but do so with caution.
Maximize Your Jira Workflows with Smartsheet
Empower your people to go above and beyond with a flexible platform designed to match the needs of your team — and adapt as those needs change.
The Smartsheet platform makes it easy to plan, capture, manage, and report on work from anywhere, helping your team be more effective and get more done. Report on key metrics and get real-time visibility into work as it happens with roll-up reports, dashboards, and automated workflows built to keep your team connected and informed.
When teams have clarity into the work getting done, there’s no telling how much more they can accomplish in the same amount of time. Try Smartsheet for free, today.