How to Create a Timesheet in Excel Using a Template
The simplest way to create a timesheet in Excel is to start with a template. Choose one that includes space for all the information you need. If you can’t find the perfect template, we’ll show you how to customize one.
Download an Excel Timesheet Template
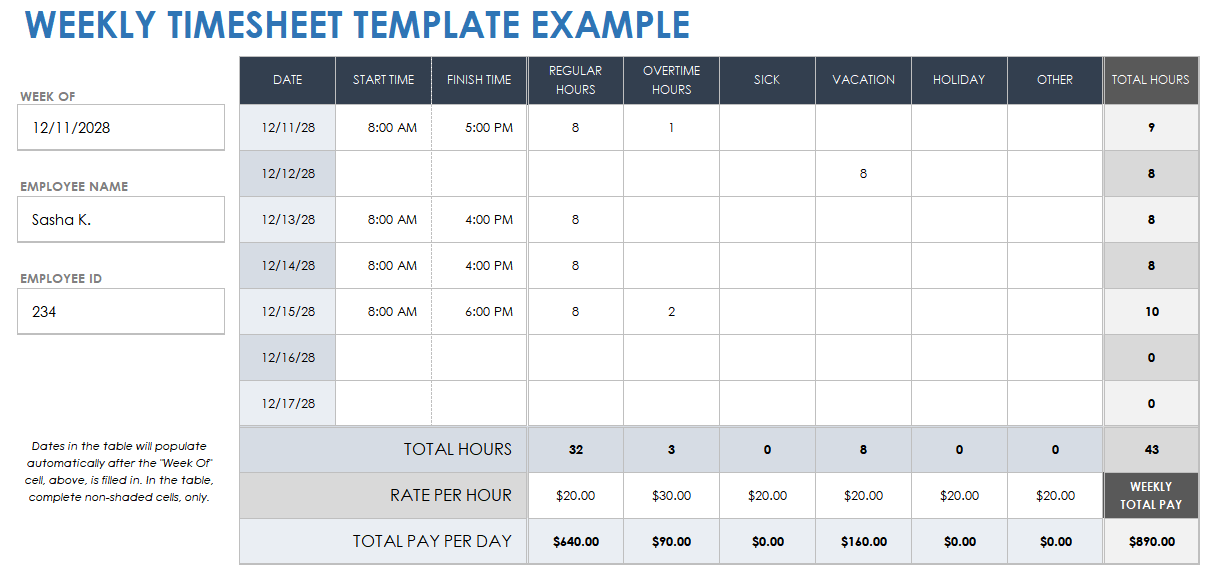
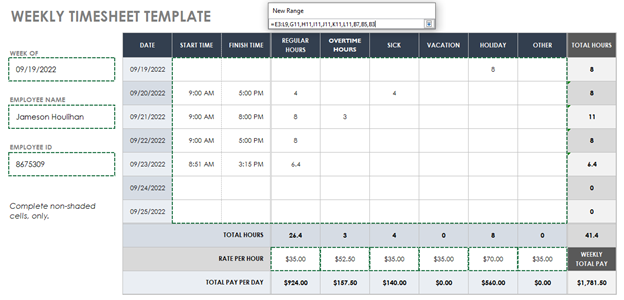
Download the Weekly Timesheet Template for Excel
This Excel timesheet template includes space to log your hours for each day of the week, including overtime, sick, vacation, and holiday hours. The template includes formulas to calculate the number of hours worked and how much you are owed based on your hourly rate. This template is free to download, easy to use, and completely customizable. Follow along, and we’ll show you how.
1. Prepare the Timesheet Template
- After you download the template above, open it. It will automatically open in Excel.
- If the Protected View banner appears at the top of the spreadsheet, click Enable Editing. This will allow you to make changes and add information to the template.

- Ensure the template includes all of the sections that you will need. This template is fully editable, so you can easily change any of the text fields. We’ll cover how to add break columns to customize your template in the tutorial below.
2. Enter Identifying Information
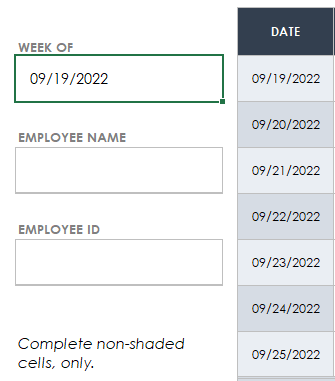
- On the left side of the spreadsheet, click on the Week of field and add the date that starts your workweek. The template will automatically populate the dates for the rest of the week in the date column to the right.
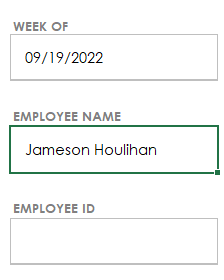
- Next, click on the Employee Name field and enter the name of the employee whose hours you are tracking.
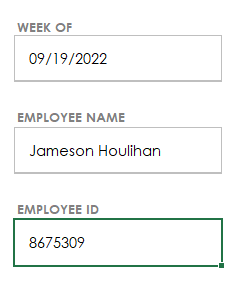
- Then click on the Employee ID field and enter the employee’s ID number, if applicable.
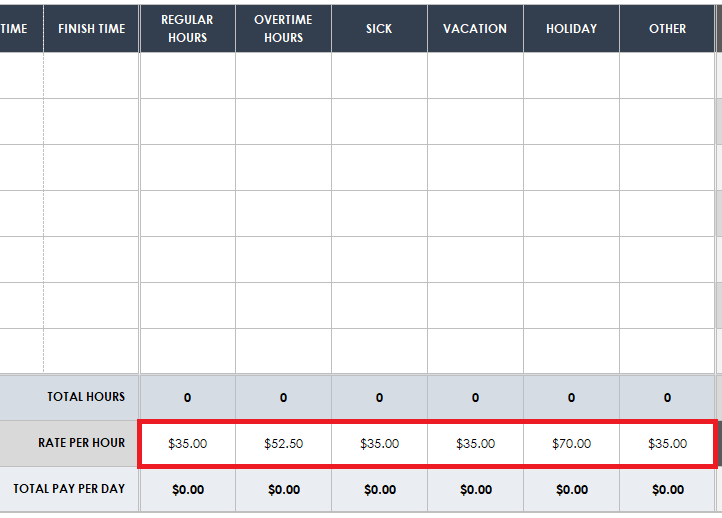
3. Enter the Rates of Pay
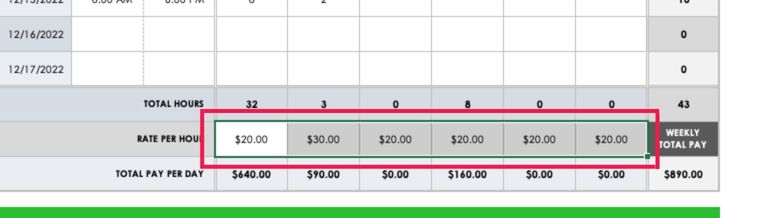
- In the bottom section of the template, fill in the employee’s rates of pay by clicking on each field in the row and entering the hourly pay rate for each of their regular, overtime, sick, vacation, holiday, and other hours.
4. Enter the Employee’s Hours Worked
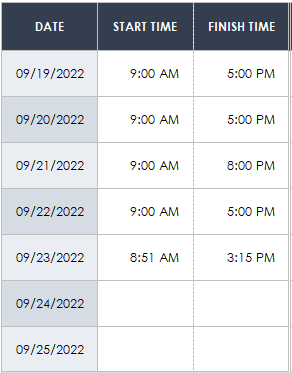
- Click on the Start Time field for the first day of the week, and enter the employee’s start time in the format HH:MM AM or PM.

- Click on the Finish Time field for the first day of the week, and enter the employee’s finish time in the same format.

- Repeat this process for each day of the week the employee worked.
5. Calculate and Enter the Type of Hours Worked
- For each day of the week, calculate the number of hours of each type worked, and enter it in the appropriate field. The template will automatically add up the total number of hours per row for each day in the Total Hours column.
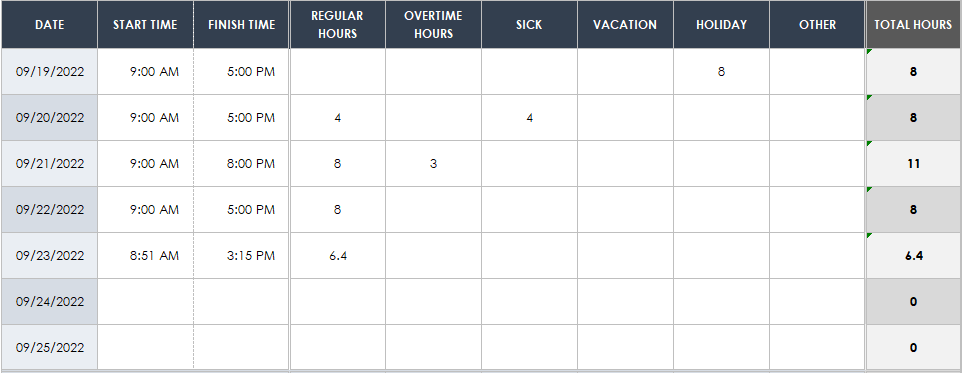
- Pro Tip: If you are having trouble calculating the total number of hours and minutes worked each day, use an online hours calculator.
- The template will automatically calculate the total number of hours for rate type and display the total pay per day, as well as the weekly total pay.

6. Verify Your Information and Save Your Timesheet
- When all of your timesheet information has been added, verify that it is correct.
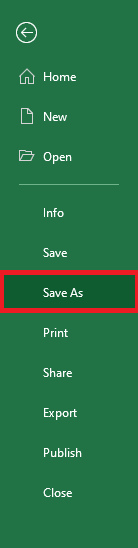
- Click the File tab.
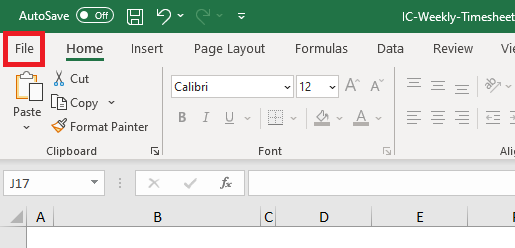
- Click Save As to save your timesheet.
How to Customize an Excel Timesheet Template
Once you know how to use a timesheet to track time in Excel, you’ll want to learn how to customize. We’ll teach you how to add images, colors, and a column for breaks, as well as how to change fonts.
For an assortment of free templates for multiple formats, check out our collection of timesheet and time card templates.
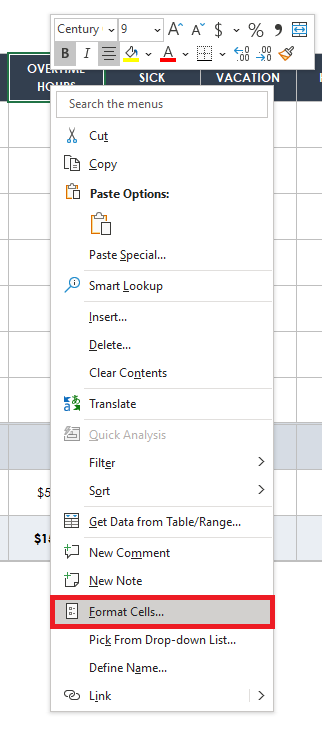
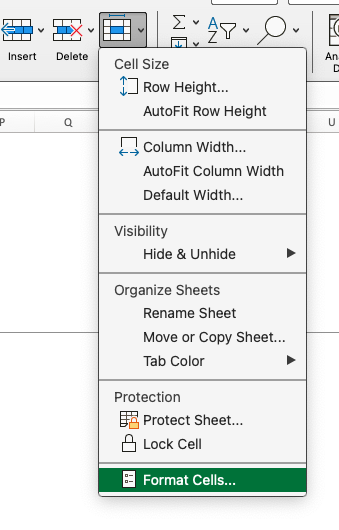
Format Cells in Excel
Right-click the desired cell, then click Format Cells… in the menu. Cycle through the menu options Number, Alignment, Font, Border, Fill, and Protection to change number styles, fonts, and colors; add or change borders; change the cell’s alignment; and protect cells.
Pro Tip: To format a group of cells, hold the Shift key on your keyboard and click the first and last cells within the desired range. Release the Shift key. Right-click anywhere inside the highlighted selection. Click Format Cells… in the drop-down menu.
How to Change Fonts
- Select your desired cell or cells, and right-click. Select Format Cells… from the drop-down menu.
- Click on the Font tab. Select your new font, then click the OK button.
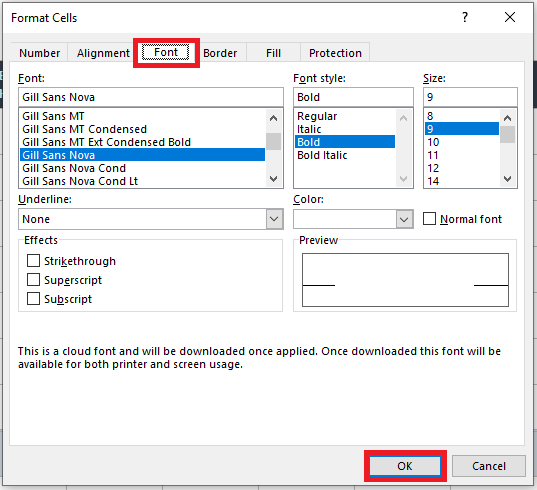
- Repeat these steps to change the font in all desired cells.
How to Add or Change Background Colors of Cells
- Select your desired cell or cells and right-click. Select Format Cells… from the drop-down menu.
- Click the Fill tab. Select your desired fill color, then click the OK button.
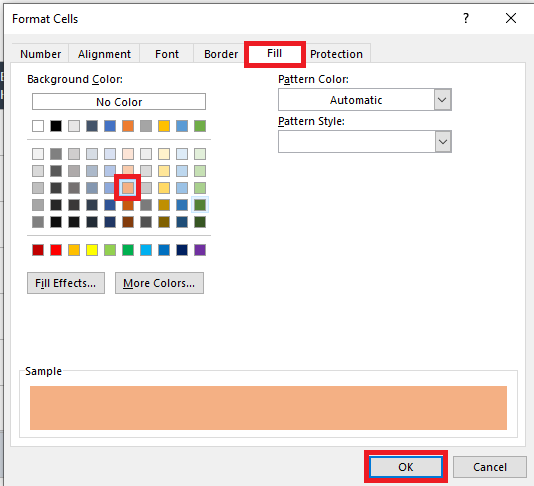
- Repeat these steps to add or change color in all desired cells.
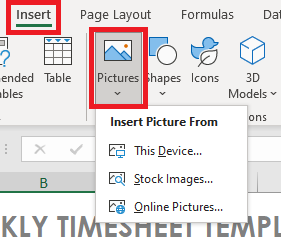
How to Add Logos and Images
- Click the Insert tab, then click Pictures. Choose Stock Images or Online Pictures to browse categories of images you can add to your timesheet. To add an image saved on your computer, click This Device… in the Insert Picture From menu.
- Navigate to the location of the image on your computer, select the image you would like to insert, then click the Insert button.
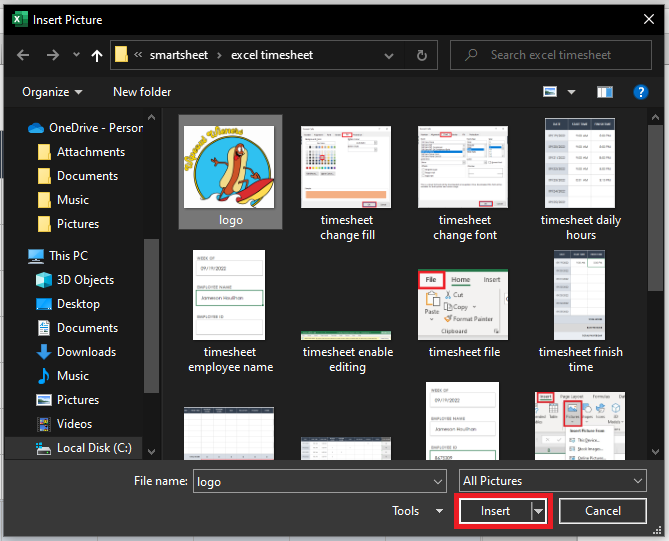
- Resize your image by clicking and dragging the circles surrounding the image, and click and drag the center of the image to place it where you would like it to go.

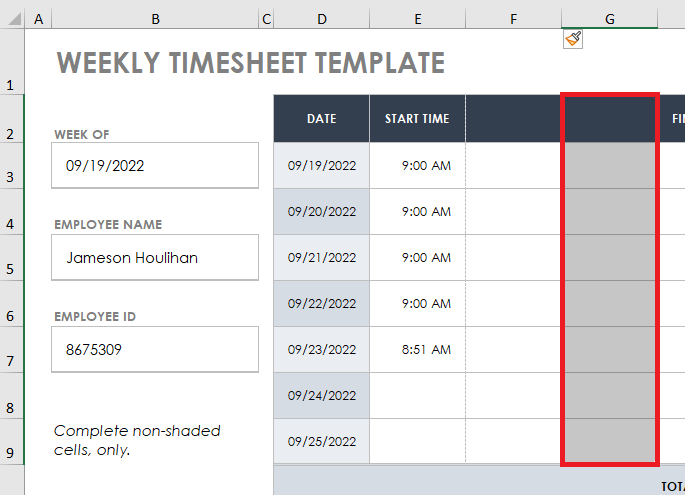
How to Add Columns to Track Breaks
- Right-click on the F column and click Insert from the drop-down menu to add a column to the left.

- Repeat this process to add a second column.
- Hold the Shift key on your keyboard, and click cells G2 and G9 to select the range. Release the Shift key.
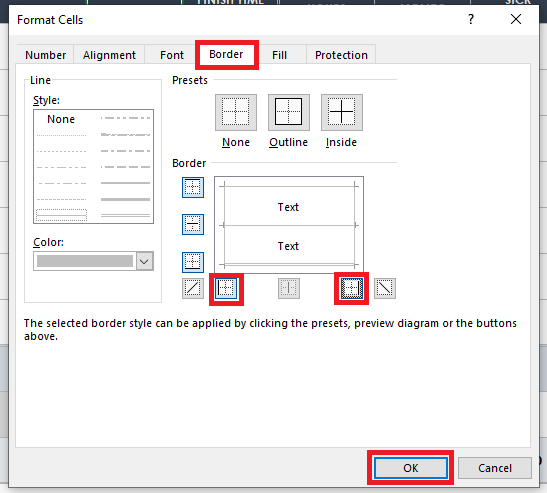
- Right-click within the selected range and click Format Cells… in the drop-down menu.
- In the Format Cells… window, click the Border tab, click the options to create left and right borders, then click the OK button.
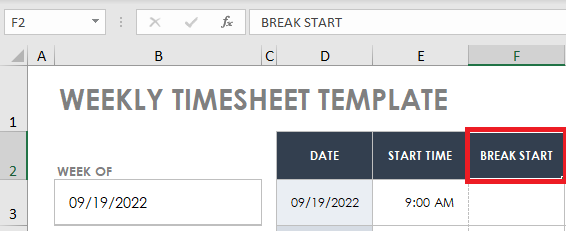
- Click in cell F2, press the Caps Lock key on your keyboard, and enter “BREAK START.”
- Click in cell G2, press the Caps Lock key on your keyboard, and enter “BREAK END.”
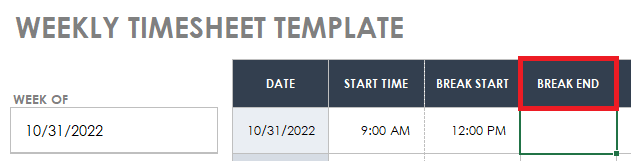
- Use these new columns to track the time the employee clocked out for their break and when they clocked back in.
Pro Tip: Don’t forget to subtract this time when calculating the employee’s total hours if the break is unpaid.
How to Protect a Range of Cells in Excel Timesheet in Microsoft Enterprise 365
The instructions below are for Excel found in Microsoft Enterprise 365. Some Excel versions of Microsoft 365 don’t support the Allow Edit Ranges button. If your version of Excel doesn’t have this button, you’ll find steps for protecting a range of cells below.
- Click the Review tab, then click Allow Edit Ranges.
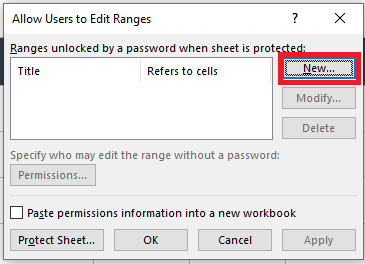
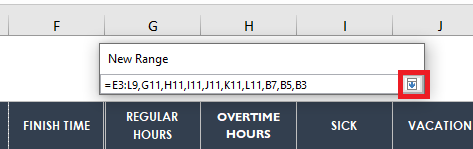
- Click the New button in the Allow Users to Edit Ranges window.

- Click the Up Arrow button in the New Range window.
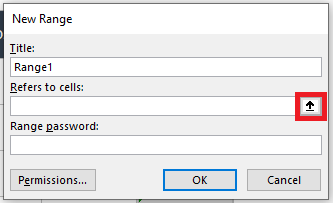
- Select the range of cells you would like to allow users to have edit access to. To select a large range of cells, hold the Shift key on your keyboard and click the top-leftmost cell and the bottom-rightmost cells. Release the Shift key. To select additional cells, hold the Ctrl key on your keyboard and click on the additional cells you would like to add to your selection.
- Pro Tip: Select the cells that you would like users to be able to fill in. Your selection may not match the image, depending on what you would like to allow edit access to for all users.
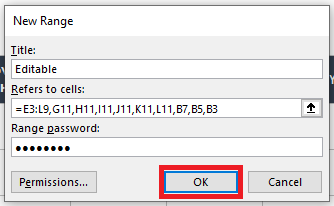
- When all your cells have been selected, click the Down Arrow button in the New Range window.
- Change the Title of your new range, if desired, and create and enter a password in the Range Password field. Then click the OK button.
- Reenter the password you created in the previous dialog box to confirm, then click the OK button.
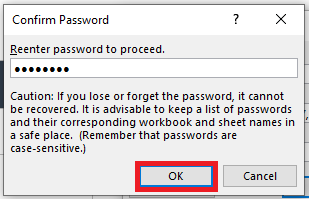
- Pro Tip: Choose a password you are sure you will not forget, as it cannot be recovered if lost.
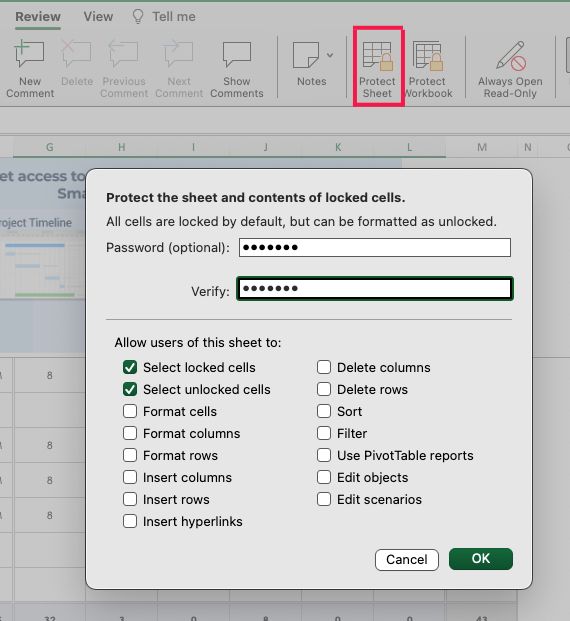
- Click Apply, then click Protect Sheet.

- Create a password to unprotect the sheet and enter it in the Password to unprotect sheet field. Then click the OK button.
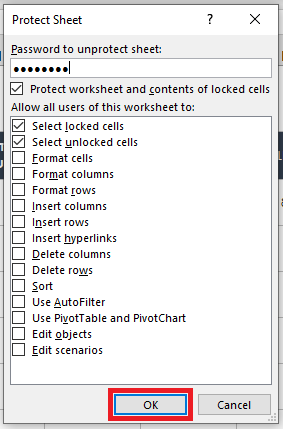
- Reenter the password you created in the previous dialog box to confirm, then click the OK button.
- Pro Tip: Use the same password that you created to unprotect your range of cells above to avoid greater confusion.
- Click on one of the cells within the range you selected in step 4. Enter the password you created, then click the OK button.
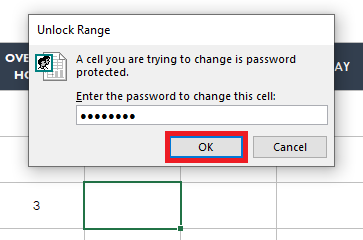
- Your sheet is now protected, and users can only make changes to the cells within the range that you created.
How to Protect a Range of Cells in Microsoft 365 Excel
These instructions are for how to protect cells in Excel for Microsoft 365.
- Click and select the cells you want to protect on the timesheet.
- On the Home tab, click Format and click Format Cells.
- In the pop-up window on the Protection tab, click Locked. Click the OK button.
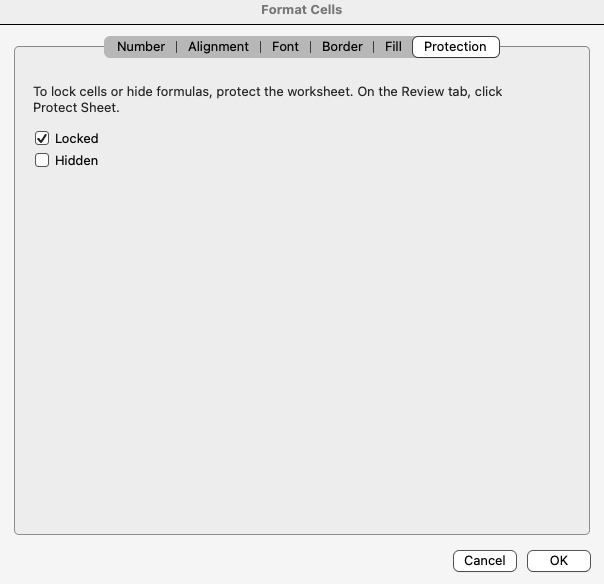
- On the Review tab, click Protect Sheet. Enter a password and enter it again in the Verify box. Click the OK button. The cells are now locked and can’t be changed unless someone knows the password.
Challenges of Using Excel for Timesheets
Excel is a powerful tool, but it is not optimized for time tracking and timesheets. From the need for manual calculations to the difficulty of sharing with multiple users, we’ve outlined some challenges of using Excel for timesheets below.
Here are the most common challenges of using Excel for timesheets:
- Manual Calculations: Creating complex formulas can be difficult in Excel. For many people, it may be easier to use an online time calculator, or to perform calculations manually, than to set up complex formulas in Excel.
- Combining Different Hour Types: Regular pay, overtime, vacation, and holiday pay will differ between employees, and laws surrounding overtime may differ based on location. It is difficult to track these numbers accurately in Excel without extensive knowledge of local laws and Excel formula building.
- Visualizing Longer Periods of Time: An Excel timesheet only covers the time that you set it up to cover. It does not expand automatically or allow targeted viewing of date ranges. This can make it difficult to reference past timesheets or to maintain accurate records.
- Saving and Sharing: Saving and sharing Excel files between multiple users can be complicated. Excel files are not optimized to be accessed by multiple users in real time, so you may not always have access to the most current file version.
- Automation: Excel time tracking cannot be automated. Users must spend time editing and sharing Excel files that could be used for other work.
- Accountability: Excel timesheets require users to self-report their time. This practice can be more vulnerable to manipulation than an automatic time tracker.
Get the Most Out of Your Timesheets with Real-Time Work Management in Smartsheet
Empower your people to go above and beyond with a flexible platform designed to match the needs of your team — and adapt as those needs change.
The Smartsheet platform makes it easy to plan, capture, manage, and report on work from anywhere, helping your team be more effective and get more done. Report on key metrics and get real-time visibility into work as it happens with roll-up reports, dashboards, and automated workflows built to keep your team connected and informed.
When teams have clarity into the work getting done, there’s no telling how much more they can accomplish in the same amount of time. Try Smartsheet for free, today.