What Is Project Scheduling?
A project schedule is a visual and descriptive outline of a project’s timeline. The schedule includes assigned tasks, dependencies, and anticipated dates of completion. Scheduling provides an overview of the project in a single-page document.

“Project schedules are used to guide the team through the tasks that must be accomplished to get to the end product,” says Dr. Stefan Oborski, Director of Project Management at Red River. “The schedule is one of the most important pieces of the project plan. Without a schedule, your team cannot know what to do, when to do it, or when the end product is due. Detailed schedules break the tasks into manageable chunks for the team to work on and provide progress markers along the way.”
Project scheduling is achieved by organizing and compiling various parts of the project plan into a single-page, shareable document that highlights the steps needed to complete the project, as well as estimated start and end dates for each task. Project schedules can take many forms and provide many benefits. To learn more, read our definitive guide to project scheduling.
The project schedule should be prepared by the project manager and updated regularly to ensure that it is always in an accurate state. Consider using a project schedule template to get started when creating your own.
What is the Purpose of a Project Schedule?
A project schedule serves as a reference to ensure that tasks are completed on time. This tool helps keep project execution on track. It is also convenient to share with stakeholders, as it includes much of the information they need.

“Creating a project schedule is one of the most important steps in planning and executing a project,” says Will Yang, the Head of Growth at Instrumentl. “It allows you to see, at a glance, which tasks need to be done and when they need to be completed. This gives you the ability to make adjustments as necessary and keep track of your progress.”
You can use a project schedule to compare your actual completion dates to your estimated ones and revise or forecast your project needs going forward. Project schedules can also be used to forecast the possible needs of future projects based on the actual needs of completed ones.
Project Schedule vs. Project Plan
A project schedule is a pared-down, digestible version of the more detailed project plan. A project schedule is concise. Share a project schedule with stakeholders and project plan with the team.
What Does a Project Schedule Include?
Individual schedules might vary. In general, a project schedule should include a visual timeline, task assignments, deliverables, due dates, task dependencies, a budget summary, basic resource tracking, and a link to the complete project plan.
Here’s a breakdown of the project schedule elements:
- Visual Timeline: Include a timeline using a visual chart, such as a calendar or Gantt chart. This timeline should include project phases, major milestones and deadlines, and estimated start and end dates for each major project step.
- Task Assignments and Deliverables: Your schedule should include who is assigned to which tasks and each of their deliverables.
- Task Dependencies: Include task dependencies when building your schedule to catch delays and bottlenecks before they pose major problems.
- Budget Summary: Your project schedule should include a basic budget summary chart or a link to a more complete project budget breakdown.
- Resource Tracking: Include charts that display resource use and availability when applicable.
- Link to the Project Plan: Including a link to your project plan allows stakeholders to dig deeper and answer some questions on their own without needing to ask you or your team. Make sure to keep the project plan up to date.
What Are the Steps in Project Scheduling?
Results might differ, but creating a project schedule always involves the same basic steps. First, define your goals and create the project plan. Then, find the critical path and assign tasks. Finally, create and share your document with stakeholders.
Here’s an overview of each step in making a project schedule:
- Define Your Goals
Before you begin a project, it is important to identify your project goals and how you will measure success. - Create the Project Plan
Organize your project information and create a project plan. The finalized plan should include a project overview, a defined project scope, budget information, a risk management strategy, a communication plan, and a detailed project schedule. - Break Down Project Tasks
To create your detailed project schedule, work backward and break down each project phase into individual, manageable tasks. Put them in order and estimate the time needed to complete them. Be sure to make note of project deliverables and dependencies. - Identify Critical Path
Identify the critical path of your project tasks to determine the total length of time necessary to complete the project. This path is based on estimates of the time needed to complete project tasks. It’s a good practice to build in extra time where possible to reduce the risk of the project running over time. - Assign Team Members Tasks
Now that you know what must be completed and how long they should take, start assigning tasks to your team. Assign tasks to them based on their bandwidth and strengths. Depending on the project, you might assign all project tasks at the beginning or create a cadence of assigning new tasks based on need once the previous tasks are completed. - Finalize the Schedule
Once you finalize the schedule, submit it along with your completed project plan to the project’s sponsor. When it has been approved, your project can move from the planning phase to the execution phase. - Share, Monitor, and Update the Schedule as Needed
Share the schedule with stakeholders, and keep it up to date as the project progresses. The schedule should always reflect the most up-to-date project status so that it can be used by anyone to check a project’s headway.

What Does a Project Schedule Look Like?
Project schedules can take many forms. For small projects on small teams, a simple task list might suffice. For larger teams working on more complicated projects, the project schedule might look like a calendar or Gantt chart.
Some projects are simple and require only a few steps, but your project schedule should be as comprehensive as needed to cover all relevant information. “Schedules that are too broad aren’t very useful,” says Oborski. “As an example, and taken to an extreme, you could have a one-line project schedule that says build a car that is three months long. How would you track progress with that?”
Below, we provide an overview of three project schedule formats, from simple to more complex, in the list below.
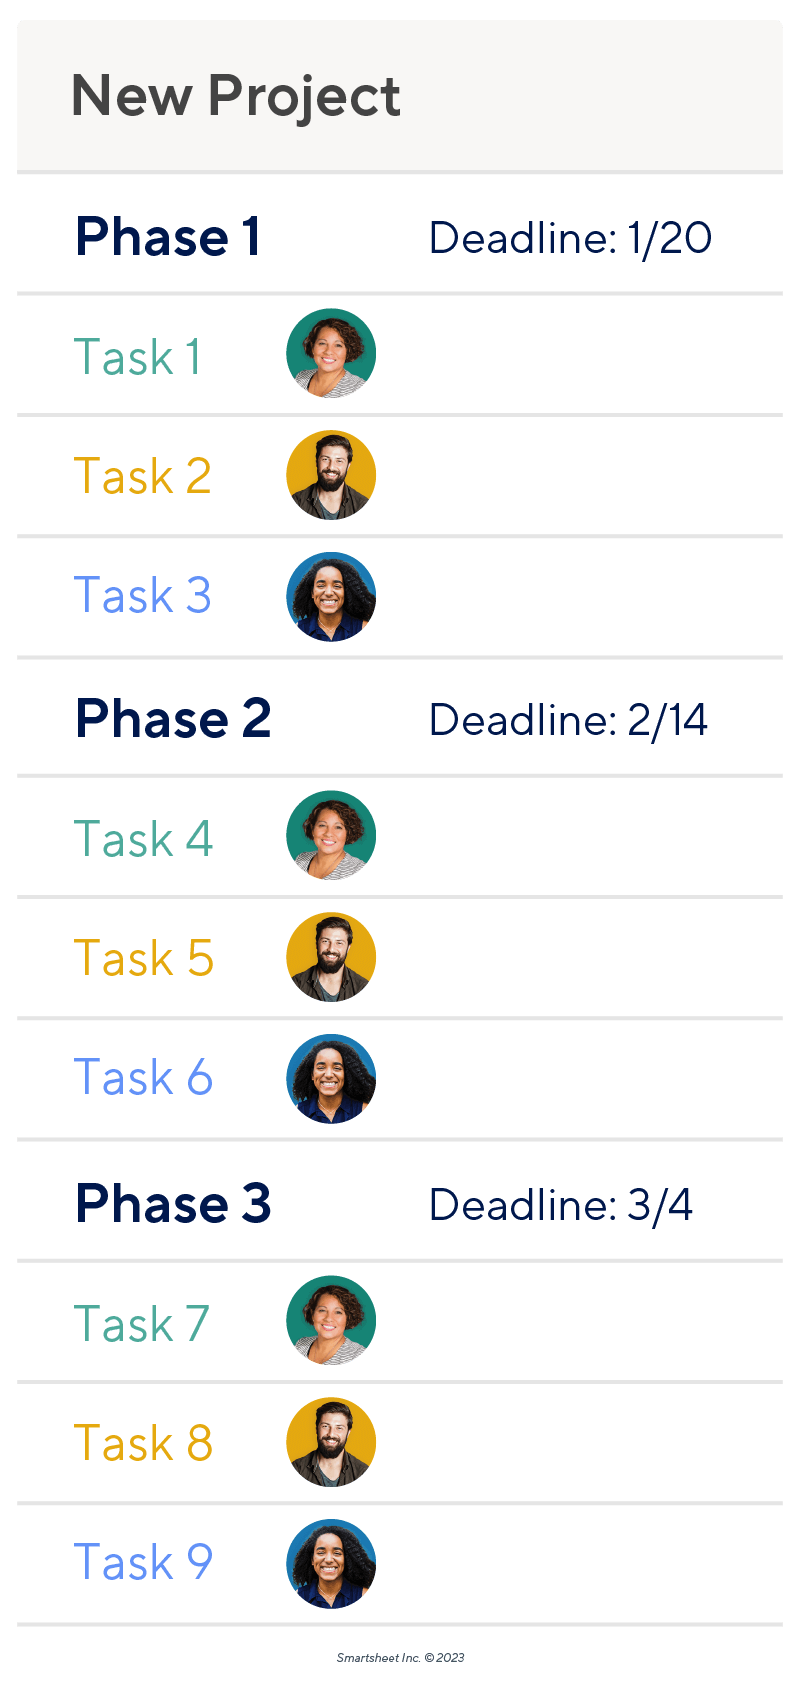
A Task List Project Schedule
A task list project schedule is ideal for straightforward projects with few steps and a small team. They are especially useful for short projects or sprints, where each team member is highly focused on only the current project. Task lists cannot reflect work being done at the same time or on other projects. While task lists are helpful, they are not overly visual and are recommended as a first draft when building a more robust project schedule.
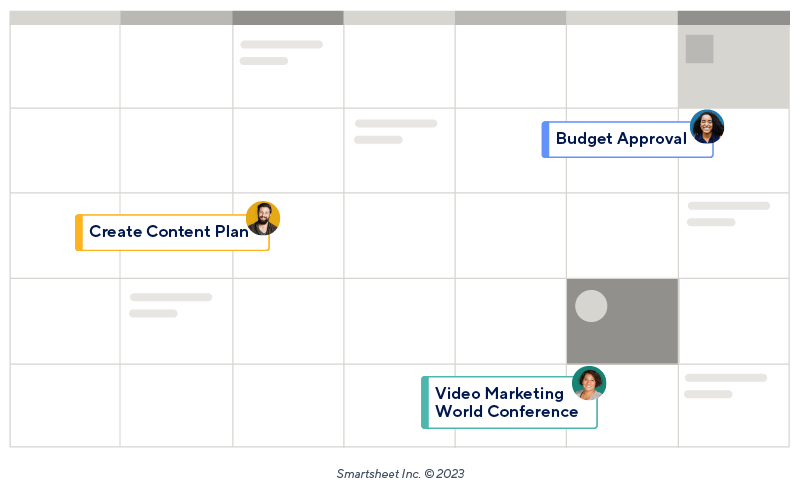
Project Schedule in a Calendar Format
A calendar layout is another good choice for a project schedule because you can visualize the time needed by different team members to get tasks done. A calendar shows start and due dates, but it might take some extra steps to understand the displayed information. Some teams might use different colors for different people or tasks to organize the schedule, but you can find better methods designed specifically for that purpose.
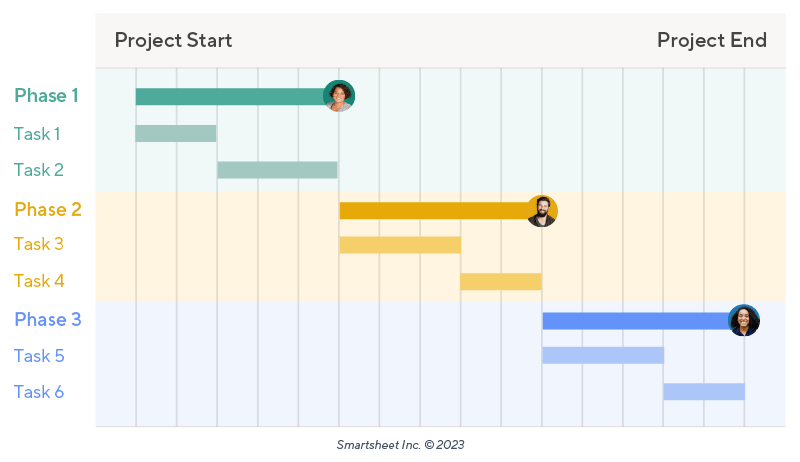
Gantt Chart Project Schedule
Using a Gantt chart is the best way to visualize a project schedule. Gantt charts model the start and end dates for a task against all other tasks in a project. Thus, you can easily see who is working on what, when they started, when they will finish, and any next steps. When paired with a task list, you can include more descriptive comments about each task, including links to invoices, specific deliverables, things to watch out for, and other comments. Learn how to make a Gantt chart.
Project Schedule Template with Gantt Chart and Task List

Download a Blank Project Schedule Template with Gantt Chart and Task List
Excel
| Google Sheets
Download a Sample Project Schedule Template with Gantt Chart and Task List
Excel
| Google Sheets
This project schedule template includes both a task list with space for links and comments, as well as a Gantt chart to display tasks on a calendar. Also, the sample project schedule template includes example data so that you can see how to fill out the form. Use this template to schedule project phases and tasks, assign them to a team member, and leave links to reference budgets and more detailed project plans. This template will automatically determine the duration of each task and populate the Gantt chart based on the task start and end dates you enter.
For more options, check out our expanded collection of project schedule templates. To learn how to do it yourself, read our step-by-step guide to using a project schedule template in Excel.
How Is Project Scheduling Done?
Project scheduling is done with such as Gantt charts and task lists, along with strategies such as Program Evaluation Review Technique (PERT) and the critical path method (CPM). We outline these and other tools and techniques in the list below:
- Work Breakdown Structure (WBS): By breaking whole projects into phases and reducing those into individual tasks, you can more easily predict the time that tasks and phases will take to complete, and who on your team is the best choice to do them. WBS is essential to organizing and assigning project tasks.
- Critical Path Method: Using CPM is one of the best ways to determine the minimum amount of resources needed to complete a project. Once you have mapped out your project tasks in order, estimate the time needed to complete each, and then add the amount of time needed through the longest project path.
- Program Evaluation Review Technique (PERT): Project managers use PERT for project scheduling because it can help estimate project completion, gauge the likeliness of meeting deadlines, and find and capitalize on flexibility in a schedule.
- Gantt Charts: Gantt charts are a perfect visual tool for project scheduling because you can see task start and end times in relation to one another and who is working on what throughout the course of a project. Gantt charts are widely used by project managers in all industries.
- Task Lists: Sometimes, all you really need is a simple list of tasks. For uncomplicated projects, creating a list of the tasks to complete and checking them off as they are finished is enough to ensure that everything gets done. Task lists can also be useful as planning tools in the initial stages of organizing large projects. They are often the first step for more complicated, but organized methods.
- Calendars: Calendars form the backbone of project schedules and are useful for tracking and managing time. Many project managers combine calendars with other organizational methods or even use them on their own. Shared calendars are especially useful for project planning to track team members’ days out of the office and help manage their time while working on multiple projects or tasks.
How Do You Create a Realistic Project Schedule?
The best way to create a realistic project schedule is to use real data from similar projects. Also, stay in touch with your team about their work. Be sure to make adjustments early when things take longer than expected.

“Involve the people doing the work,” suggests Jan Schiller, Partner and Chief Project Officer of Berkshire Consulting. “Review your work plan draft with the people assigned to the project to confirm estimates, identify missing or unneeded work or resources, and correct inaccurate assumptions. This is especially important when external resources contribute to the success of the project. The project manager never knows it all and shouldn't be expected to know it all.” The project manager’s role is to facilitate the work being done, not to be the expert on every task, so be sure to ask questions when you need to.

Linda Shaffer, the Chief People and Operations Manager at Checkr, has additional advice: “Ensure that you break down tasks into manageable steps and assign each step an estimated timeframe. It is important to look ahead and factor in any potential delays or challenges. Keep communication open between team members and make sure that everyone is on the same page about the expectations for the project timeline and deliverables.”
“Make sure you’re taking into account all of the factors that will impact your timeline — especially if you're working with new employees or contractors who have never worked with you before. It's important to communicate how much time they have to complete each task and the level of quality you expect. If there are any deadlines that are critical for your business, make sure everyone understands why and when those deadlines are coming up,” recommends Yang.
“Don’t forget to consider your team’s individual workloads,” continues Yang. “If anyone is stretched thin by other projects or emergencies, then it's going to be hard for them to maintain enough energy and focus on the current project.”
Best Practices for Creating a Realistic Project Schedule
To create a realistic project schedule, ensure you involve the people working on the project in timeline estimations. Communicate clearly and often about expectations and deadlines, and be mindful of people’s existing workloads.
We outline more best practices below:
- Be Mindful of Your Team’s Total Workload: It is likely that members of your team are working on multiple projects with different expectations, deadlines, and time requirements. Be mindful of their total workload, as stressed teams are more prone to make mistakes.
- Communicate Clearly and Often: Check in with your team often and ensure everyone knows what is due when and in what state. Make yourself available to answer questions and clear up any misconceptions from your team or stakeholders.
- Consider Your Team’s Experience: If your team is new or inexperienced, add in time for them to find their groove. When they have more experience, they’ll likely be able to complete the same tasks faster.
- Find the Critical Path: Work backward, break up tasks and dependencies, and schedule tasks according to the time each one takes. Ensure you are not guessing; your estimates will be more accurate.
- Include Room for Error and Delays: Nothing goes exactly as planned. Once you have determined how long the project should take, add time for emergencies, errors, or unforeseen delays. It is better to deliver things before they are expected than to deliver them late.
- Involve Stakeholders: One of the best proactive steps you can take to create a realistic project schedule is to ask the people doing the work how long they think it will take to complete based on how long it has taken them in the past.
- Maintain Realistic Expectations: Step aside and ask yourself honestly if your expectations are realistic in the context of the business as a whole. If you think they might not be, revise the workloads and deadlines to something more realistic.
- Review and Adjust as Often as Needed: As soon as you realize a projection is off or you’ll miss a deadline, revise the project schedule. Small, early delays can cascade down the line and cause larger, more severe issues. Be sure to adjust timelines as often as necessary.
- Use Past Projects as a Reference: If your team has not worked on similar projects before, use data from other projects as a reference to build your project schedule. Similar projects with similar teams and experience should take about the same time to complete. That said, be sure to add in a little extra time just in case.
- Use Visual Scheduling Tools: Use visual tools such as Gantt charts, bar graphs, and other charts to help convey your project’s progress. We cover a wide variety of charts and visual tools in our guide to project management charts.
Benefits of Creating a Project Schedule
Creating a project schedule comes with many benefits in addition to keeping a project on track. Effective project planning, including setting a realistic schedule, keeps teams and stakeholders informed and working efficiently at all project stages.
Other benefits include the following:
- Meet Business Goals: Creating a detailed schedule as part of strategic project planning aids in the successful completion of projects. The Project Management Institute has found that more than 70 percent of projects meet business goals when you prioritize skills such as strategic thinking.
- Predictability and Confidence in Work: A project schedule makes work more predictable for both the people doing it and those waiting for it to be complete. Building a track record of predictability creates confidence in higher-up stakeholders, who will be more willing to buy in and trust your judgment on future projects. “Project schedules give you the ability to earn and sustain executive and stakeholder confidence in project performance, which becomes especially useful on project rescues or when major risks are realized,” explains Schiller.
- Resource Tracking: A well-made schedule can help show what team members are working on and when certain resources, such as people and machinery, might be needed or unavailable for other projects. “Project schedules help ensure that resources are allocated effectively and efficiently, and they allow team members to plan ahead and anticipate potential problems or delays,” says Shaffer.
- Risk Mitigation: Scheduling a project can help you see areas that might create risk, such as conflicts with other projects, resource availability, or other factors. A holistic view of a project’s needs at every step can help you avoid emergencies later.
- Sets Expectations: A schedule establishes early expectations for deliverables and deadlines, as well as the resources required for each phase of a project and the total amount of time a project will take. Setting those expectations early aids in ensuring you meet them. You can’t track success if you don’t know your metrics.
- Visibility: Creating a project schedule provides visibility for your team and other stakeholders. It is easier to track tasks and manage work when anyone can see the whole plan at any time. Visibility also aids in communication. Stakeholders can often answer many of their own questions when they have access to the schedule.
Tips for Choosing Project Scheduling Software
Project scheduling software should integrate with solutions you already use and include the tools you need. Utilize free trials, learn about installation, and read reviews from similar companies to choose a solution that will work best for your company.
- Consider Customer Support: Most larger project scheduling tools offer a robust customer support system in the form of forums, online chat, and call-in service. Customer support can provide troubleshooting, setup, tips, and sometimes even free templated load-outs customized for your projects and teams. Check to make sure the provider offers the type of support you want at the times you’ll need it.
- Ease of Use: To encourage your teams to buy-in to and learn the new software, choose one that is easy to use and intuitive to learn. It should also require little to no knowledge of code or programming. “Using scheduling tools is trainable,” suggests Schiller. “The tool should align with the project management, solution delivery, and outcome management processes it supports; remember that tools do not create, optimize, or fix a process.”
- Integrations: Many project scheduling tools include integrations with other solutions such as Microsoft Teams, Slack, Google Drive, and more. Selecting a tool with these integrations means your team can save time learning to use multiple new programs at once. “I look for tools that are user-friendly and can integrate with other tools and software I’m already using,” says Shaffer.
- Multiple Users and Real-Time Viewing: The best project scheduling tools allow multiple users to view, edit, and access a schedule simultaneously. For best results, the schedule should always reflect the most current version.
- Read Reviews: Read reviews from similar companies doing similar projects and see what they have to say. Be sure to look at what did and didn’t work for them and consider how it relates to your projects.
- Useful Tools: Most project scheduling software includes the same basic functionality across the board, such as reporting, shared calendars, and dashboards, but some offer extras. If you are paying more for added features, make sure your team will actually use them.“I look for features that will help me do my job more efficiently and effectively. I want to be able to see at a glance what my team is working on, what's due soon, and how much time is left before each task is finished. I also need to know who's responsible for each task so that I can quickly delegate responsibility when needed,” explains Yang.
- Utilize Free Trials: Many project scheduling tools offer free versions or free trials so that you and your team can try their product on your own projects. Schiller recommends using free versions to try different software for small teams and projects especially.
There are many types of project management software. To learn more, read our guide on how to choose the right project management solution for your team.
Project Schedule Starter Kit
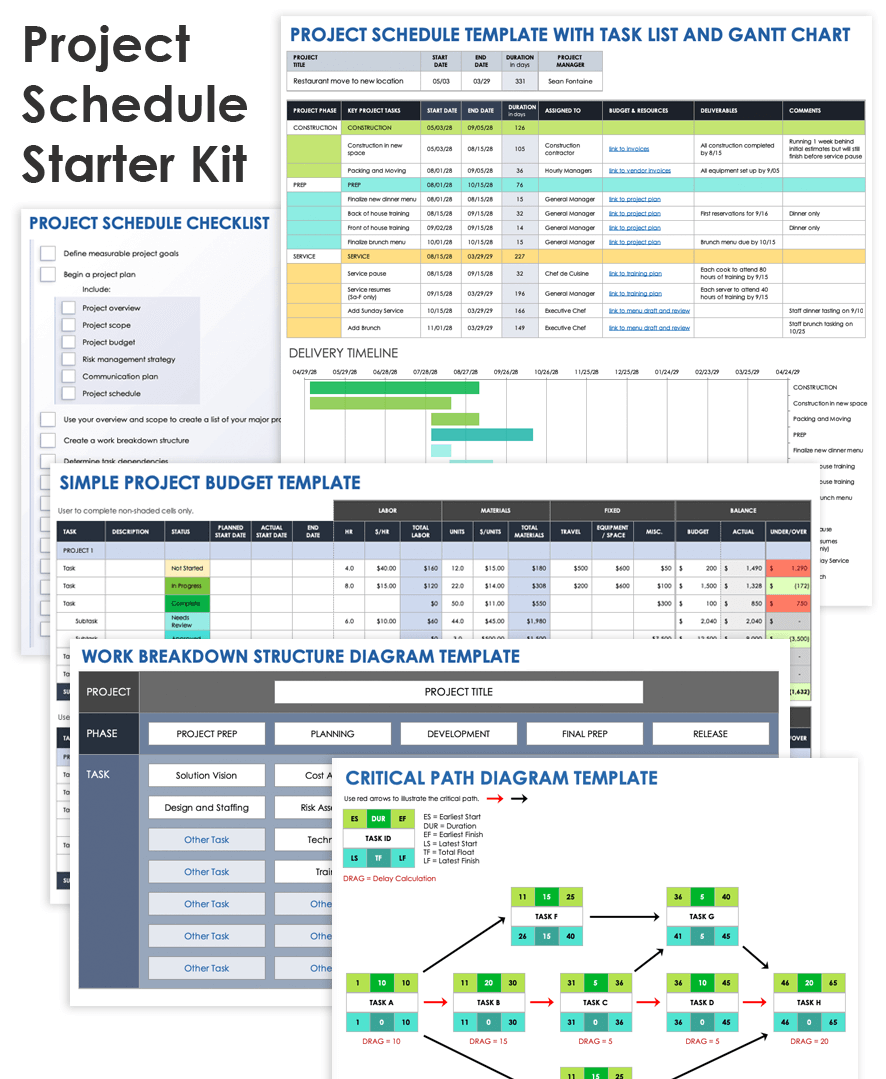
Download the Project Schedule Starter Kit
This project schedule starter kit has everything you need to write a comprehensive project schedule. You’ll find a project schedule template with a Gantt chart and task list to track project tasks. Each template is customizable. Download the complete set with the link above, or download the templates individually from the list below.
Included in this kit, you’ll find the following templates:
- A work breakdown structure template for Excel to help organize a project into manageable tasks.
- A critical path template for Excel to help identify the time needed to complete a project.
- A project schedule template with Gantt chart and task list for Excel to create a detailed list and visual representation of the project’s major phases and tasks.
- A project budget template for Excel to outline the necessary resources and their costs for tracking within your project schedule.
- A project schedule checklist for Microsoft Word to guide you through the steps required to create a robust project plan.
How to Be More Efficient Using a Project Schedule Template in Smartsheet
Smartsheet offers tools and templates to easily create a comprehensive project schedule and keep project planning all in one place.
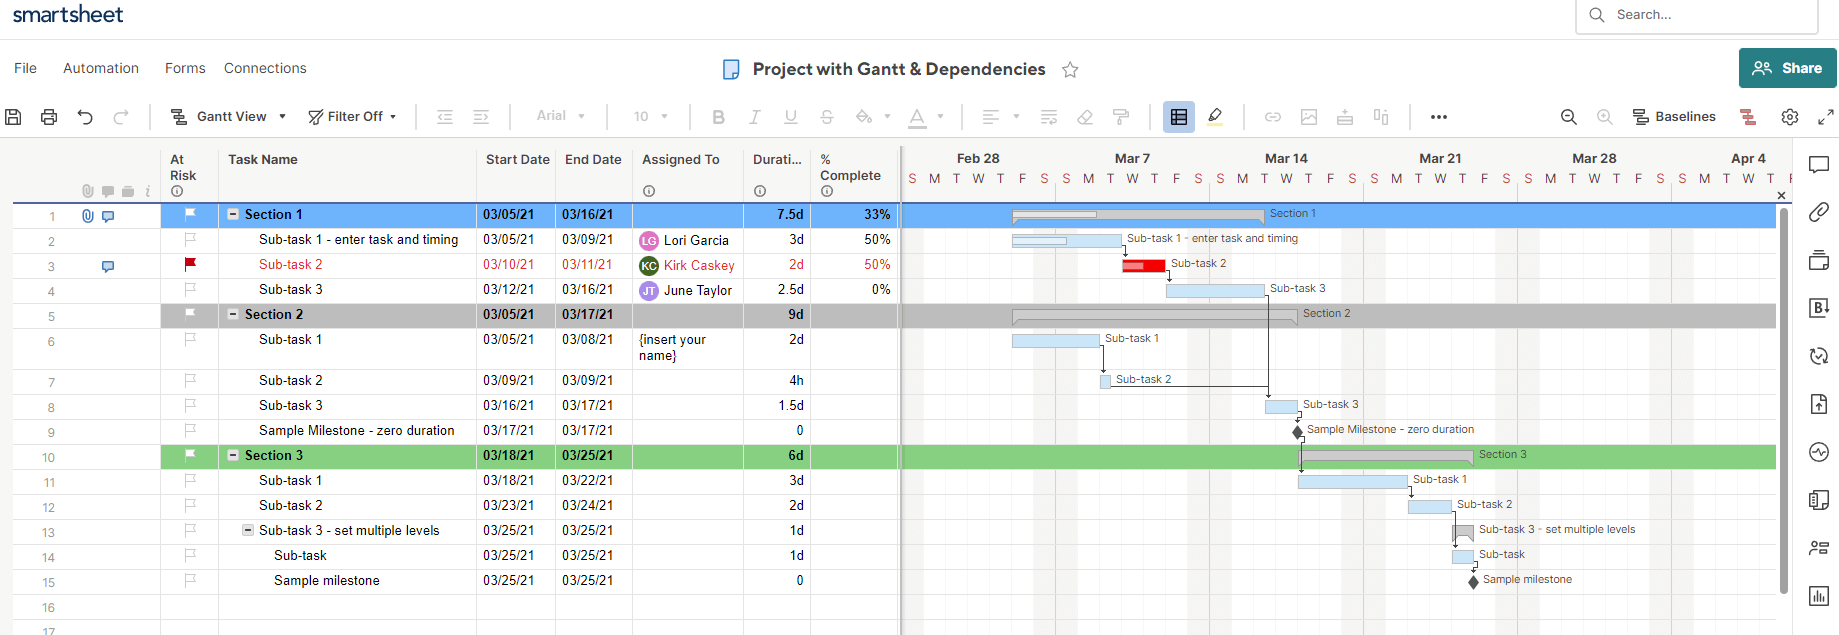
This example of a project schedule template is available from the Smartsheet Solution Center, which includes more than 175 customizable templates for all your project management needs. This Project with Gantt & Dependencies template includes a customizable task list with details for assignments, expected duration, and notes, as well as a timeline that can be displayed as a Gantt chart or in card view.
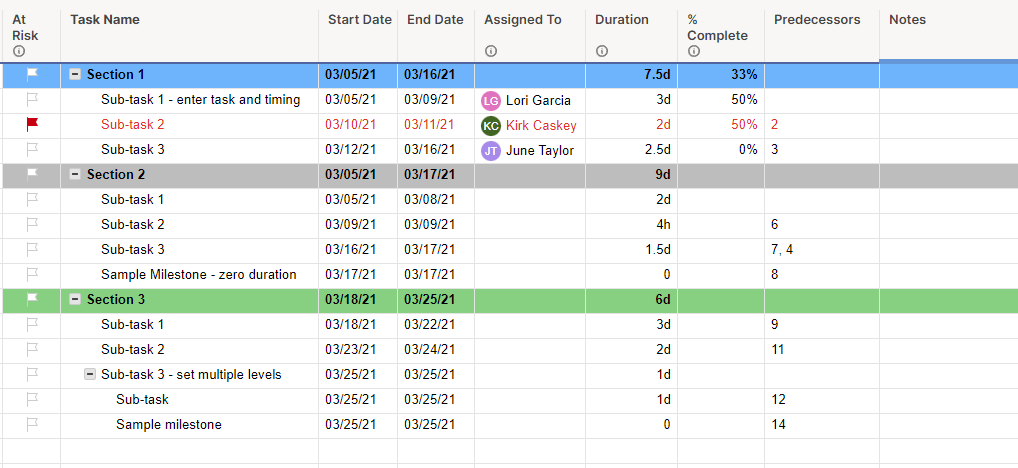
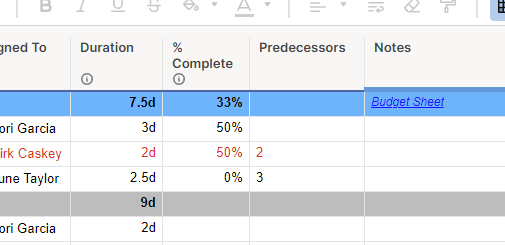
The left side of this template includes spaces to name project phases, tasks, and subtasks; their start and end dates; and who they are assigned to. There’s also room to list the progress of a task, its predecessors (or dependencies), and notes or links to other sheets.
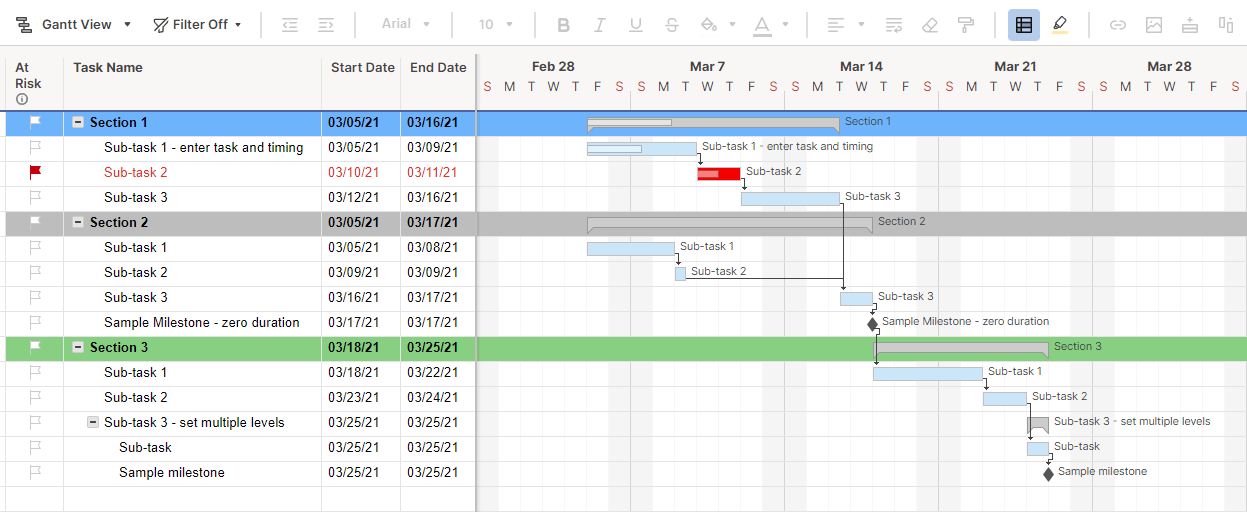
The template defaults to Gantt view, which automatically creates a Gantt chart to the right of the task list as you fill in information.
- The colors of the bars change based on a task’s risk level, as well as the progress percentage you add.
- Project sections or phases are indicated with bars that have a small notch on each end; each subtask within that range below it is included in that phase.
- Task dependencies are marked with an arrow between the rows you indicate. Milestones are marked as a diamond by indicating that they are a task with 0 duration.
How to View Your Project Schedule in Card View
Card view displays a project schedule based on the tasks assigned to your team. It shows the name of the task, its risk level, the projected start and end dates, and the task duration. This view can help you see what each team member is working on when, and who is responsible for what.
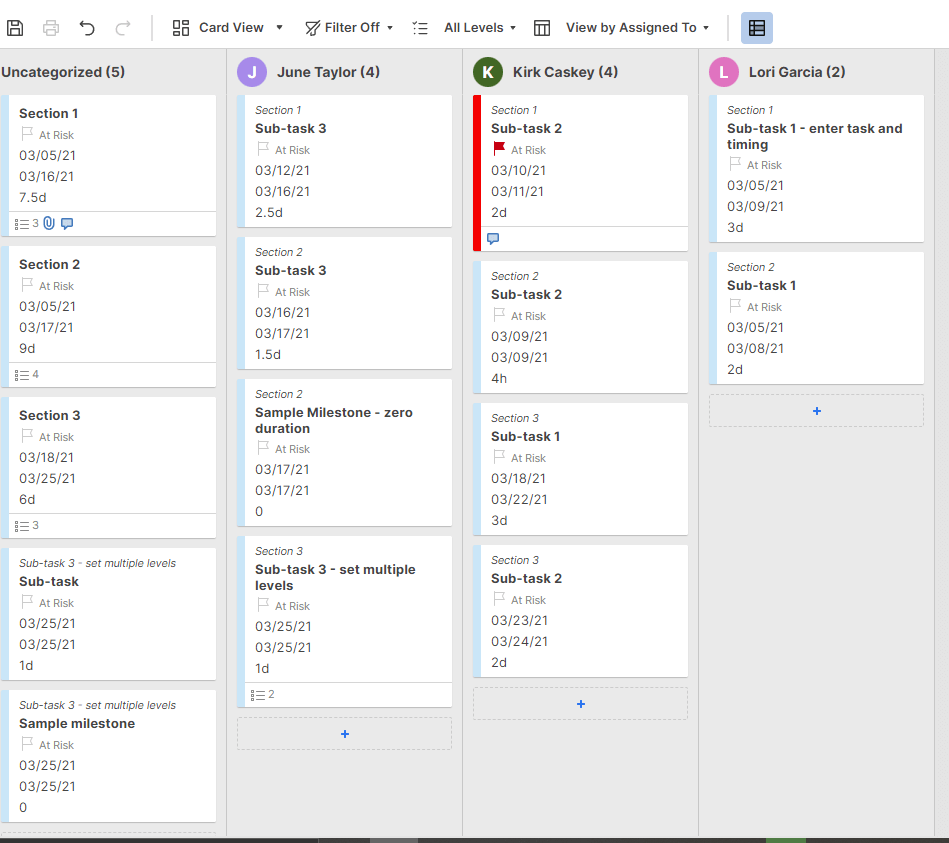
To change to card view, click the Gantt View button and select Card View in the drop-down menu. This action will open the same project schedule template in a different visualization.

How to Add Links to Project Information
To add links to your budget sheets, project plans, or any other project information within Smartsheet, right-click in the notes field and navigate to Hyperlink in the drop-down menu.
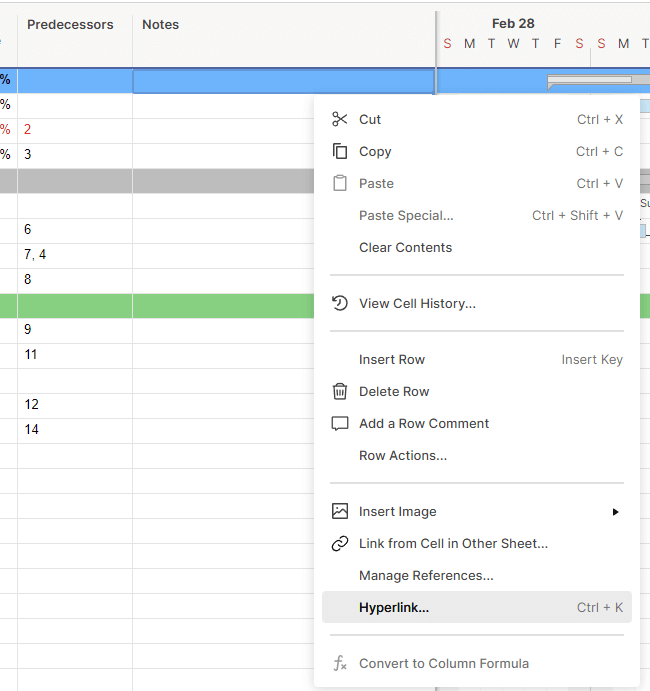
Click on the Link to other Smartsheet radio button, then click <select sheet>. Search for the sheet you want to link to in the search bar, then select the sheet and click the OK button.
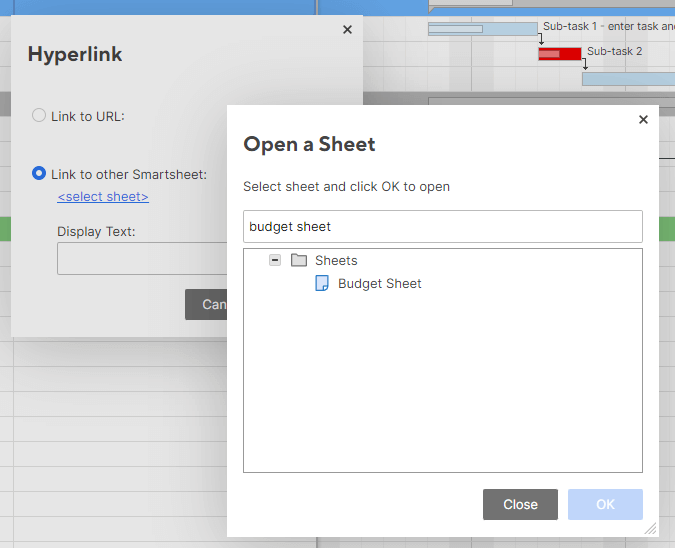
This action will create a hyperlink within your project schedule that (in this scenario) goes straight to your detailed project budget and plan information. Stakeholders can use these links to find more information about a project without having to ask your team.
Create a Powerful Project Schedule With Smartsheet for Project Management
From simple task management and project planning to complex resource and portfolio management, Smartsheet helps you improve collaboration and increase work velocity -- empowering you to get more done.
The Smartsheet platform makes it easy to plan, capture, manage, and report on work from anywhere, helping your team be more effective and get more done. Report on key metrics and get real-time visibility into work as it happens with roll-up reports, dashboards, and automated workflows built to keep your team connected and informed.
When teams have clarity into the work getting done, there’s no telling how much more they can accomplish in the same amount of time. Try Smartsheet for free, today.